
Steam Deck - Content Creation on a Budget: Recording in Gaming Mode (Part 2 of 7)
In the last part, we covered how to record and master your gameplay in Desktop Mode. Now let’s explore an alternative way to record your gameplay, unique to Steam Deck. Thanks to the magic of the modding community, recording in Gaming Mode from the comfort of your sofa (or couch, or anywhere for that matter) is now possible!
This starter guide is a big one, but I’ll walk you through this and the reward will be worth it. As I say, I’ve been doing it this way on YouTube for a while now! You will not only record, but also dip your toes into editing. As usual, the important steps and tips are highlighted in bold like this if you want to save time.
Let’s delve in!
What You’ll Need
You’ll need the following hardware for the editing part of this guide:
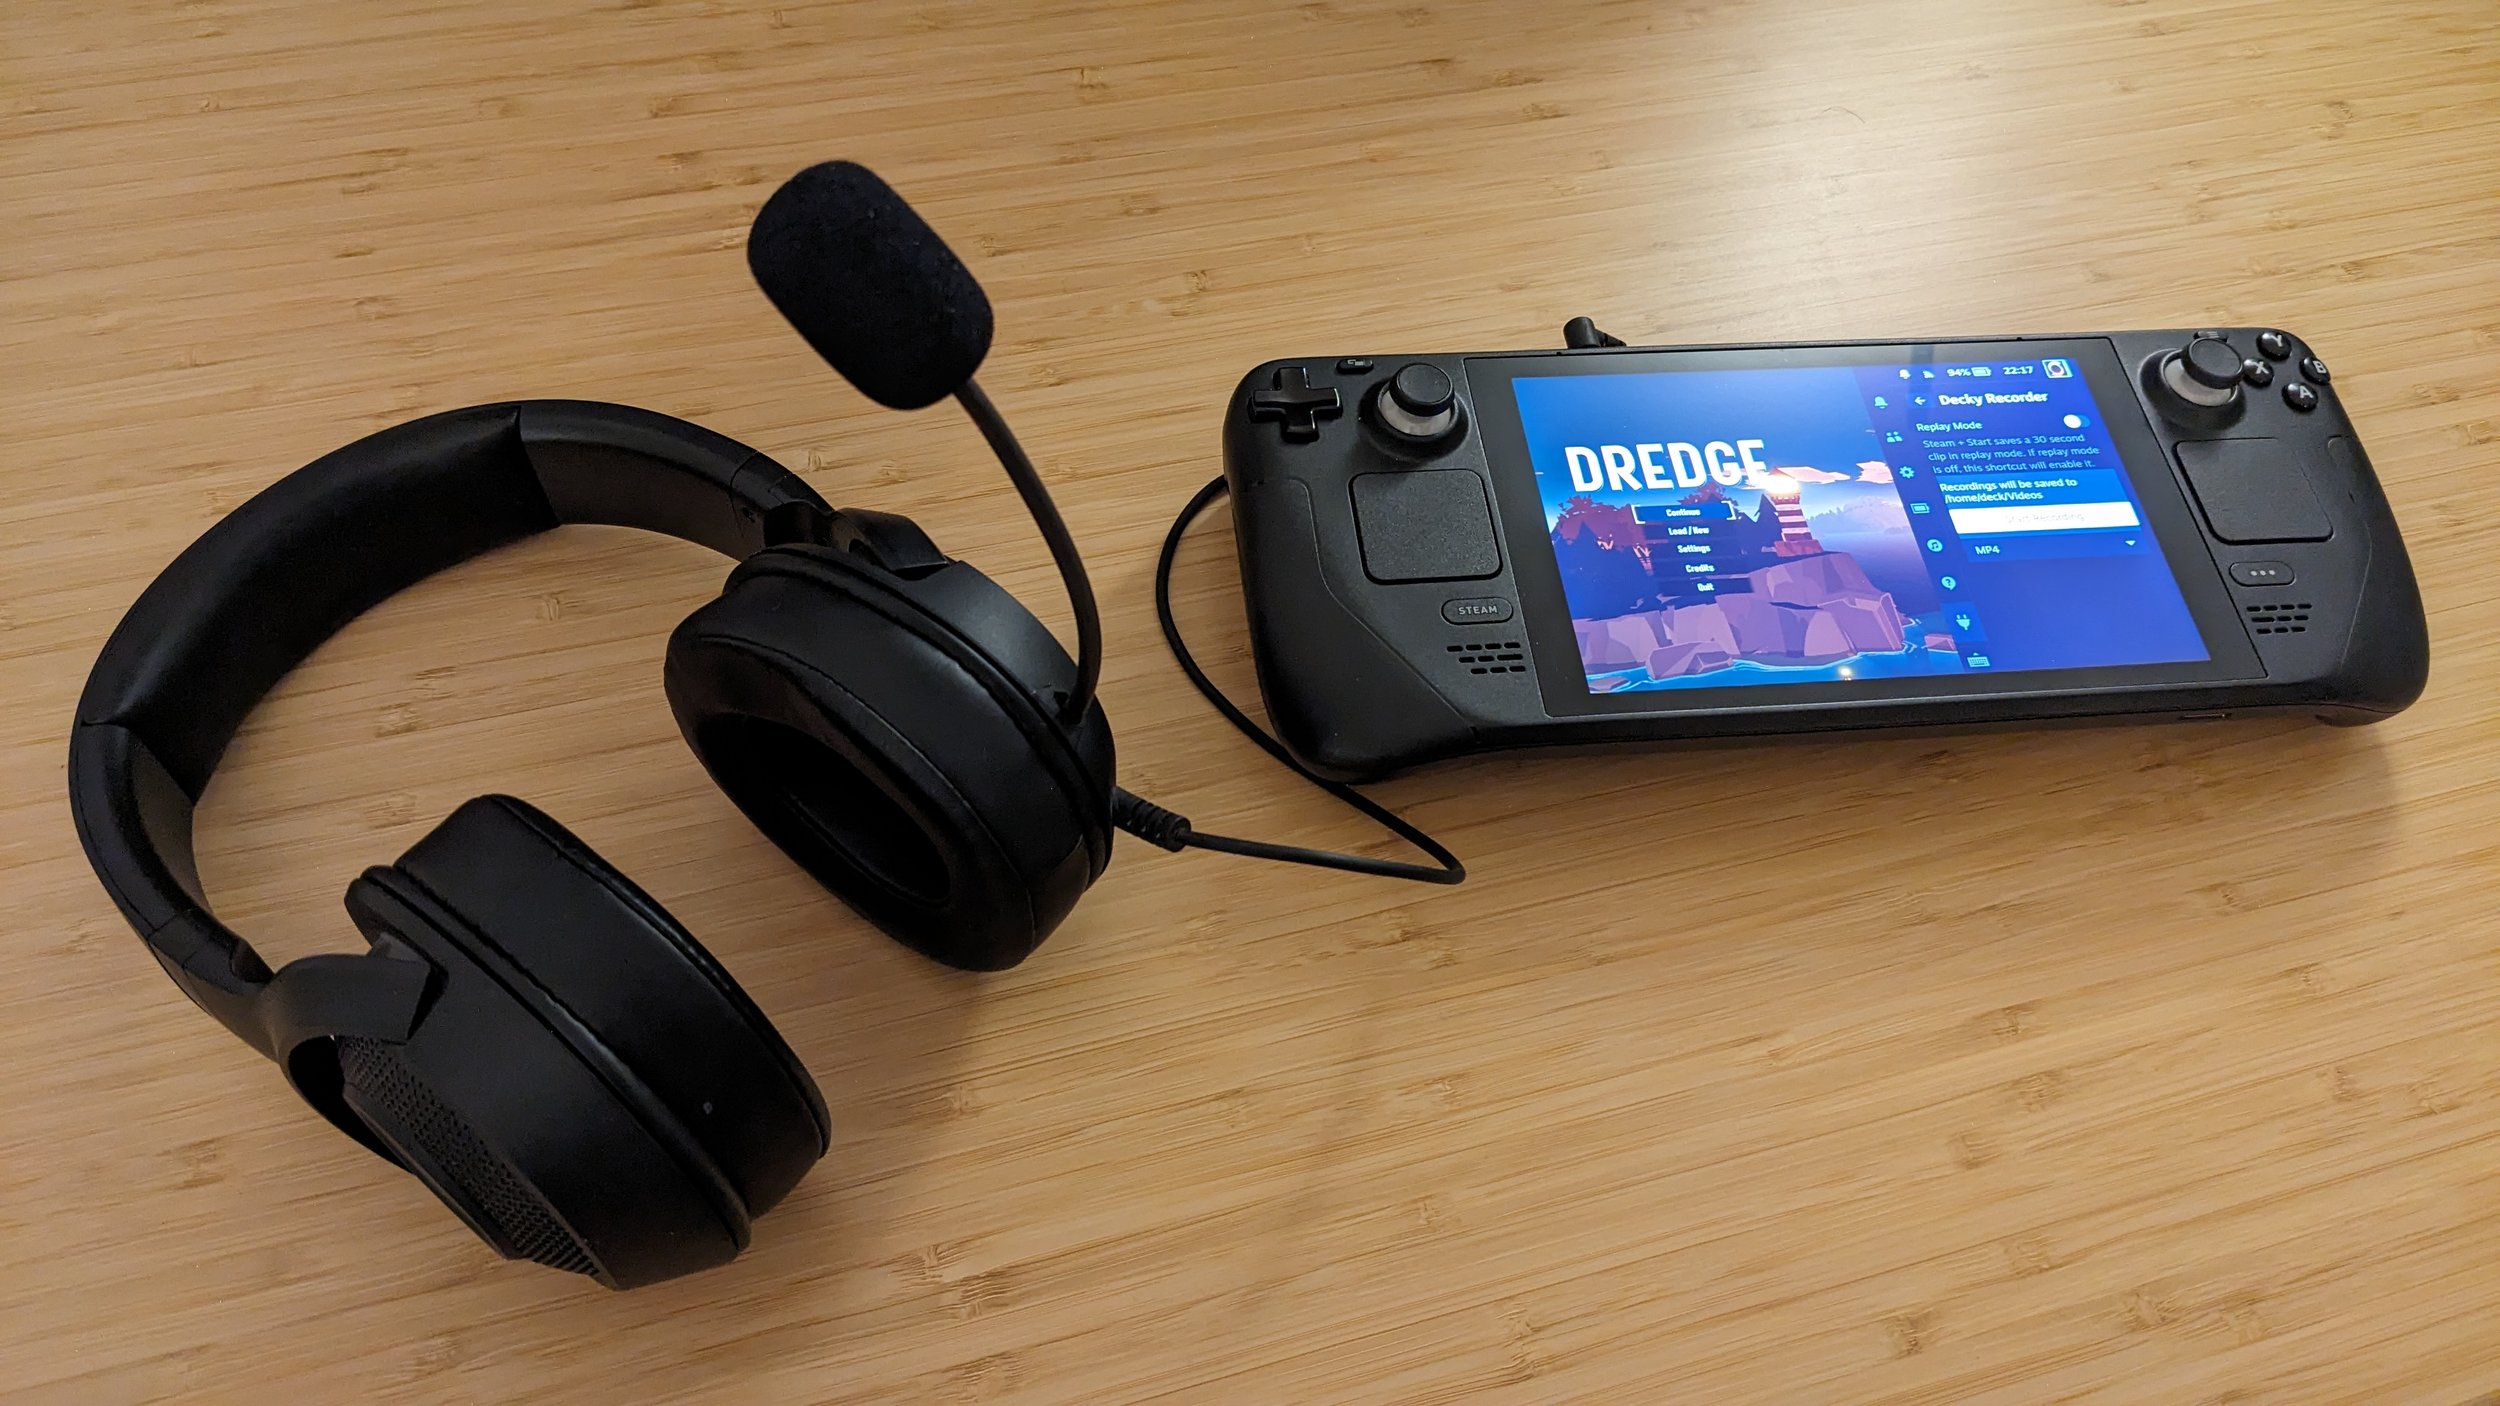
A gaming headset with 3.5mm jack (I used a Razer Kraken X Lite. The Steam Deck has a built in mic but it isn’t the best tool for this job)
Steam Deck Docking Station or USB-C hub (including HDMI port, at least 2 USB ports, and USB-C charging passthrough with at least 45w charging power)
Mouse & keyboard
A monitor (or TV)
Let’s Get Everything Ready!
I’m going to kick this off with a quick disclaimer: Decky Loader is a third party modification that allows the installation of third-party plugins. Therefore, this is to be used at your own risk. I’ve used this for multiple video uploads and have good reason to favour it, however this remains your choice. If you feel uncomfortable with this, follow my previous post instead to record in Desktop Mode.
If you’re good to go, let’s install this now. Head into desktop mode by first pressing the power button (or pressing the [ Steam ] button, then selecting the ‘Power’ option).

Now select ‘Switch to Desktop’.

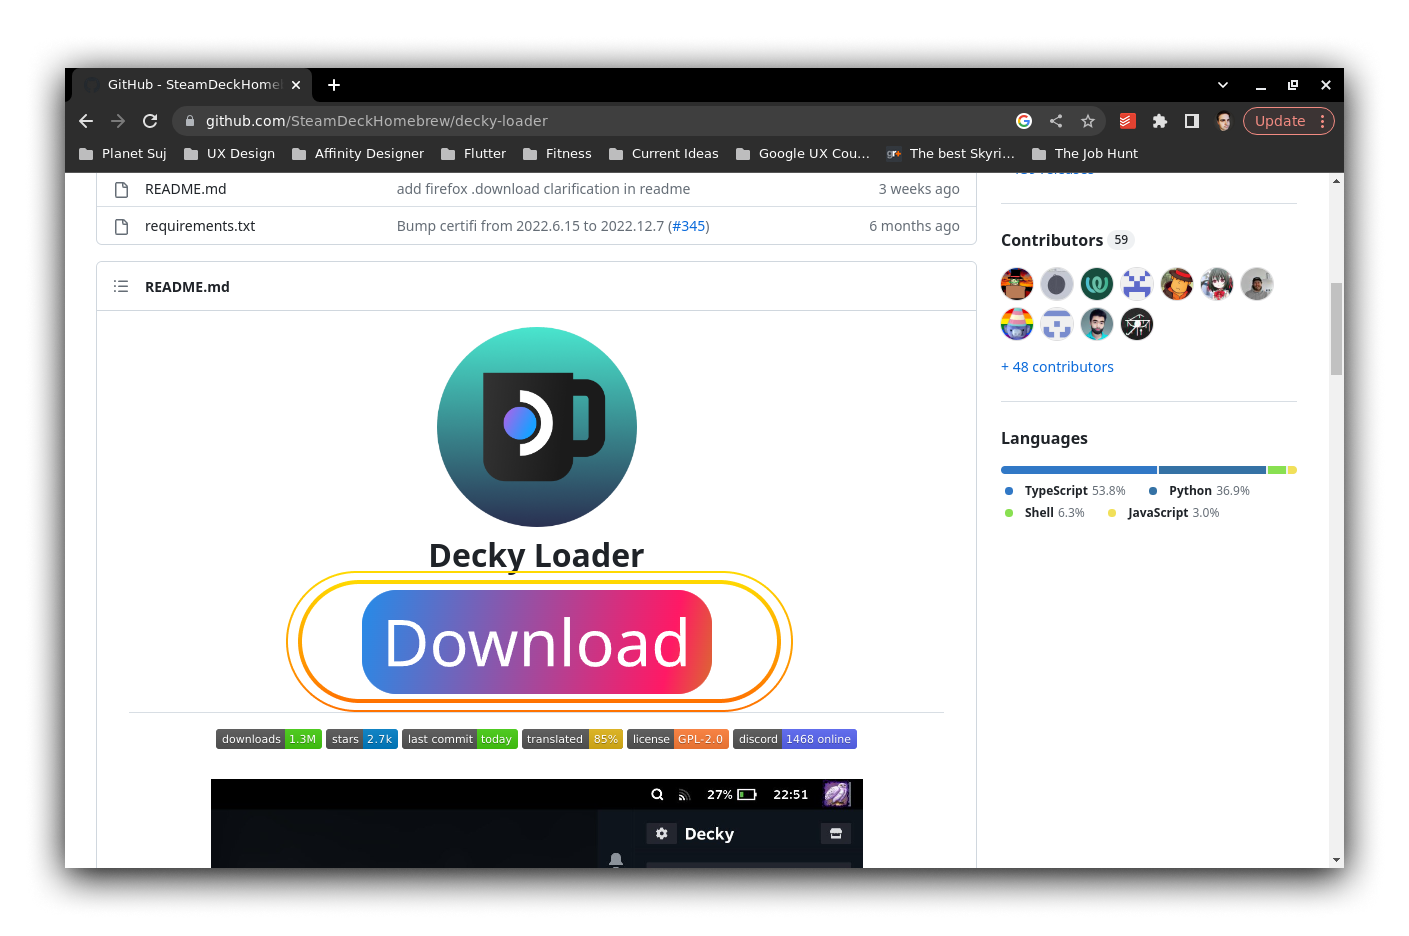
Once in Desktop Mode, download the Decky Loader installer from here using the download button on the page.
Follow the instructions in the ‘Installation’ section below that button to install Decky Loader. You will see a Matrix-like Konsole terminal window pop up during the process. Keep following the instructions until this is finished.
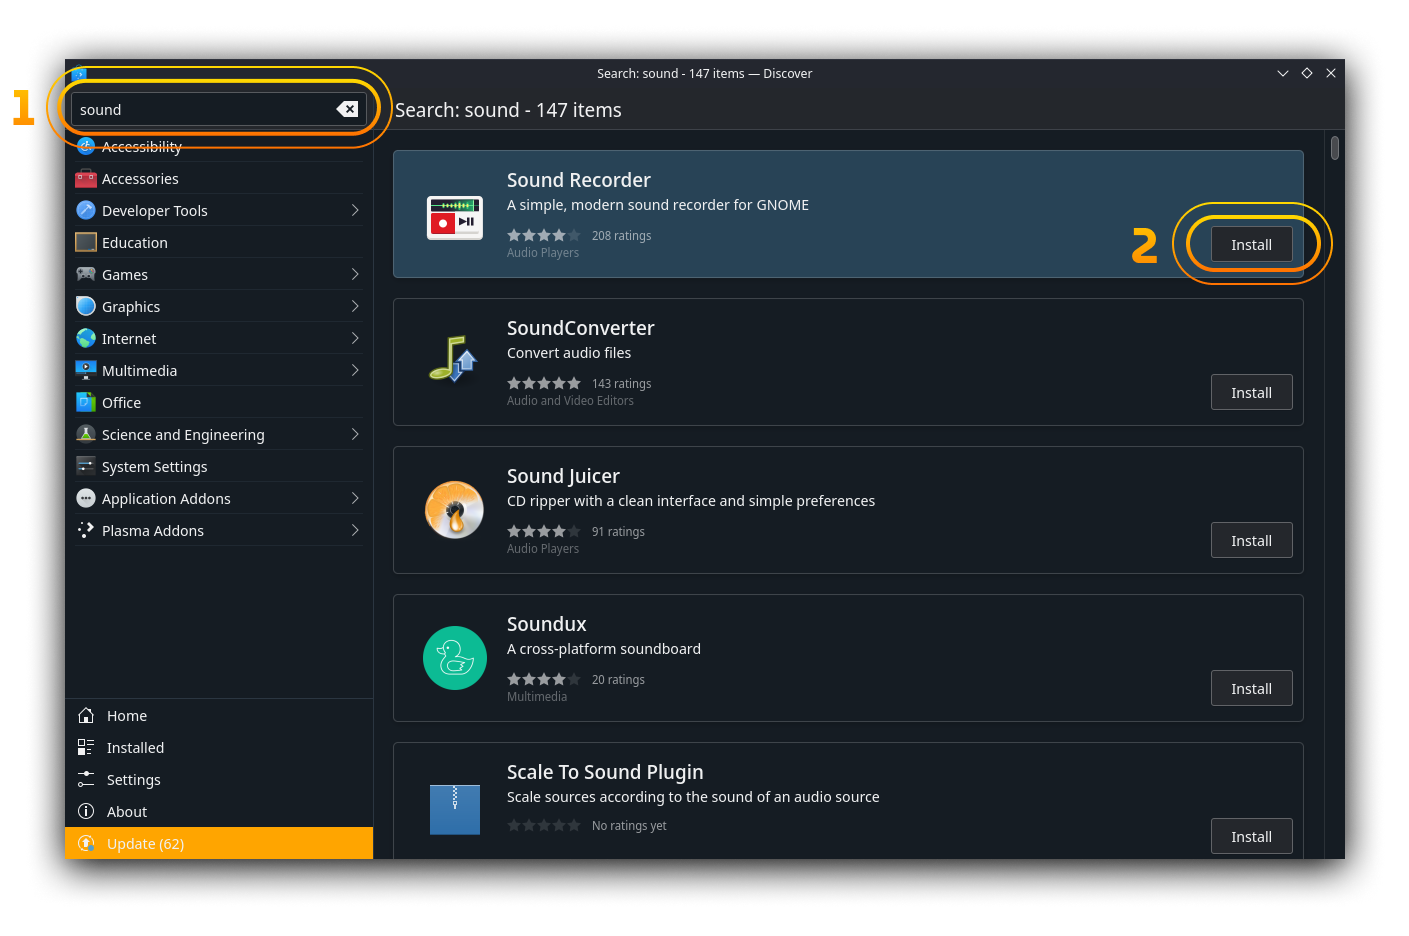
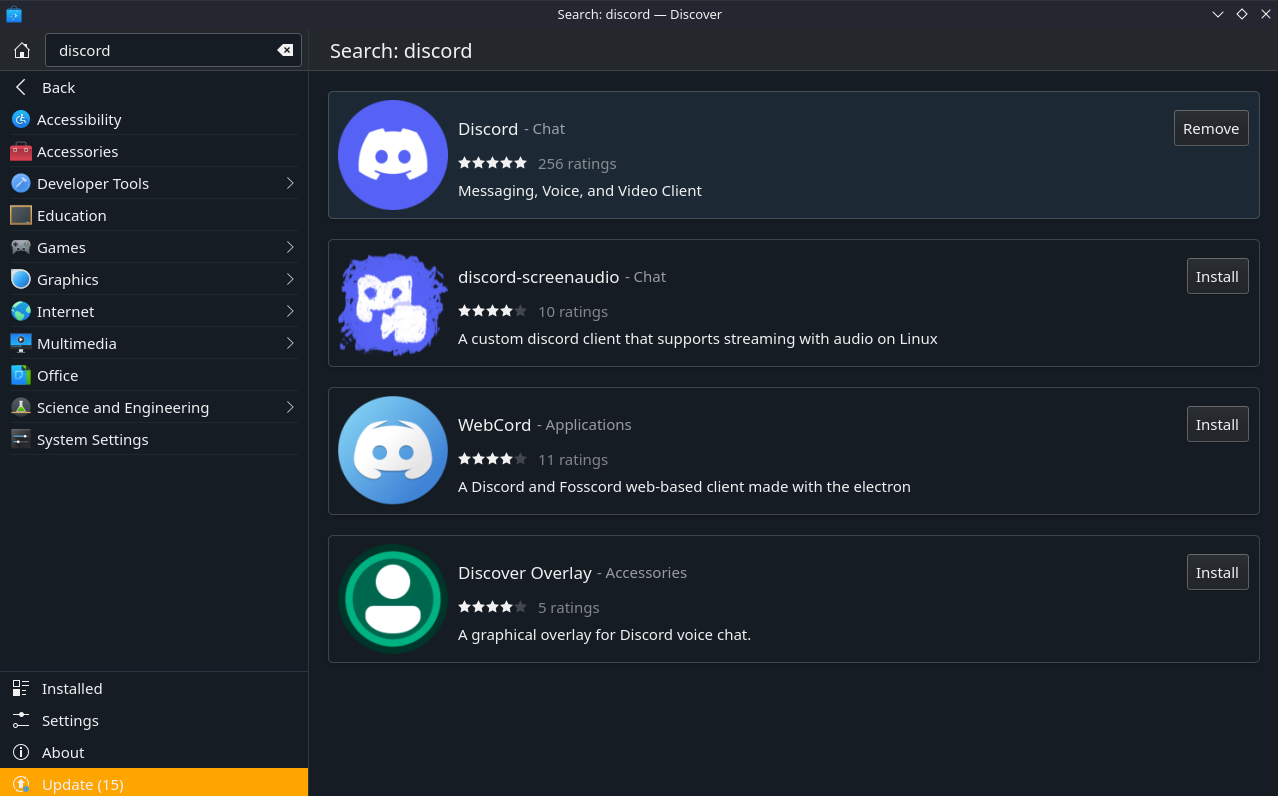
Now open the Discover app then search for and install Sound Recorder, Audacity and Kdenlive (& Discord if other players’ mic audio is required). I’ll tell you more about these later.
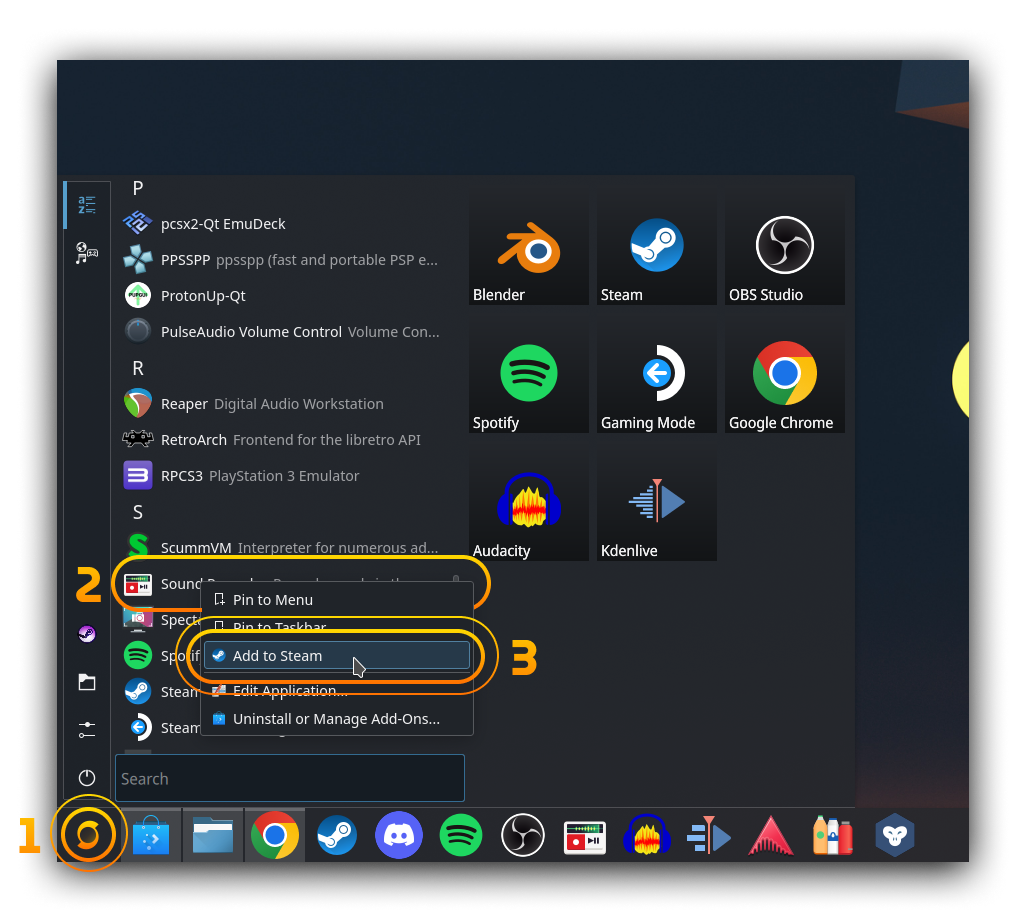
Now add Sound Recorder (& Discord if required) to Steam by opening the ‘Launcher’ menu (your button icon will look different to mine). Now right-click your app and select ‘Add to Steam’ for each. This makes them usable in Gaming Mode.
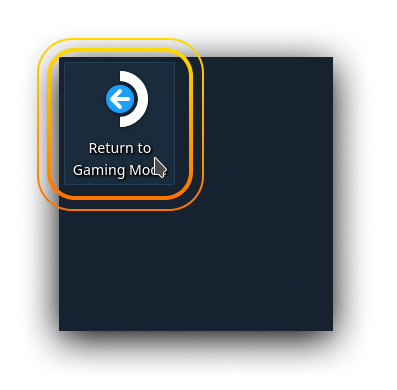
Optional: you can also change the artwork for each app in Steam if they look unsightly, learn more in my previous post here. Once ready, return to Gaming Mode using the desktop shortcut.
Press the [ … ] button and you should see a new ‘Decky’ option. Press it, then head to the ‘Marketplace’.

Now find and install Decky Recorder.
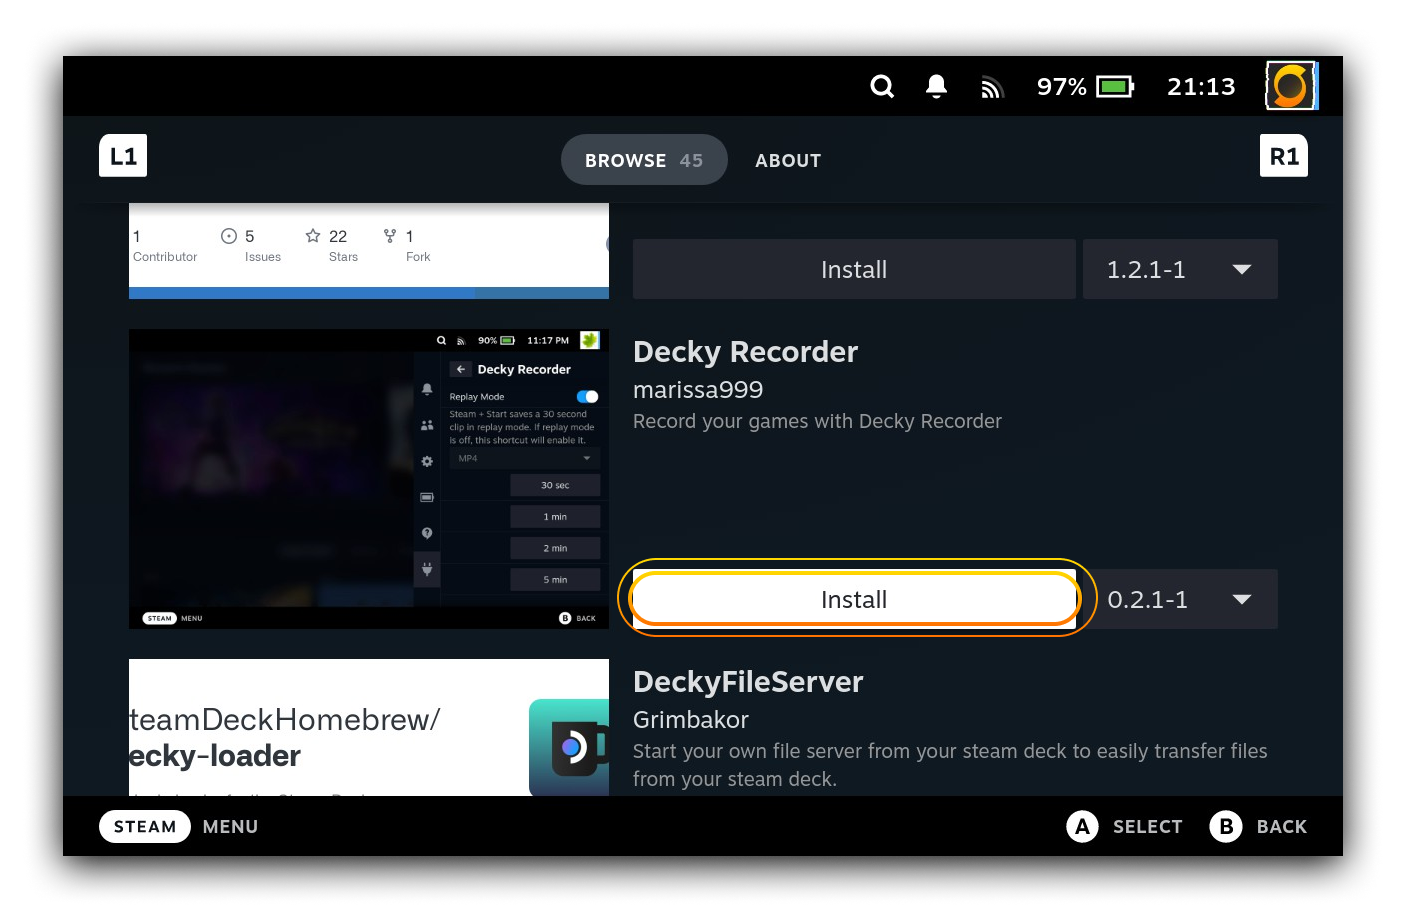
We’re ready to go, let’s move on!
Let’s Get Set Up & Recording!
Let’s set the stage! Firstly we need everything open and running. You can open multiple apps by opening the first app, then hitting the [ Steam ] button and selecting ‘Library’ to open another. Open Sound Recorder and the game you want to play (& Discord if other players’ mic audio is required).

You can also switch between apps by pressing [ Steam ], selecting one of the open apps, then selecting ‘Resume game’.

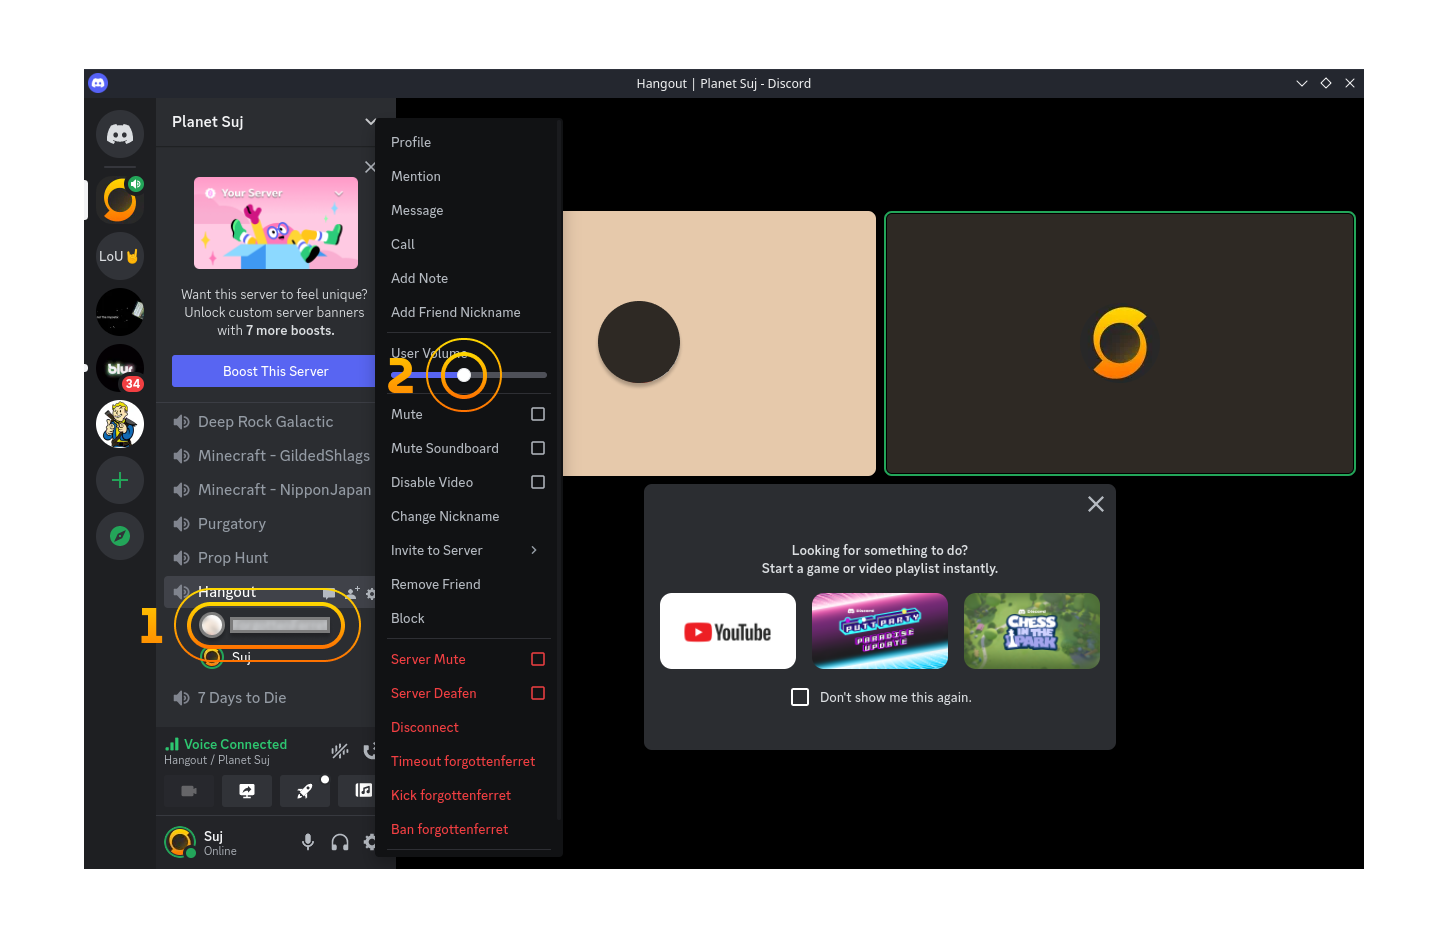
This is how you multitask in Gaming Mode. If you are using Discord and have more than one other player on mics, you may want to adjust their volume levels so that they are matched better. You can do this by right-clicking any user in an active voice chat, and adjusting ‘User Volume’.

I’d also advise heading to your game settings and lowering audio to about half or less of the other players’ mic volume.
When the levels are right, it’s time to get recording. Switch back to Sound Recorder and tap the ‘Record’ button. You can try this multiple times to check your volume level before pressing for the final time.

Now switch back to your game and press the [ … ] button. From here select the ‘Decky’ icon, then ‘Decky Recorder’.

We’re now about to record! A few tips here before you start:
If you clap near the mic as you hit the ‘Start Recording’ button in Decky Recorder, this will help to sync audio to video footage later (like the clapper device directors use while calling ‘action!’)
If you have a headset, keep the mic about 1-2 inches from your mouth and off to the side slightly. This minimises distortion from breathing.
Leave a gap of 5-10 seconds before speaking if you will be introducing the video to viewers. This will help with things such as fade in effects when editing later.
Wait around 5-10 seconds at the end before you cease recording, again for editing purposes.
Hit ‘Start Recording’ to begin.

If Decky Recorder is misbehaving, troubleshoot the following:
If Decky Recorder doesn’t show anything in its area: go to any other quick setting icon after pressing the [ … ] button, then go back to ‘Decky’ > ‘Decky Recorder’.
If Decky Recorder still isn’t working as expected, try the following:
If the button doesn’t say ‘Stop Recording’, try tapping this again.
If this still doesn’t work, restart Steam by pressing the [ Steam ] button then ‘Power’ > ‘Restart Steam’. If this doesn’t work try ‘Restart’ instead.
Still no luck? Check for the latest updates by heading to ‘Decky’ > ‘Settings’ > ‘Plugins’. If the dropdown next to ‘Decky Recorder’ says ‘Reinstall’, then it’s on the latest version.
If nothing else works, try reinstalling Decky Recorder by clicking that option.
If all is well, enjoy your session! Return to this point when you’re done.
Once you’ve finished, press the ‘Stop Recording’ button in Decky Recorder.

Now switch back to Sound Recorder and tap the ‘Stop’ button.

Lastly tap the name field, name the sound clip (use [ Steam ] + [ R1 ] to bring up the on-screen keyboard) and confirm.

OK, we’re now ready to combine everything. Close all apps & switch back to Desktop Mode when ready.
Let’s Put it All Together!
This part takes a little while, but stick with it!
From this point onwards, make sure that all of your hardware is set up so that your USB-C dock is plugged in & charging your Steam Deck, and your mouse, keyboard & monitor are also connected.
When you’re ready, let’s get into it! Create a new folder in a memorable place to store video and audio in (the name of the game can work here). You don’t have to put this in ‘Video’ If you don’t want to, just remember where it is. Within this folder, add two new folders with the following names: ‘Raw’ & ‘Final’.

Decky Recorder will save footage to ‘/home/deck/Videos’ by default. Find your video footage and rename it (right-click > ‘Rename…’).
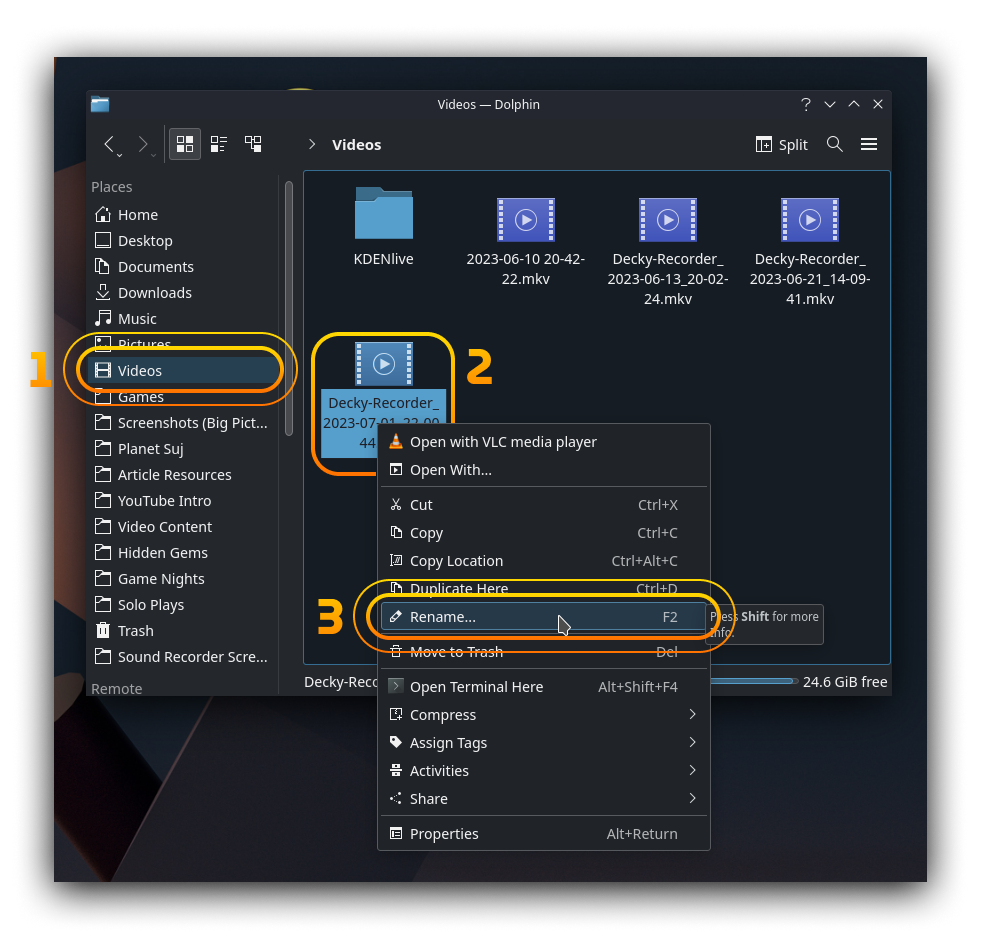
Now move it to your newly created ‘Raw’ folder (if you’re wondering how I split the window, hit the little ‘Split’ button in the top right!)

Now let’s retrieve your mic audio. Open Sound Recorder, find your audio clip and hit the ‘Export’ button (if you can’t see it, click the audio clip to make the buttons visible)

Select your ‘Raw’ folder once again as the destination, then name and save.

This will export your audio in FLAC format, which is usually fine but there is one caveat: Kdenlive doesn’t play nice with FLAC. This means we need to convert the audio into a different format.
Enter Audacity, the ever-dependable Microsoft Paint of music (though there is far more depth than first appears!). Open Audacity, then drag your FLAC file into the empty grey area.

Now export it into a WAV file by heading to ‘File’ > ‘Export’ > ‘Export as WAV’.

Although a compressed format such as MP3 is much smaller, you want as much quality as possible when using raw footage. Remember, YouTube compresses your audio as well!
Now select your ‘Raw’ folder as the destination, name & save, then hit ‘OK’ on the next window. You don’t need to name it differently from the original FLAC name as it’s a different format.

You may close Audacity now. No need to save, its job here is done (for this post at least!).
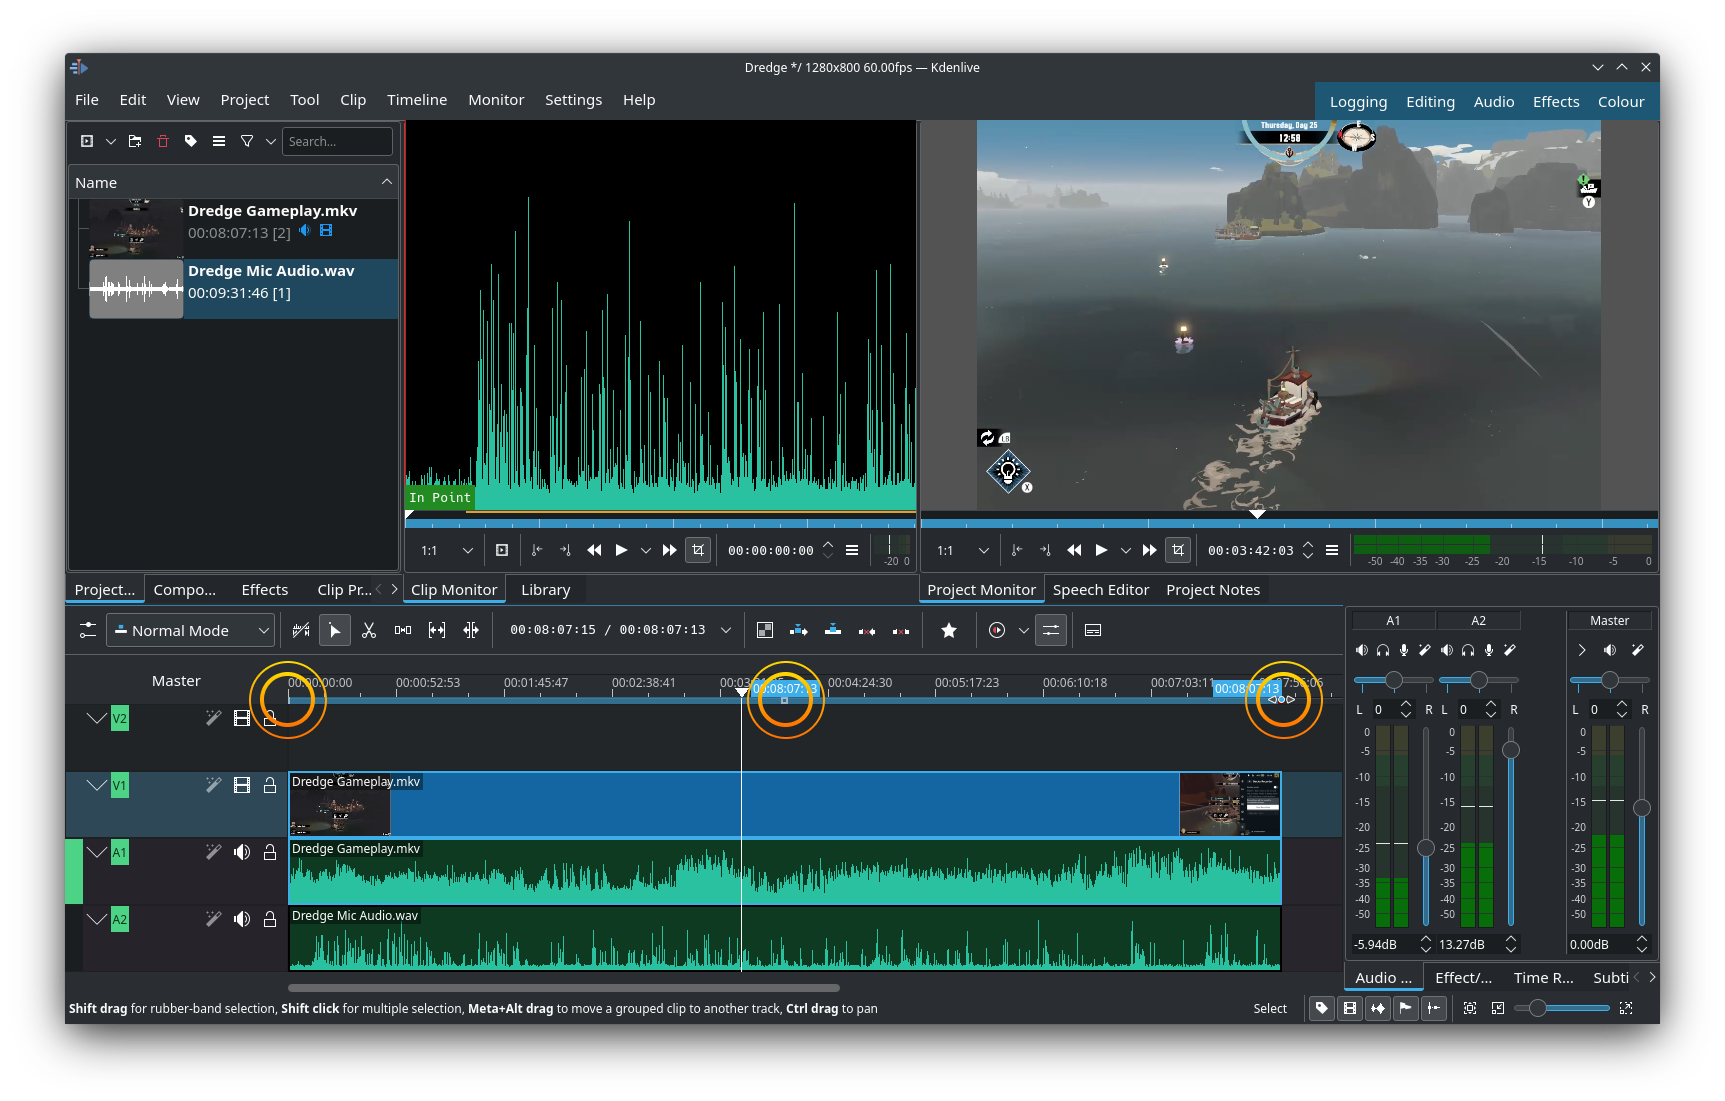
Your assets are now ready. It’s time to introduce our video editing suite: Kdenlive. Open it up and get to the point where you reach this screen.
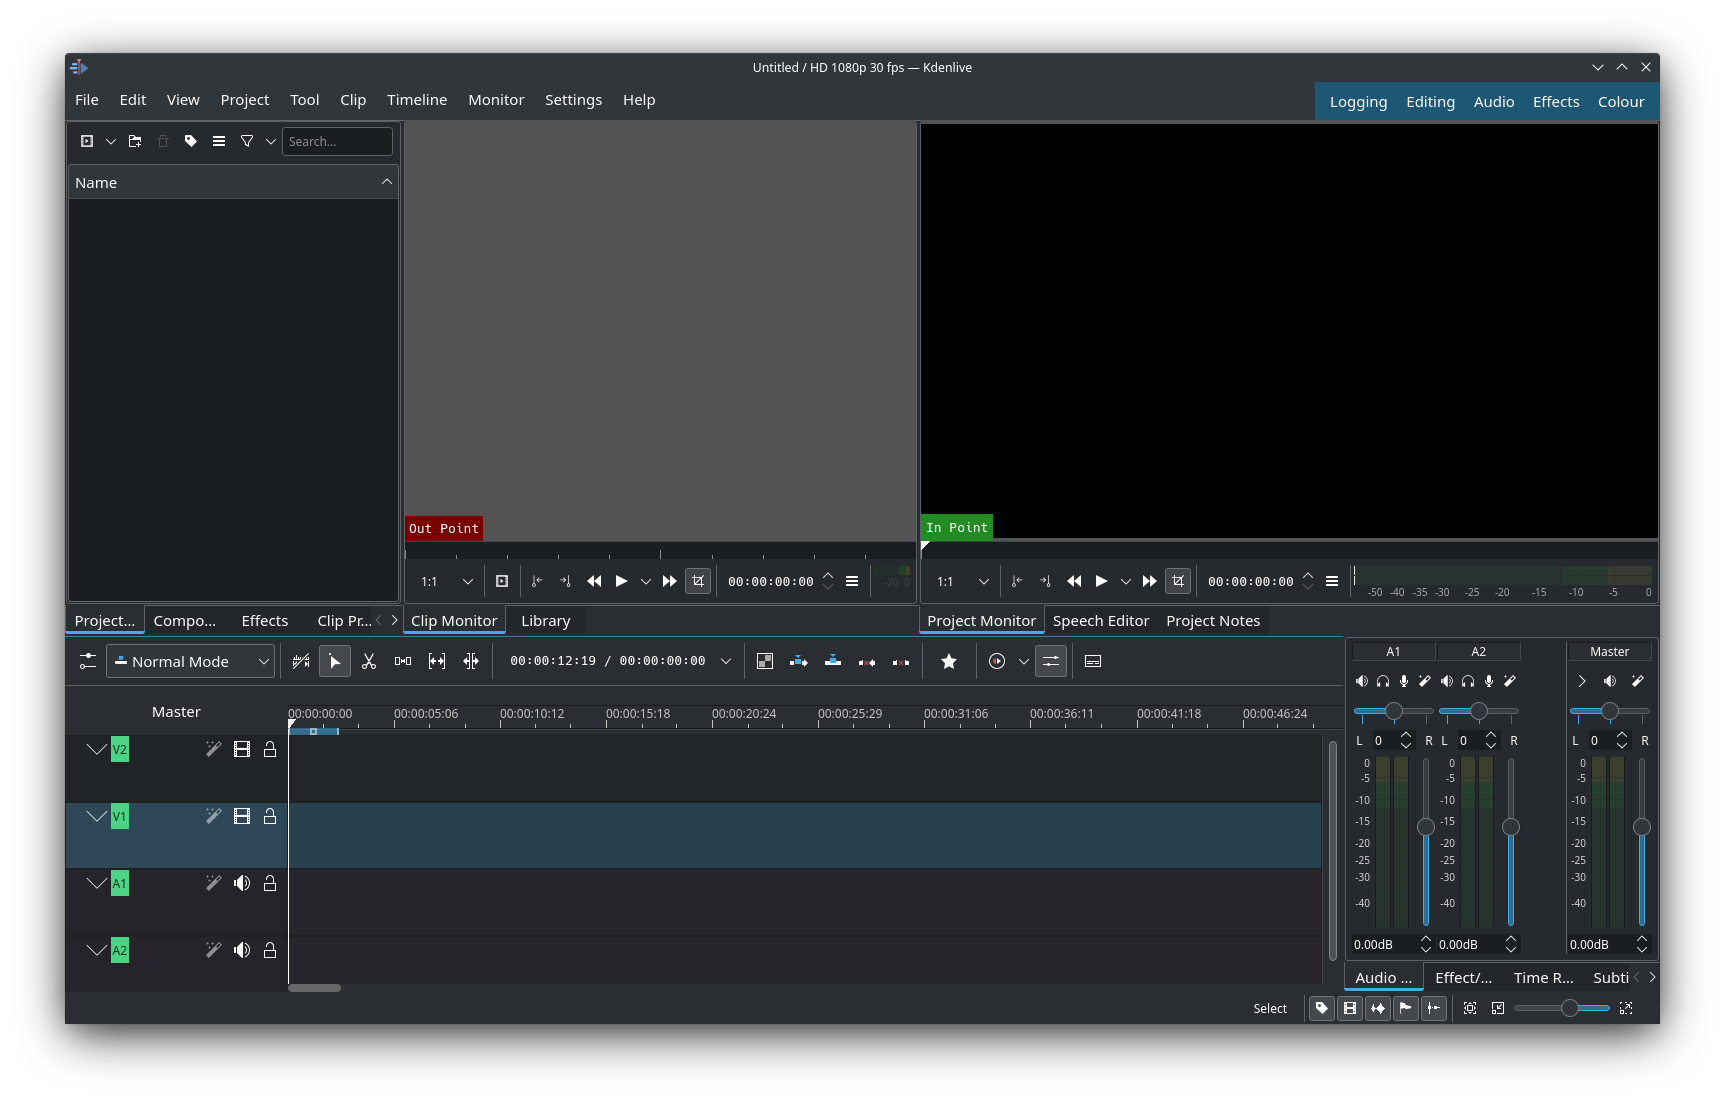
Just like OBS Studio in the last post this may look daunting, but Don’t Panic! I will show you the important areas and walk you through it!
The first place is the ‘Project Bin’ area in the top left. If you don’t see this initially, click the ‘Project Bin’ tab to put it in focus.

This area stores all of your assets for use in your project. Add your video footage to your project by dragging this to the ‘Project Bin’ area.

If your video footage is the first asset, you will be asked if you want to change video settings to ‘1280x800 60.00fps’ or similar on import. Of course, say yes to this.

If the option wasn’t offered, try deleting the asset and importing again. If fps shows as ‘59.94fps’ or something similar instead of ‘60.00fps’ (like above), head to ‘Project’ > ‘Project Settings’.

Now change the preset to ‘1280x800 @ 60.00fps’ within the ‘Presets’ area.

Next, add your mic audio in the same way as your video footage to the ‘Project Bin’ area.

You should now have all of your assets in the ‘Project Bin’ area.
Let’s turn our attention to the ‘Timeline’ area. Here, you have labels on the left marked as audio tracks (e.g. ‘A1’) and video tracks (e.g ‘V2)’. Let’s drag our video footage from the ‘Project Bin’ next to video track ‘V1’.

It should snap to the beginning of the timeline. You’ll also notice that the audio part of the footage matches to the corresponding audio track label (e.g. ‘A1’ matches with ‘V1’).
Next, drag your mic audio next to audio track ‘A2’.

To monitor as you make changes, you can start and stop the playhead (the moving line with triangle on top) by either pressing [ Space ] or the play button in the ‘Project Monitor’ area.

If you want to play from a certain point, click with the mouse where the time markers are at the top of the timeline. You can also drag with your mouse to seek; the video and audio play when you do which is a very helpful thing.

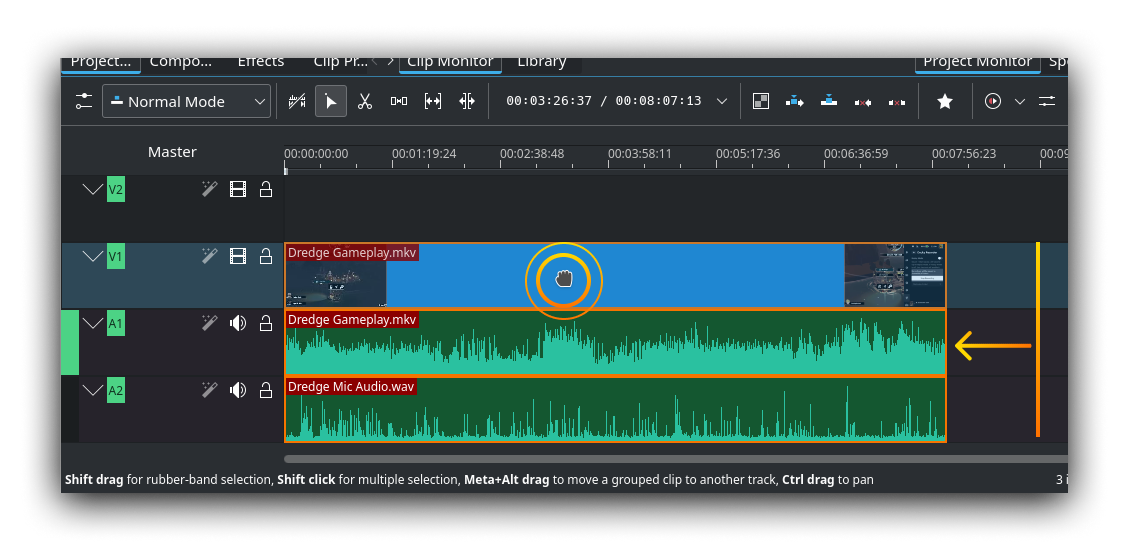
Let’s trim the audio slightly. Drag the left part of the audio clip until it matches the ‘clap’ sound you created during recording. If you didn’t do this earlier, try to align your mic audio with the video footage by dragging the audio clip left and right. Moving your video footage to the right temporarily can help with this. You can also scroll with your mouse wheel to zoom in and out for extra accuracy

Once done with this, drag each end of your audio clip to match your video footage to make things easier.

Now drag both clips to the beginning of the timeline.
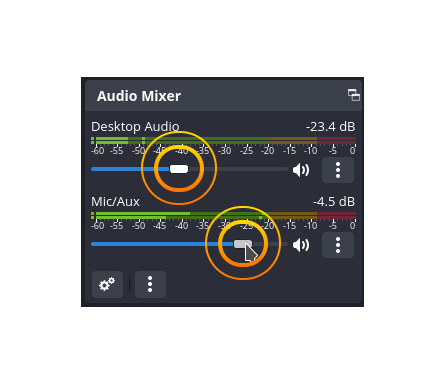
Nice, we have everything synced! Let’s proceed to balance audio levels a bit. On the bottom right, click the tab marked ‘Audio Mixer’ to bring up the audiometers.

Now keep playing back the footage and checking audio levels. Adjust these up and down using the faders in the ‘Audio Mixer’ area, so that the audio level reaches the lower part of the yellow area on the audiometers at its loudest. If you can’t hear yourself over the game, make the game footage a bit quieter. Take your time with this part.

Good job, we’re nearly there!
Let’s Render it Out!
OK let’s render out the final video, this is what we’ve been building up to! First we want to set the range we want rendered. Set the selection region by dragging and scaling the blue bar in the top part of the timeline to match the start and end of the video. If you can’t see this, drag it out from ‘0’ on the timeline initially.
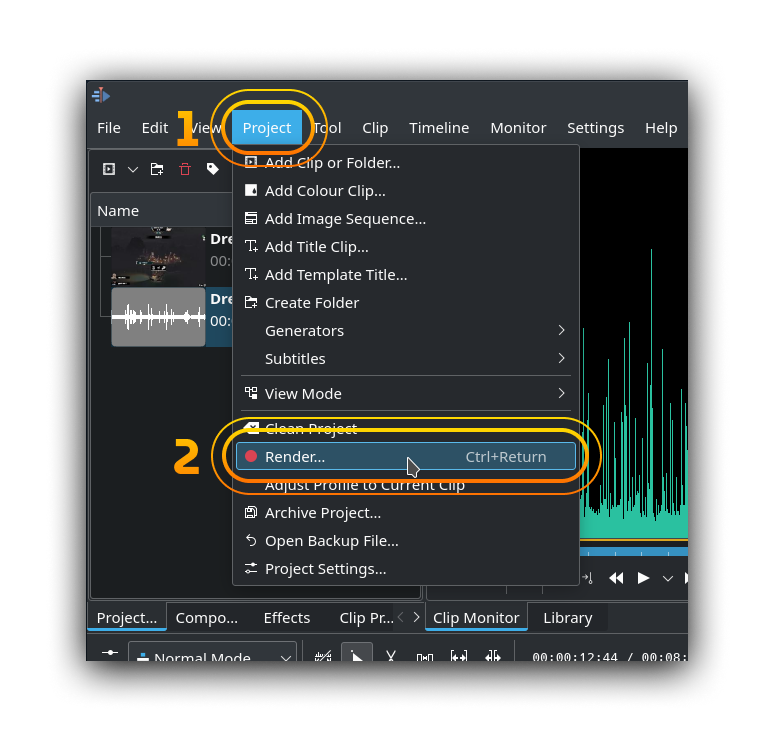
Next, head to ‘Project’ > ‘Render’ to open the rendering options menu.
Set the format of the video in the ‘Presets’ area (‘MP4’ or ‘Matroska’ under ‘Generic’ are good picks).

Next, click the button next to the ‘Output File’ text input.

Now set your ‘Final’ folder created earlier as the destination, name your final video and hit ‘Save’.

Next select ‘Selected Zone’ as the rendering option, then hit ‘Render to File’.

Now the final video is rendering. This may take a little while but when this is complete you’ll hear a noise and see a tick next to your render job. After this you can double-click the job to open your final video location and check out the result!

Finally, don’t forget to save your Kdenlive project. And that’s it, you now have a watchable video of your gameplay session!
Where We're At
Congrats, you’ve successfully created a video of your gameplay in the most comfortable way possible, and set your foundation in video editing! I’m making a note here: your mic audio might not sound great at the moment (I know mine was pretty noisy!). In the next part we are going to address this. I will help you to process your mic audio to make it as clear as possible and hopefully teach you some more useful tricks along the way.
Until then, I thank you for following this guide and hope to see you next time. Bye for now!
Steam Deck - Content Creation on a Budget: Recording in Desktop Mode (Part 1 of 7)
Ever thought those awesome gaming sessions you have are just that little bit too entertaining? Have you fancied saving those memories or sharing the fun with communities around the world? Well, you're in luck!
In this multi-part series, you will be transformed from a humble Steam-Deck-owning gamer to a content creator - all on a tight budget. I've been doing this exclusively on the Steam Deck for YouTube and have had a blast so far. Follow along to get started!
FYI - all the important tips and steps will be in bold like this if you want to save time. Lets get prepped!
What You’ll Need
Download this free software from the ‘Discover’ desktop app:
OBS Studio (the video capturing software we will use)
Discord (if other players’ mic input is needed for multiplayer, also create an account if required)
You’ll also need the following hardware:
A microphone (on a headset or otherwise. The Steam Deck has a built in mic but it isn’t the best tool for this job)
Steam Deck Docking Station or USB-C hub (including HDMI port, at least 2 USB ports, and USB-C charging passthrough with at least 45w charging power)
Mouse & keyboard
A monitor (or TV)
Make sure that all of your hardware is set up so that your USB-C dock is plugged in and charging your Steam Deck, and your mouse, keyboard & monitor are also connected.
Let’s Get The Steam Deck Set!
OK, here we go. Let’s now get your external monitor set up in SteamOS. If you’ve already done this, feel free to skip to the next section (‘Get the Visuals Cooking!’).
Firstly, click the SteamOS ‘Launcher’ button in the bottom left of the desktop and find the ‘System Settings’ button. My launcher menu will look different to yours, I’m using one called ‘Tiled Menu’ (found via the ‘Discover’ app). The important thing is to look for a button like the one in the screenshot below.

Next head to ‘Display & Monitor’.

Next, select your external monitor from the ‘Device’ dropdown.
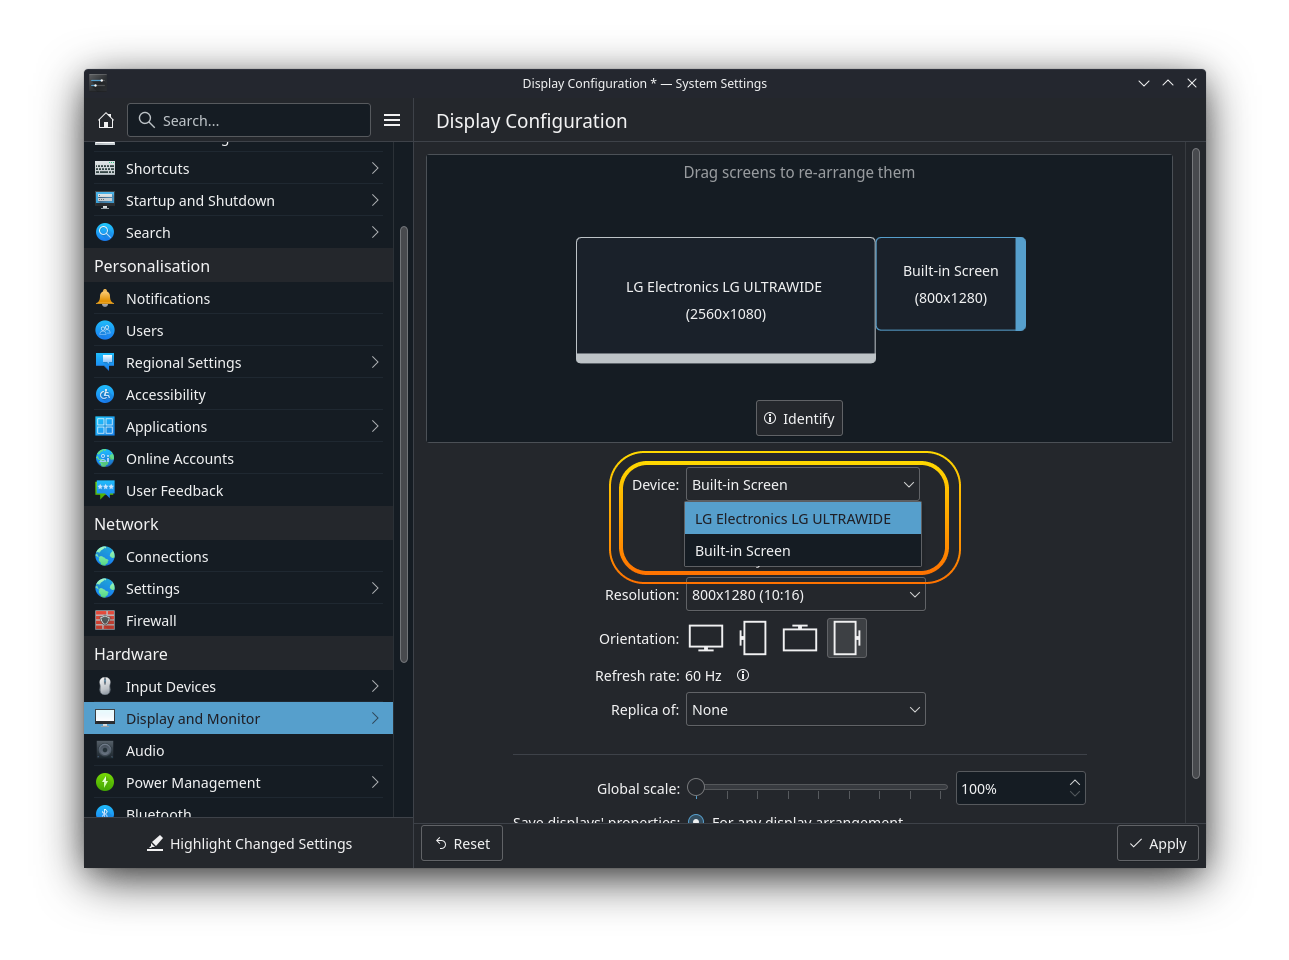
Now tick the ‘Make Primary’ checkbox. Not doing this means any game you fire up will open on your Steam Deck display by default in desktop mode, not on your external monitor.

Get the Visuals Cooking!
Let’s get to it! Fire up a game and open it full-screen on your external monitor.
Open up OBS Studio, and move it to your Steam Deck display. The initial video settings won’t matter yet, we’ll get to those. Get to the point where you should see this interface in front of you.

If you have never used software like this, at first this may look daunting. However, in the famous words of the Hitchhiker's Guide to The Galaxy cover title; Don’t Panic! I’ll highlight the important areas and what they do, and once you’re set up you’ll find that all you need to do later is press ‘Record’ most of the time and get straight into the action!
Firstly, let’s set the scene. In the ‘Scenes’section, press the ‘+’ button and enter a name.

As we’re not filming a high-budget blockbuster or documentary here, we’re only using one scene. It doesn't matter what you call it, just name it and go.

The ‘Sources’ section is where you establish what your scene actually records, such as audio from a mic, a desktop window or even just an image. Press the ‘+’ in this area and select ‘Window Capture (Xcomposite)’.

Next, select the source you’ve just created, then the little dropdown next to ‘Window’ (just above the ‘Audio Mixer’ section) and select the open game window.

You should now see your game on the central canvas. Now head to File > Settings.

Now select ‘Video’ & change the resolution to your needs. I would suggest either 1920x1080 or 1280x720 for both ‘Base (Canvas) Resolution’ & ‘Output (Scaled) Resolution’ as these are preferred by services such as YouTube due to automatic video compression applied while uploading.


At this point I’d advise setting your game resolution to 1920x1080 (or 1280x720 if your game is sluggish). The Steam Deck is only so powerful when docked and using an external display, so it’s preferable to play less resource-hungry games and use 30 FPS instead of 60 FPS where required. Keep testing to find what works for you.
Now then, this is where things got a little weird for me. I have an Ultrawide monitor with a resolution of 2560x1080 (21:9 ratio) instead of the usual 1920x1080 (16:9 ratio). If your monitor resolution is unusual, you can adjust the game window on the central canvas in OBS. Click the game window on the canvas, then drag the corner while holding [Alt] on your keyboard to maintain ratio while you resize.

Get The Path and Format Set!
Back in ‘Settings’ (‘File’ > ‘Settings’), select Output then the ‘Recording’ tab. There is a lot here but we only need to set the recording output location and the video format.

To set the recording location, click the ‘Browse’ button next to ‘Recording Path’.

If you can see yourself recording multiple videos in future, I recommend setting this to a generic ‘Recorded Footage’ folder or something similar. You can always move it where it needs to be later, so this will simplify things which is always good at the point of recording.

Next, set the video format. For YouTube, the recommended formats are MP4 and MOV, however the newer MKV format is also supported (the format I chose).

Now under the ‘Encoder’ setting, make sure this is set to ‘FFMPEG VAAPI H.264’ as YouTube also recommends this.

Get The Audio Pumping!
Audio is where things can get a little bit fiddly, but stick with this and you will see immediate improvements to your audio quality. I will lead you through this. Remember this: audio mastering makes or breaks the final product.
OK, it’s time to plug in your mic if you have one. Still in ‘Settings’, head to ‘Audio’ . Next, in the ‘Global Audio Devices’ section select the dropdown menu next to ‘Mic/Auxiliary Audio’ and change this to what your mic is.

You can close the close the ‘Settings’ menu.
Now we need to add filters to process your mic audio in real-time. Trust me, it will be worth it. Back in OBS Studio, click the 3 dots next to your ‘Mic/Aux’ audiometer in the ‘Audio Mixer’ section then click ‘Filters’ in the dropdown menu.

Then add the following filters top-to bottom using the ‘+’ button in the bottom left of the ‘Filters for ‘Mic/Aux’’ window: ‘Noise Suppression’, ‘Gain’, ‘Compressor’.

‘Noise Suppression’ is an algorithm to help minimise recording noise. It’s pretty handy if you have a particularly noisy mic or ambient noise where you are. Set ‘Method’ to Speex (low CPU usage, low quality). I use a budget Razer Kraken X Lite headset (great for the price by the way), and for me this method was much more palatable than the alternative. I also found setting ‘Suppression Level’ to -60dB worked for me, but feel free to tweak these settings to your needs.

‘Gain’ will help to increase input volume if your mic is too quiet. Set this so that the mic is perfectly audible.

Finally, the ‘Compressor’ is an essential for anyone recording their voice, used by radio and music producer professionals alike. It will help counteract peaking distortion (when the volume or input gain gets too high) and will make sure that your mic level remains consistent in real time throughout your recording. You never know when you’re getting a little over-enthusiastic during gameplay!
You should leave most settings alone here for the moment, except for two which you can adjust to your needs: ‘Ratio’ & ‘Threshold’. ‘Ratio’ is the strength of the compression, in other words how aggressive it is. The ‘Threshold’ is the amplitude level (or volume if you will) where the compression starts to kick in.

I’d say test talking & loud gamer yelling, then tweak these settings until the result sounds good. Now that your video and audio is primed, it’s time to adjust the input levels of the audio a bit.
If you’d like to use other players’ mic audio, it’s time to fire up Discord (or your chat tool of choice). Once in a voice chat, you can change the volume of each of your gaming buddys’ mics. In Discord, you can alter this by right-clicking any active user during a voice chat, then adjust ‘User Volume’ in the popup menu.
Do this until you get a good balance between each other player and in-game audio. I’d say the aim is to make the in-game audio about half or less the volume of all mic audio.
Once done, head back into OBS Studio now and check the audio mixer section. You should see both audiometers reacting to sound, if not check which is not working and adjust settings accordingly, or backtrack a bit through the steps if you have to.

Now adjust the volumes of the Desktop Audio & the Mic/Aux channels. What we’re aiming for here is for audio to be loud enough (i.e somewhere in the lower part of the orange zone) without reaching its peak (the red zone).
Time to Record!
If you’ve made it this far and everything is now set, congrats! With the hard part over we now get to do the fun (and surprisingly easy) part. Press the ‘Start Recording’ button in the ‘Controls’ section in the bottom-right of OBS.

I recommend a test recording first. Get your friends to say something silly and you can reply back. Then hit stop and check if the recording is good and in the right place. If not, head back to the right section to see if you’ve missed anything. If all is well, enjoy your play session!
Where We’re At
Good job! You have successfully captured your gameplay and hopefully learnt a few things along the way. Next time, we will be trying a different way of recording right in gaming mode; a much more comfortable way (and my preferred way). There will also be a few editing tips which will give you much more flexibility to do what you want with your videos down the line.
See you for the next part! (Edit: The next part is now here!)
VGM Vinyl - Some Serious Childhood Nostalgia
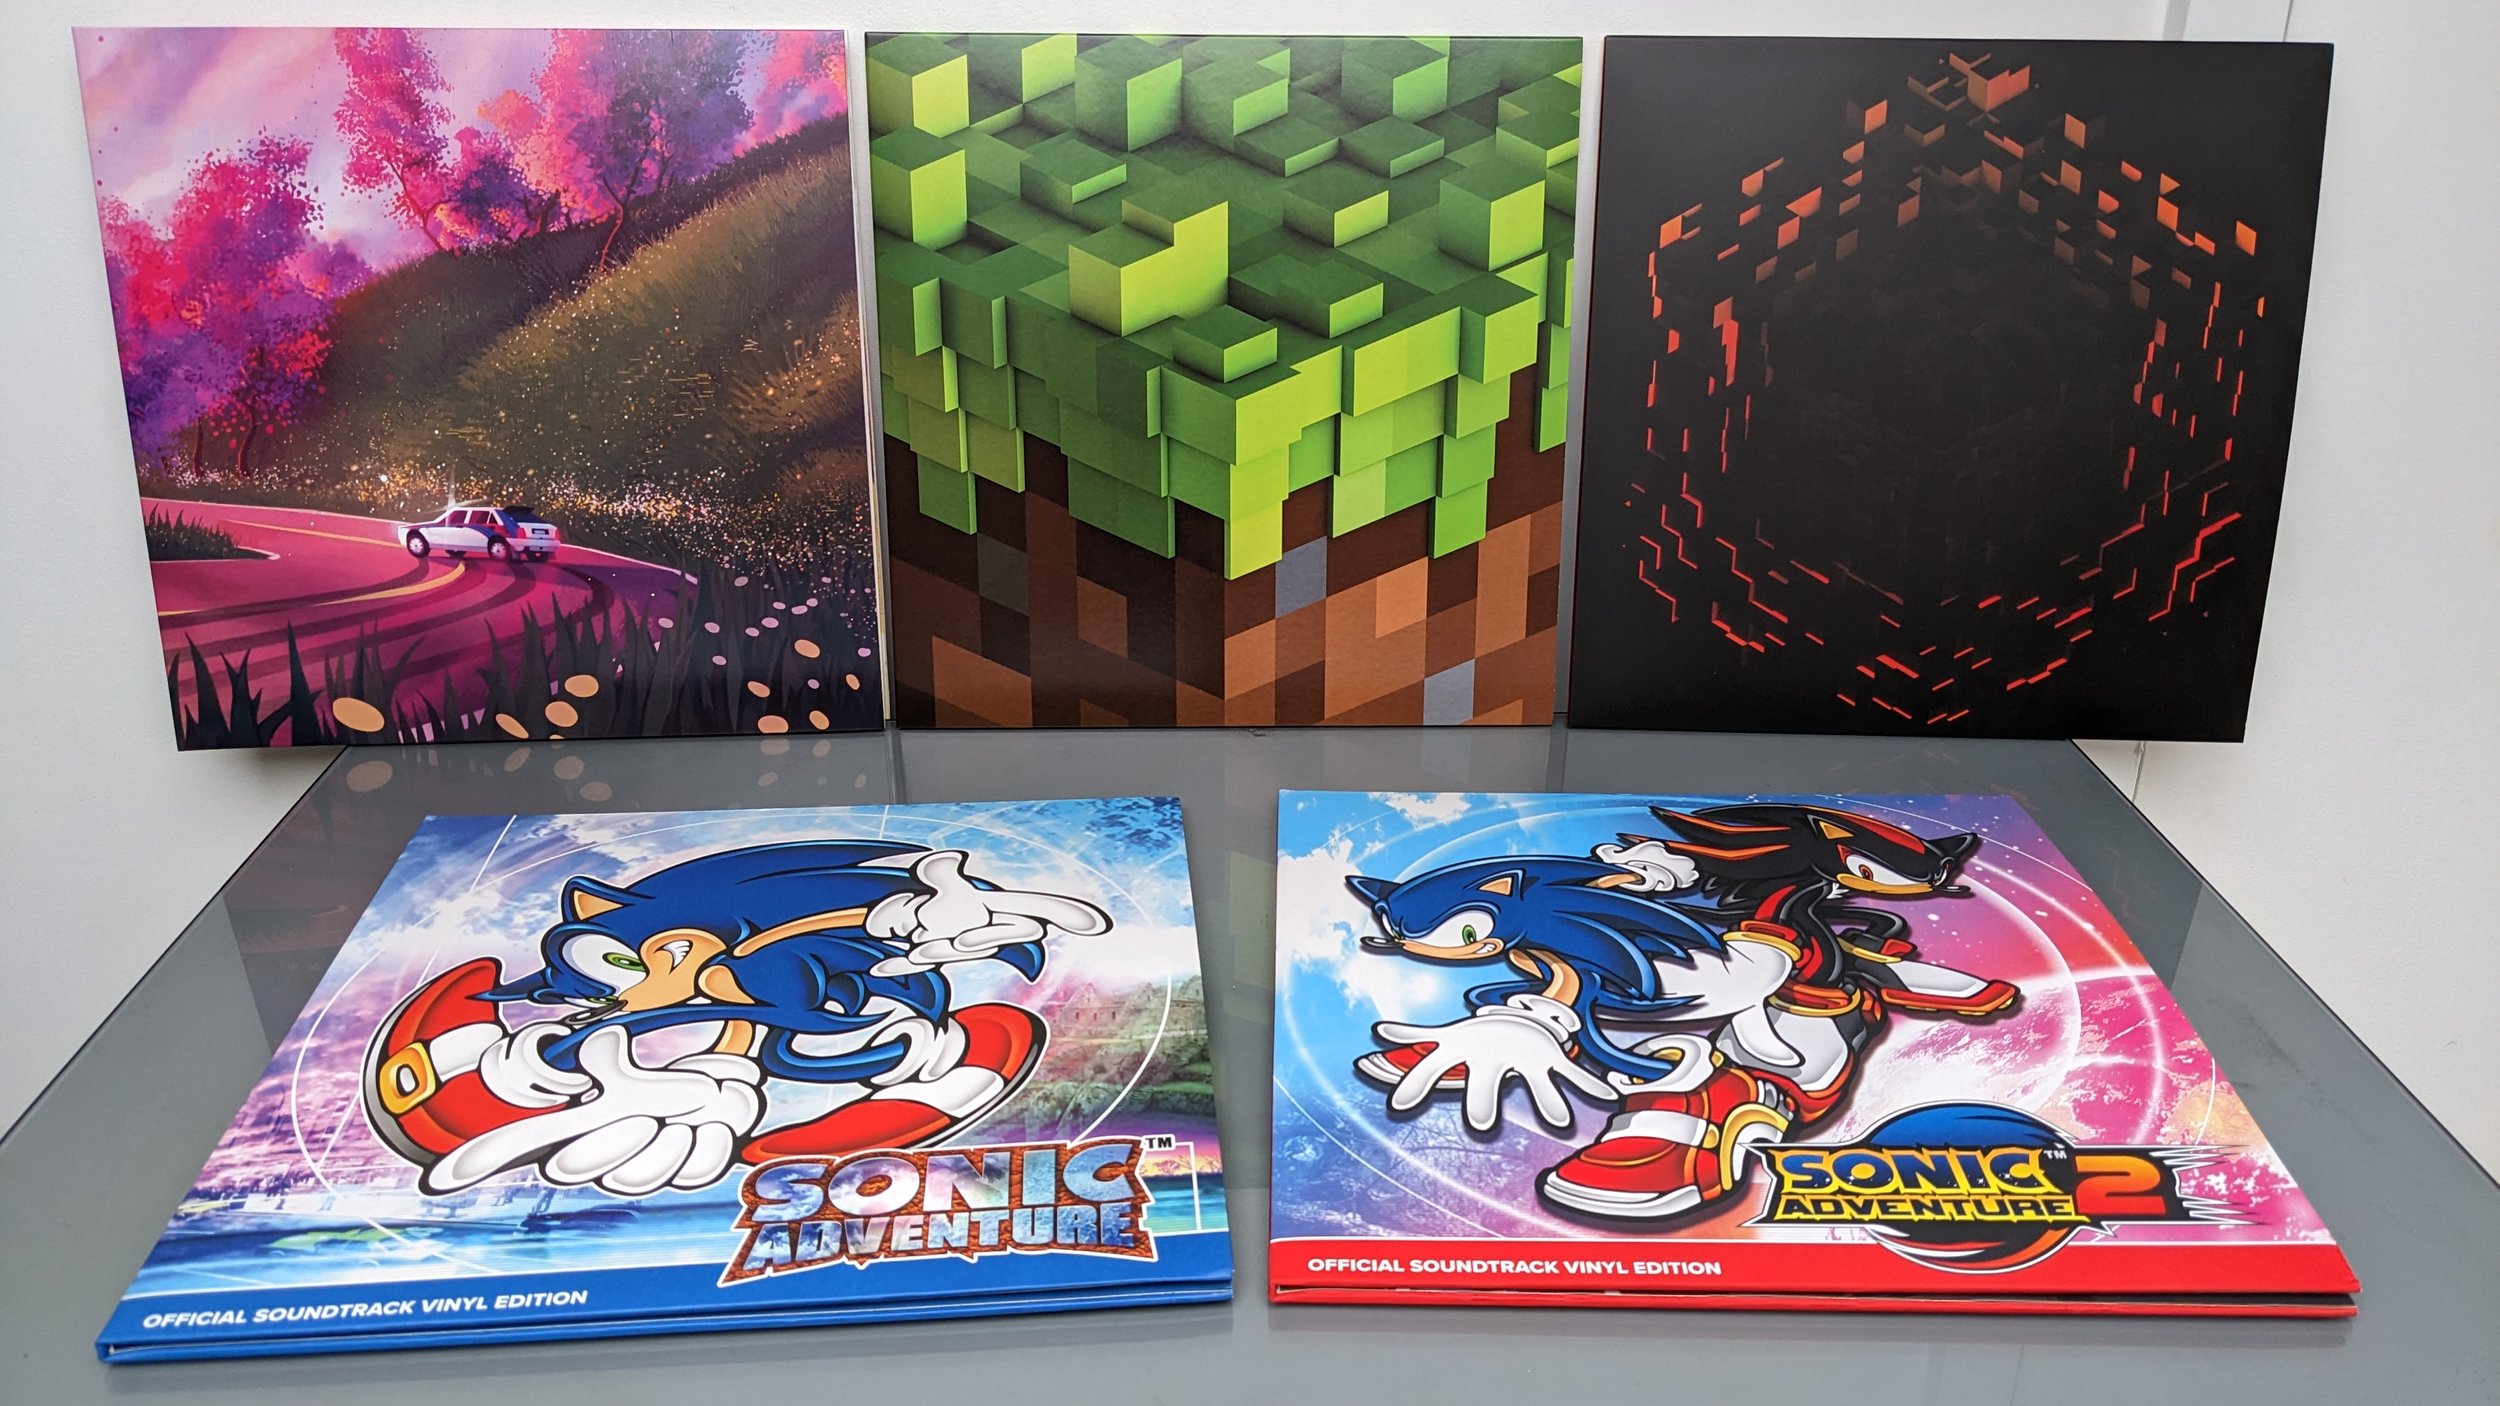
I am really excited about this one! This time we have a whole bunch of vinyls, and a couple of particular ones at the end really hit me with heavy nostalgia. Here’s more information on what’s here this time:

Art of Rally: This is one of the most minimal, purest racing experiences you will have. Here we have a typical rally game with one simple goal: to have the quickest time. You’ll be thinking that it’s not too hard, just take the best racing line and you’re golden. However, this game has much more realistic physics than you would expect, and you will find yourself wrestling with cars from the 60’s that let’s just say aren’t particularly suited to rally. It’s also difficult getting these to drift round corners, which needs to happen as the cars also have 60’s handling & acceleration and you will lose valuable time if you don’t. Cars progress through the years all the way until 1999. While you may think this gets easier to handle being that rally cars became better designed, the action only becomes more heart-in-mouth and you will find you need to take serious risks to keep up with the other competitors. But you must remember your goal to become a zen rally master, and the giant buddha statue that pops out of the ground at the start reminds you of this. If you like a game that doesn’t take itself too seriously, then this is a game for you. As another example, one of the car shapes is jokingly said to have come about because the owner of the company sat on a baguette! Alongside all of this is an airy, bright, almost 80’s inspired soundtrack that really lifts the gorgeous horizon as you race through locations such as the cherry blossoms of Japan, as well as others. The colours of these vinyls are appropriately named Sunrise Galaxy & Sunset Galaxy for this reason, a beautiful set & worthy of any collection.

Minecraft (Alpha): A game that needs no introduction. It helped greatly to pioneer procedurally-generated worlds essentially made of blocky Lego, bringing voxels (3D pixels) to the mainstream. It can be thought of as the ultimate, easy-to-access sandbox world that will hook you from the moment you punch through your first block of wood. It will keep you reeled in as you restart again, and again just to explore new worlds, find out new tricks, and build new things. It treads a well-balanced line between freedom and constraint, which can be further narrowed in scope by adjusting world generation settings, changing textures and character skins, adding beautiful graphical shaders for reflections & god-rays, and even access a horde of incredible mods such as Chunk Animator, which will animate new chunks of blocks in the distance into existence. You can choose to adventure through day and night battling monsters and upgrading your tools in Survival Mode, or become the ultimate master builder you want to be in Creative Mode. And you can easily do all this with friends too. The soundtrack is at this point legendary, created by C418 it is what you will hear underpinning your adventure with its beautifully ambient tones. And of course I just had to have it, having played Minecraft for too long now!

Minecraft (Beta): More Minecraft music you say? What a splendid idea! This is an extension of the Minecraft soundtrack, which is described by C418 as ‘bigger, more varied and sometimes even dark and introspective’. It also includes those music discs you find through fishing and dungeon-delving, which are complementary to your adventure as you return back home, set up your music box & listen to a disc while looking out at the landscape. I can’t help but wonder if this message somehow subliminally got me into VGM vinyl in the first place? We can only wonder! The vinyls themselves are gloriously firey and evoke the feeling of the Nether and End parallel worlds.

Sonic Adventure: I’m going to need to take a deep breath for this one. There is absolutely no game that defines nostalgia and that warm childhood feeling for me than this one. First some context, believe me it’s needed here. I grew up through what I see as a beautiful time period called the 90’s. I believe there was simply no better time to be part of games and technology (with the possible exception of the early to mid-late 00’s). Right at the beginning of the decade, I’d started playing this little game called Sonic the Hedgehog on the Sega Mega-Drive (or Genesis). It was a game that widened my eyes, that made me uncontrollably excited as I navigated this blue speeding blur of a hedgehog through loops, platforms and Badniks (the main robotic antagonists powered by animals captured within). This 2D vibrant world was like nothing I’d experienced, and I could only look over at my SNES counterparts in their Mario world and snigger at how un-rollercoastery it was alongside the dull colour pallete. Don’t get me wrong now Mario definitely has a lot of merits (as well as being one of the finest franchises to date), but there was seriously nothing like Sonic. Then the sequel came out, amping everything up to 11. So it continued through the 90’s. The first Sony PlayStation then came out in 1995 and blew everyone away by making 3D graphics mainstream with incredible CD-grade soundtracks (yes the Sega-CD and Saturn were both out, but I never knew anyone that owned either of these including me). But then, in 1998, the Sega Dreamcast was released. For the first time ever, incredible 128-bit arcade game conversions at perfect quality such as Crazy Taxi, Soul-Calibur & House of the Dead were available at home for anyone to play! However, I didn't play any of these games first. That title belongs to Sonic Adventure, and it absolutely blew me away. For the first time in a video game, my hero Sonic was truly 3D, he was now voice-acted and was unbelievably cool! The game was fast, very vibrant & varied featuring an incredible cast of 6(!) characters each with their own storylines revolving around the central antagonist, Dr Robotnik (named correctly in my opinion, fight me!). There was also an ever-evolving liquid-based monstrosity serving as the over-arching antagonist: Chaos. This became an ever-increasing threat and was more interesting with each absorbed Chaos Emerald. And the music……..was absolutely sensational. It engaged every adrenaline-based neuron in my body and got me seriously hyped up. If you want an idea of what this felt like, play Sonic & Knuckles then watch the intro for Sonic Adventure. And yes, this was the first intro ever to modern Sonic. It still gives me goosebumps every time & hopefully you can see how much it blew my mind! I played this game so much that when I received it on Christmas day, I checked my clock to see what the time was after a while: it was 8:00 in the morning on Boxing Day! The soundtrack is beyond legendary, and will be forever treasured in my collection. Probably helps that there is also a nice lyrics book included, as I’m still bad at remembering them!

Sonic Adventure 2: It’s safe to say I had an incredible time with Sonic Adventure, and felt every emotion from some of (in my strong manchild opinion) the greatest storytelling in any game. And then…..there was a sequel. Much to my excitement, it was every bit as good as first one and even added some fresh twists! The main one being that although there were again 6 playable characters and storylines, 3 of the characters were the bad guys, and ONE OF THEM WAS DR. ROBOTNIK. You could play as Dr. Robotnik! This blew my mind all over again and I couldn’t wait to get stuck into this campaign. But of course I had to start with Sonic being the fanboy that I am, and little did I know that right out of the gate I would be playing one of the most memorable levels in history: City Escape. A captured Sonic blasted out of a helicopter and boarded using the door down San-Fran style hillscapes. This to one of the coolest soundtracks with some very memorable lyrics, while blowing away all of the G.U.N robots trying to capture you, and ending with a gigantic truck trying to catch and run you over. It was pure game entertainment gold! Then you had the introduction of one of the coolest characters in any Sonic game: Shadow the Hedgehog - Sonic’s main rival. His amnesiac story arc was great and it was interesting to see how it turned out. A final notable change (though there are many) was how they perfected a cult-classic feature of the first game: the Chao Garden. For those who don’t know what this is, it was likely inspired by a certain craze in the 90’s called the Tamagotchi; a pocket-friendly, portable monochrome LCD device, where you take care of a digital pet. It was so popular it got banned in UK schools. Chaos are like little pets that you can breed and nurture and it was so effective that there are communities today that still play it. You could even play using the Virtual Memory Unit (an interactive memory card the Dreamcast is well known for pioneering)! Going back to the soundtrack, the musical themes in Sonic Adventure 2 are again very memorable & with a variety of genres (notably the hip-hop Knuckles theme Pumpkin Hill), and as with the previous collection, there is a very nice-looking book of lyrics included.
Whew, that definitely took something to write. If you do get the chance to play Sonic Adventure 1 & 2, give yourself a nostalgic treat and I’ll see you around for next time!
VGM Vinyl - Some New Vinyl & One Not-Vinyl
Here we are again! I’m sure many people are currently nursing their wounds after the devastation to your wallet that was Black Friday Week (or Month….maybe even Year before we know it!). Even I wasn’t safe this time (damn you Steam!). So here are some new vinyls as well as a tasty book of handheld devices for gaming and such, & I’ve uploaded a video to give you a first look of said book. Check out more below!
A Handheld History - This is a wonderfully crafted book written by many game lovers including some well-known individuals on YouTube and even from Gadget Show (one of the coolest shows on UK TV for many years of my life!). For anyone that loves little devices for taking their worlds on the go, this is defintely for you. It’s a grand love letter to the history of handheld gaming that spans all the way from the humble Game & Watch consoles (the first handheld consoles created with huge influence from the inventor of the D-pad himself, Gunpei Yokoi) to the currently in-vogue Steam Deck (my favourite handheld currently, created by Valve). I had a strong nostalgic feeling reading this, and If you have a penchant for handhelds I urge you to treat yourself to this bundle of paper joy!

VVVVVV - Yes I still don’t know how to pronounce this name myself! But it fits absolutely perfectly, as this now largely hidden gem is a 2D adventure where you can’t jump but simply change gravity to overcome obstacles. It also looks like the spikes you constantly bump fall to your death to, and is devilishly hard as can be expected by the creator of Super Hexagon. The game introduces some very interesting mechanics making it a joy to play through, if only to reunite the lost characters around the map and brighten their day (provided you haven’t thrown your controller out the window). I was in the middle over whether to get the vinyl or not, but it really hit me in the feels when I heard it again on Spotify, and I also forgot how great the chiptune score was on this one!

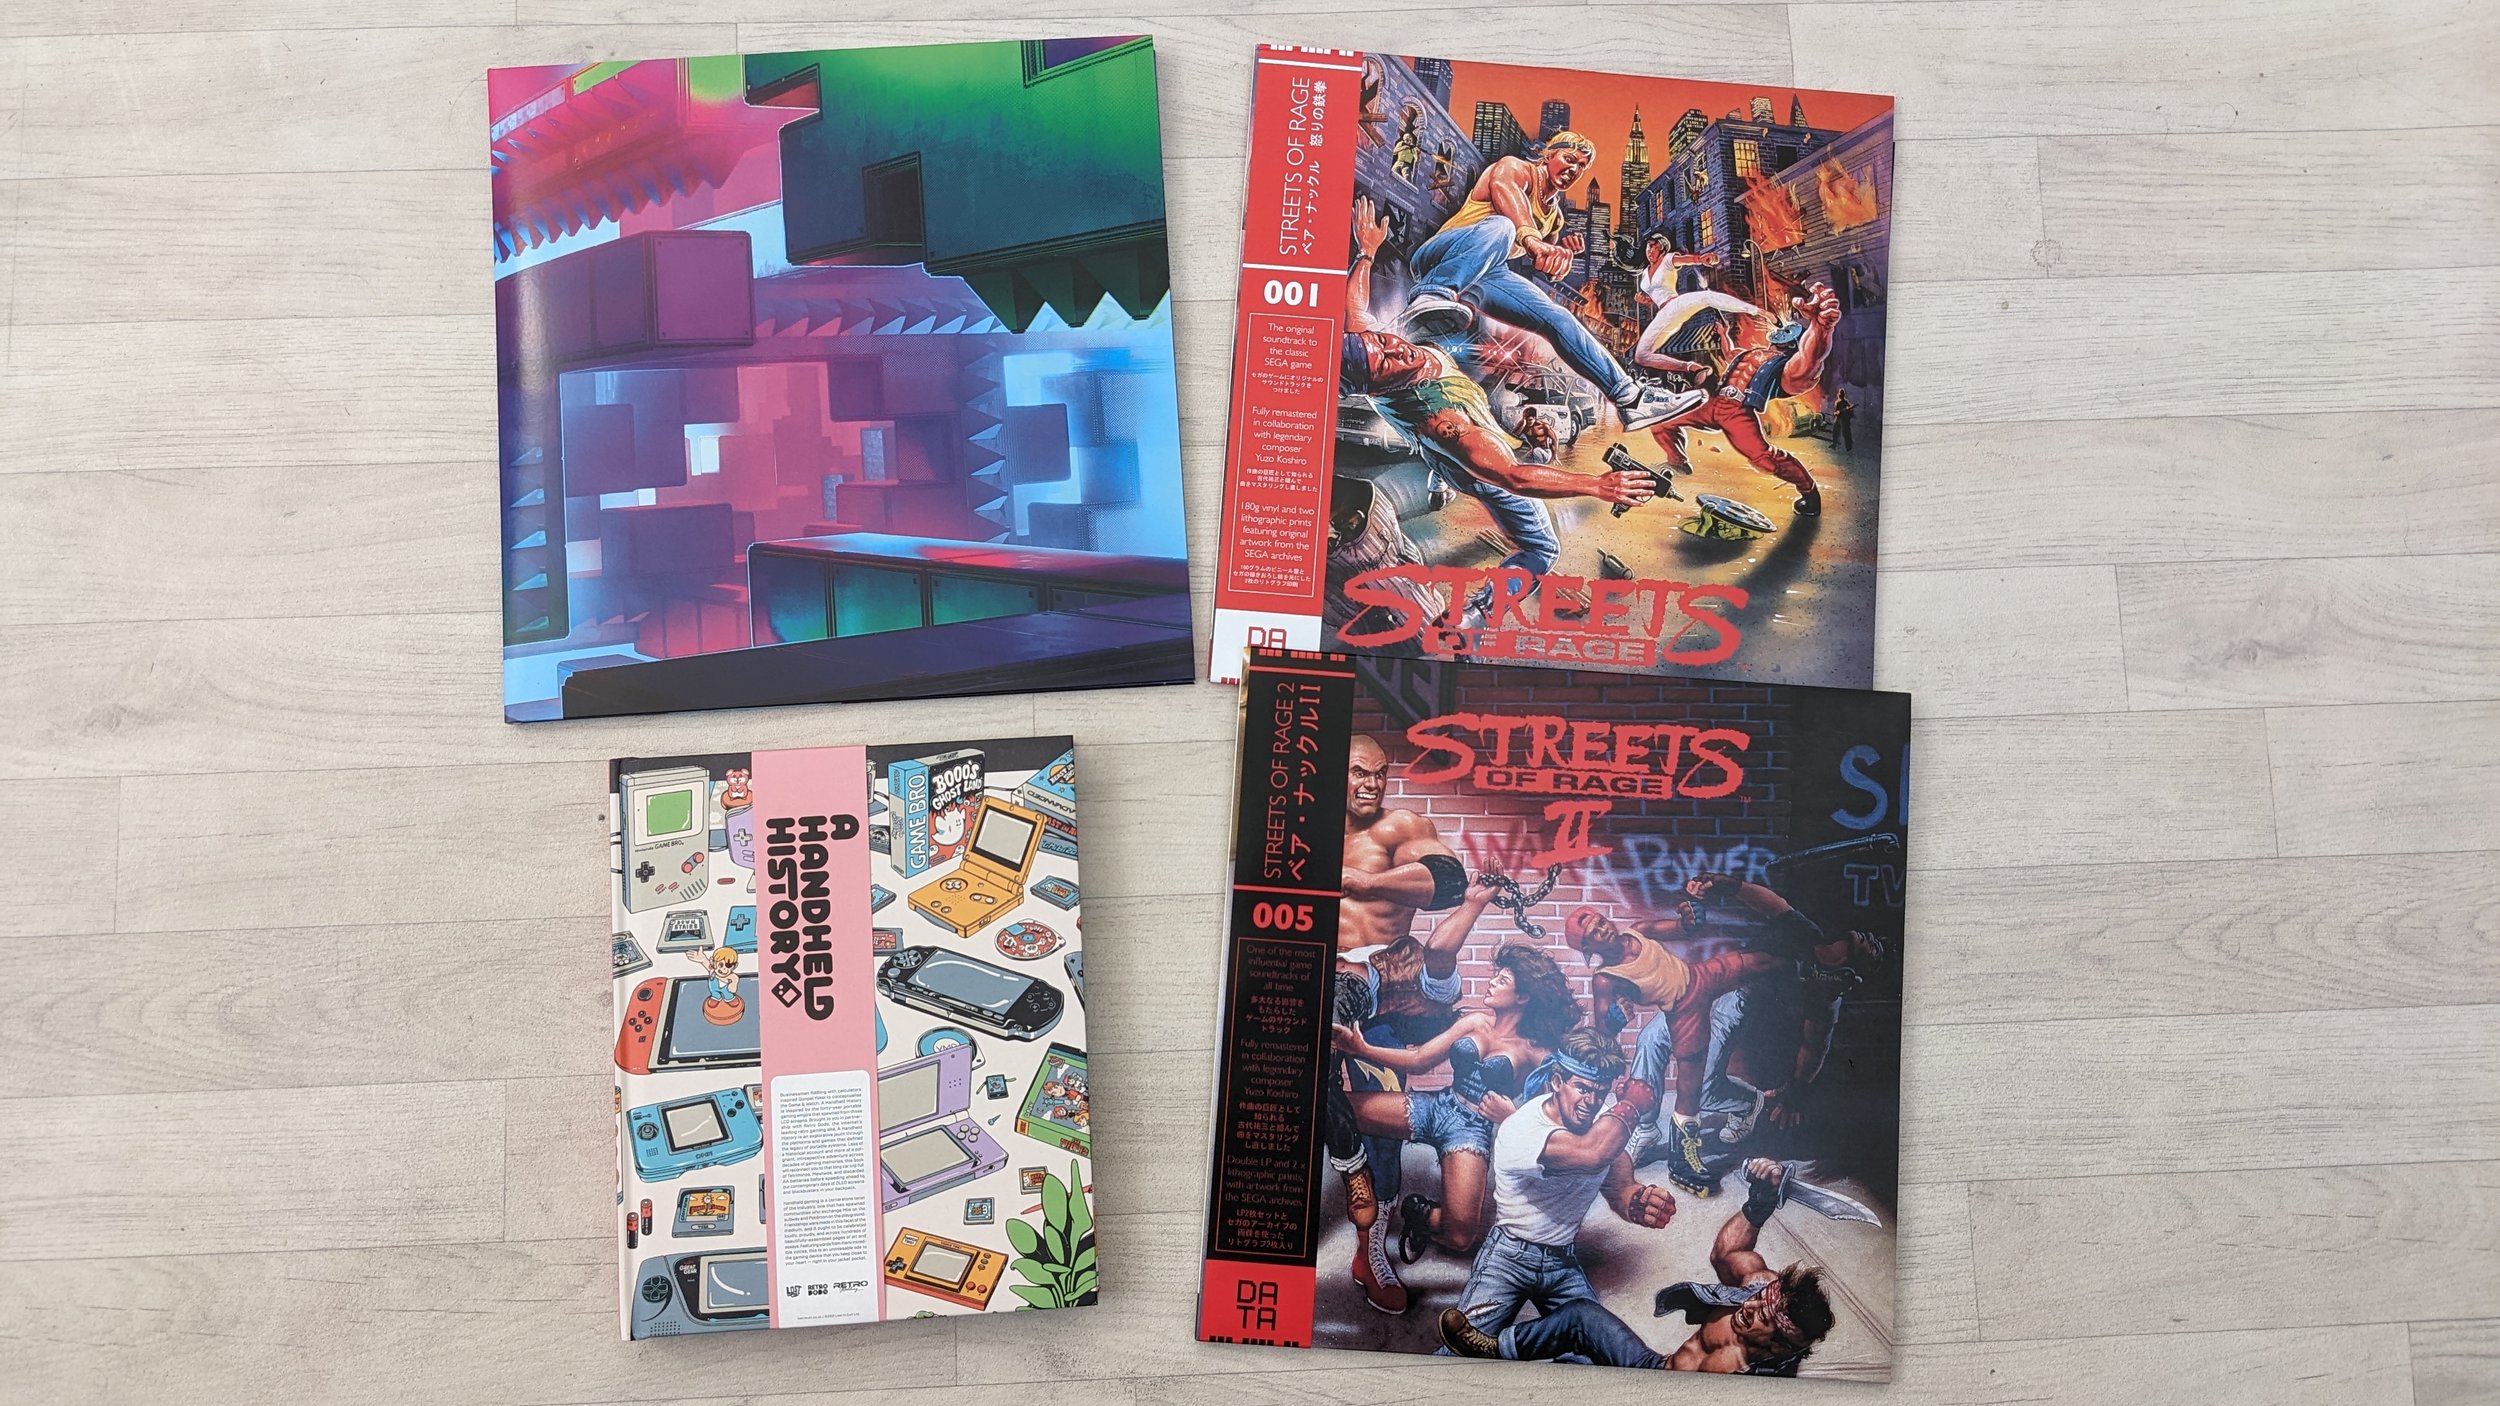
Streets of Rage - You may be surprised to know that I didn’t actually play this as a kid with a Mega Drive…..I may have been a little too distracted by Sonic the Hedgehog. However during a small window of time in the early noughties, when a shop called GameStation was open and had a massive basket full of cartridges going for as little as £1, I started a retro journey. And this game absolutely rocked. The gameplay involved throwing, slamming, punching & kicking like other beat ‘em ups such as Golden Axe & Altered Beast ( I never got along with this one for some reason). It was so well executed and varied that I just kept coming back for more. It was even more entertaining when I was playing with my then-partner, and you could punch or throw their character ‘accidentally’. Don’t look at me like that, you would have done it too! It also helped that the soundtrack was incredibly kick-ass and had an awesome early 90s nightclub beat to it that made your head bob. Fantastic debut and a definite must play!

Streets of Rage II - Of course, with the first game being so awesome on its first outing, there just had to be a sequel. And there was. And they absolutely nailed it, taking everything from the first game, adding even more move intricacies and variety in enemies and movesets. You also had some real agility from the Skate as well as the backflip kicks from Blaze. The graphics had even more colour, neon signs and city vibes somehow than the first. They absolutely dialled this up to 11. This extra detail extended to the soundtrack, that had even more punch and timbre than the previous outing. If you’re going to buy the first one on vinyl, the second one definitely will get bought!
That’s it this time around. I will be popping off to South Korea next week for some fun times & I might even be in with a nice post with all the glorious street food & sights when I get back. Of course I am also expecting some more sick vinyls soon as well. See you soon!
Steam Deck Tips: How to add a Non-Steam App With All Artwork - A Complete Guide
As it turns out (much to my glee), there are many things to know about the Steam Deck. Once you’ve played through a bunch of games native to Steam, chances are you will venture out at some point to the wonderful world of Non-Steam Apps. Not everything is on Steam after all, such as the highly popular game known as Minecraft.
For our example today, I’ll be walking you through how to add a non-Steam app – in this case the popular gaming communication tool Discord – as well as all the artwork for it in full. A quick point here: although Discord is usable in Gaming Mode, you will need to shutdown your Steam Deck by holding the [Power] button for 10 seconds when done using it. The reason is for the time being the Steam Deck freezes when trying to exit while in this mode. It’s an unfortunate quirk that will hopefully be fixed in future, but you can still use it just fine when playing games. Even though Discord is our example, this knowledge can be transferred to all non-Steam apps you wish to add. Let’s help you plucky Steam Deck upstarts find your footing!
Let’s Get Started
It all begins by installing Discord. Switch to Desktop Mode if you haven’t already, then open Discover and install Discord from there.
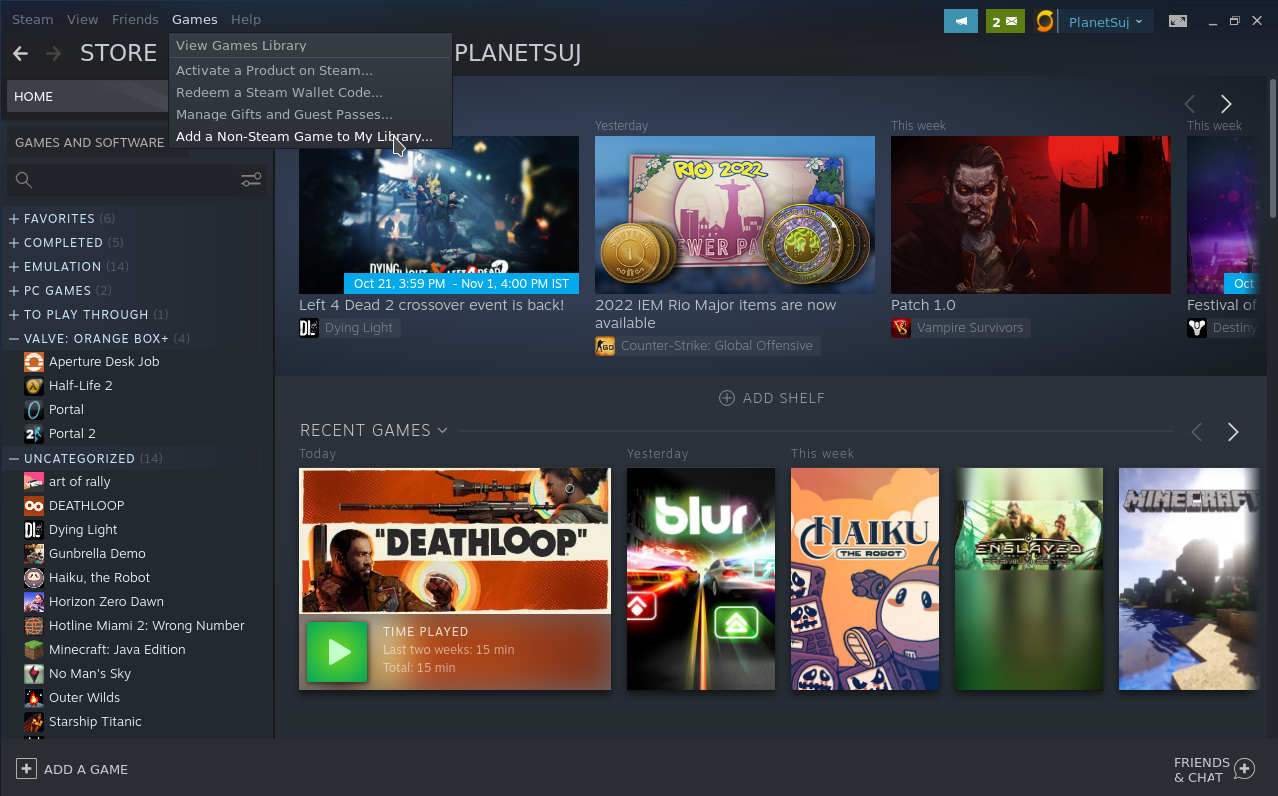
Once done, check Discord opens & works correctly, close it, then open up the Steam desktop client. Proceed to add Discord to Steam by heading to: ‘Games’ > ‘Add a Non-Steam Game to My Library’ in the menu bar at the top.
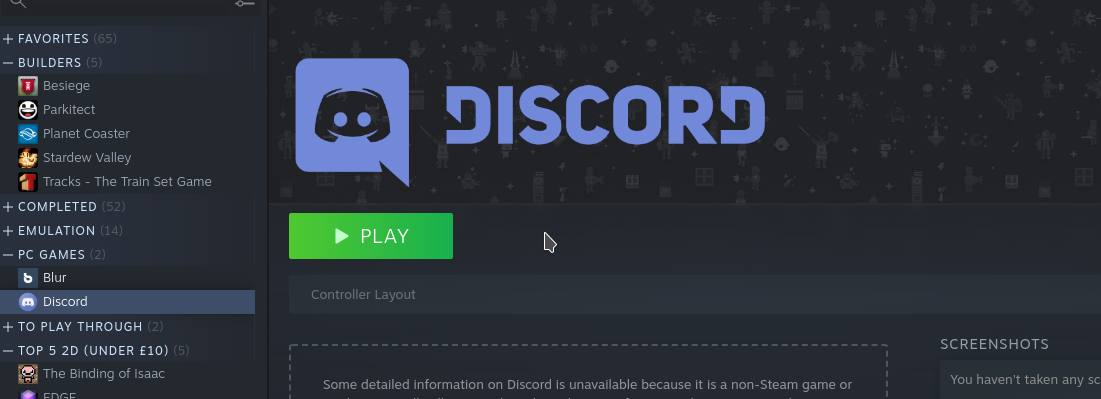
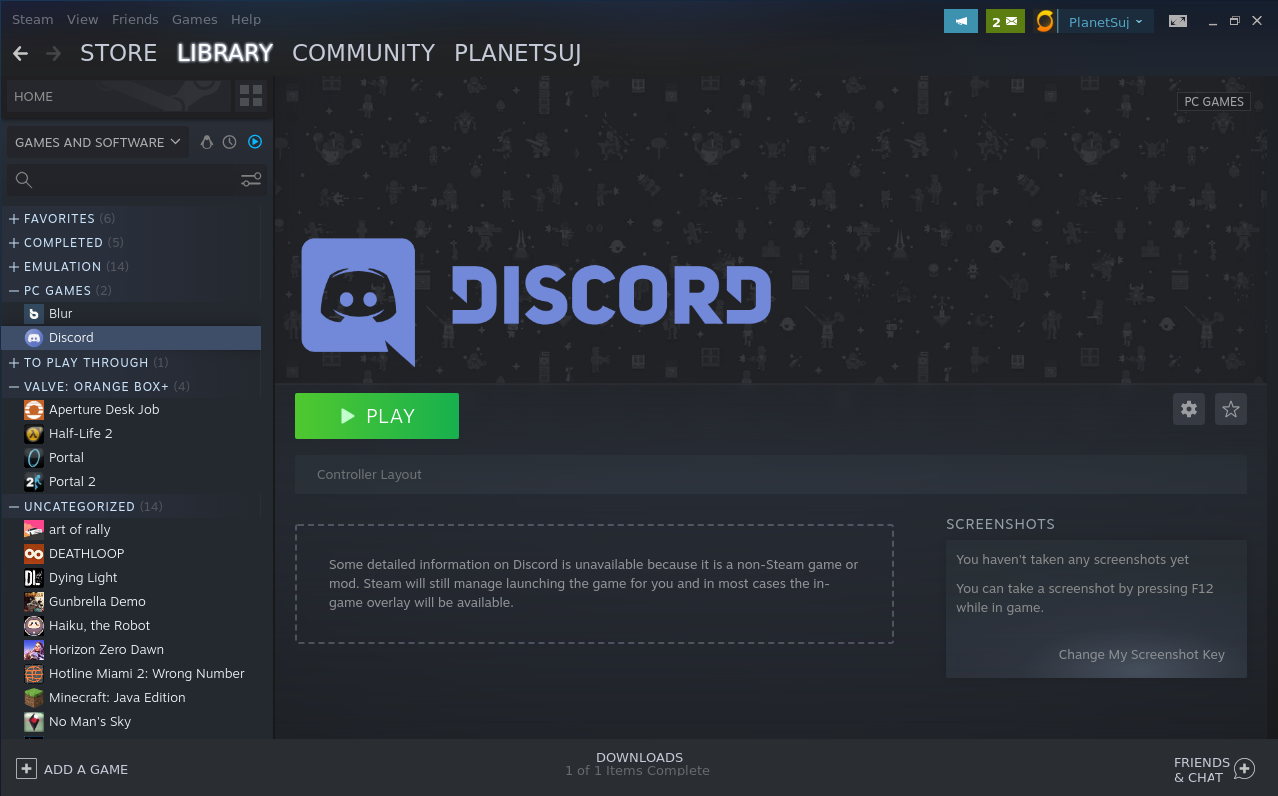
Success! You should now see it under ‘Library’ > ‘Home’ in the left-hand pane. Just one problem…….It looks horrible.
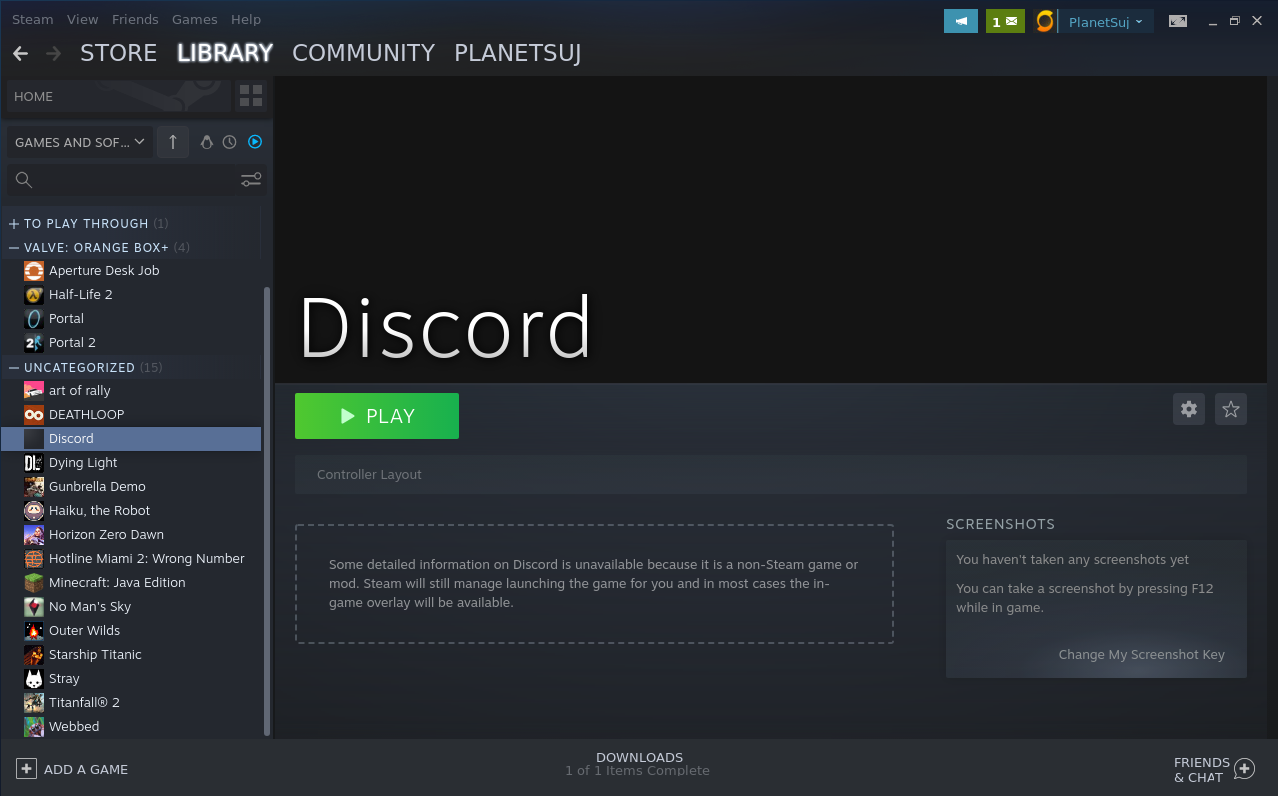
Not exactly pleasant to look at, but we will resolve that together! The go-to resource that you will find held in high regard around forums is the fantastic SteamGridDB. This site will allow you to find a wealth of artwork created by other users for many, many game titles. You can even customise native Steam game artwork if you wish. Where this gets slightly complicated is that to change artwork for any app, you have to add it in 5 different places. But don't worry, I’ll walk you through all the steps. Let's get into it!
The Steps To Get Discord Pretty
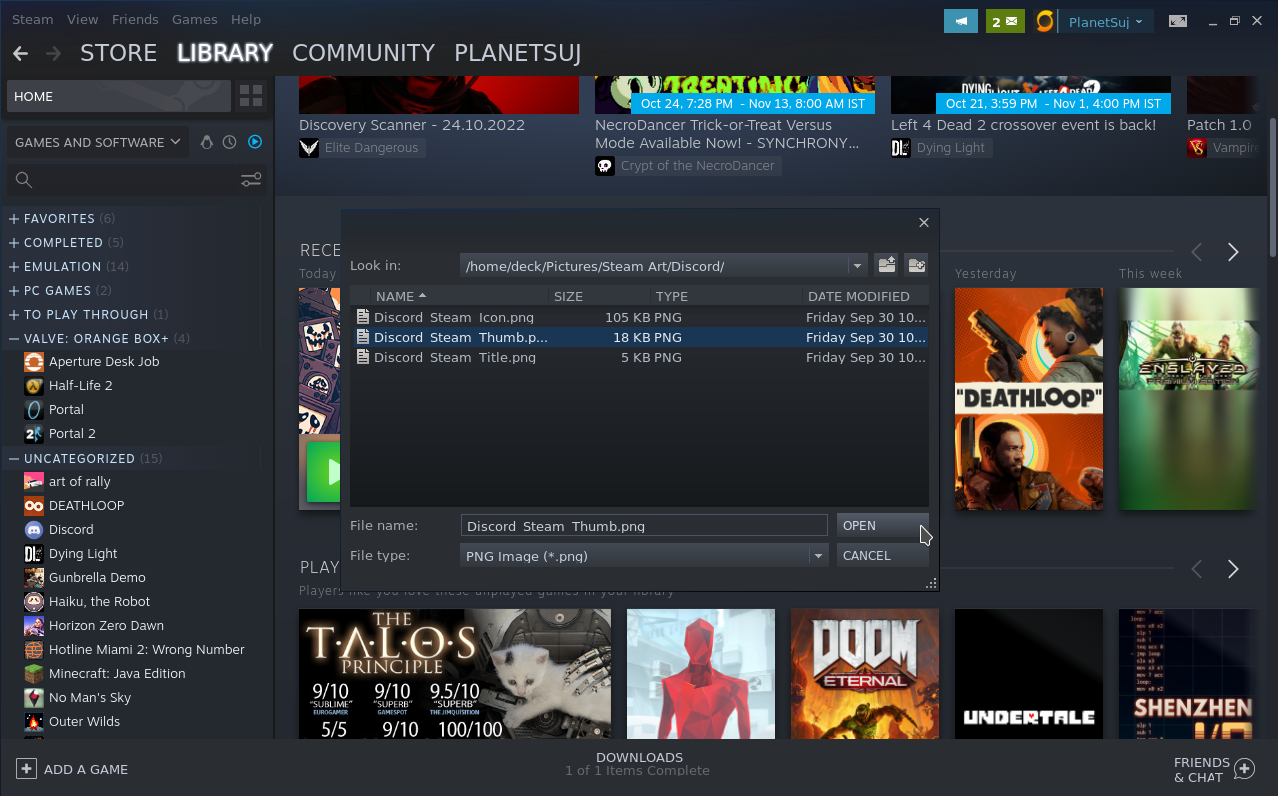
Download the following images and rename each as in their types (you can of course use alternatives, just make sure they follow the guidelines I’ve outlined in ‘Reference Info For Artwork’ at the end of the blog for best results):
Thumbnail: https://www.steamgriddb.com/grid/100623
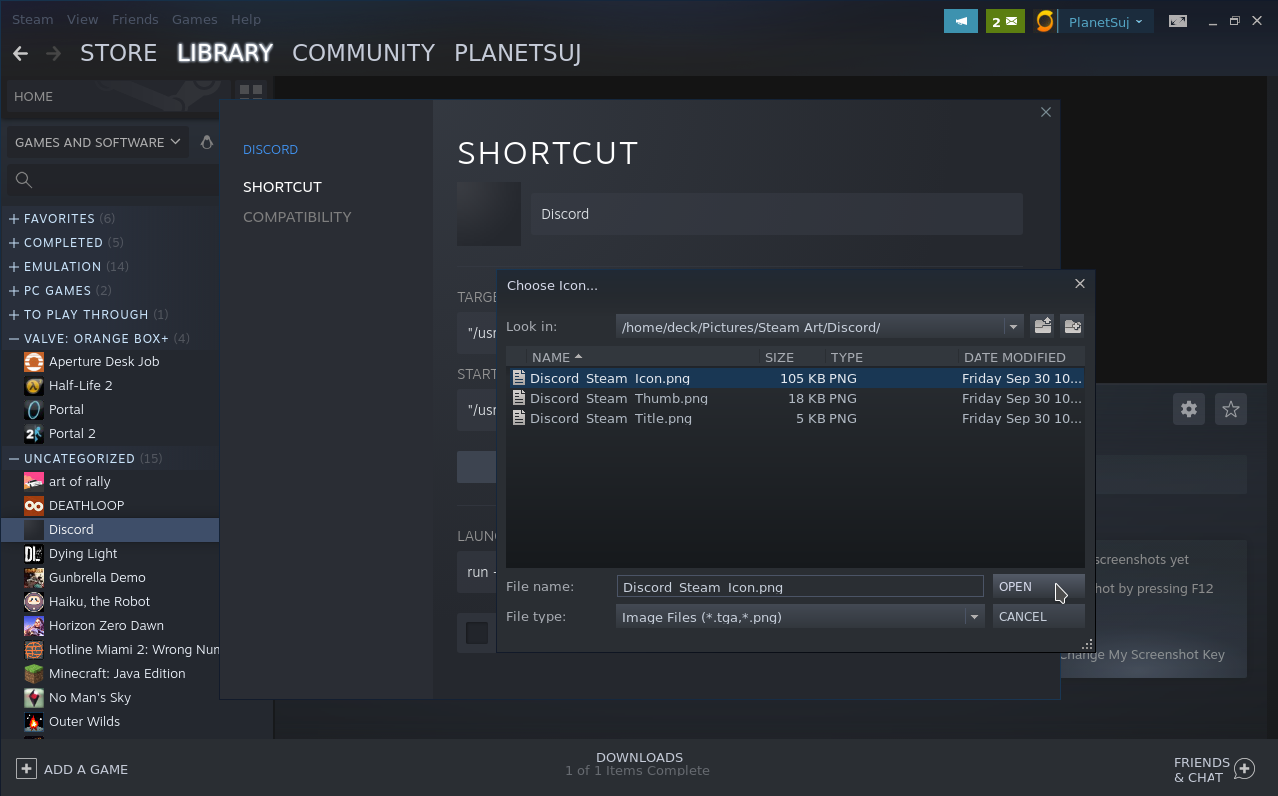
Remember to note the folder you put these in (usually somewhere in ‘Home/Deck/Pictures’ is a safe bet). Now to add the artwork. Start by right-clicking Discord in the left pane under ‘Library’ > ‘Home’. Head to ‘Properties’.

Click the square under the ‘Shortcut’ title, then locate your icon artwork and confirm. If for whatever reason you can’t see your art (e.g if it’s in .jpg format), click the dropdown menu next to ‘file type’ then select ‘all files’.
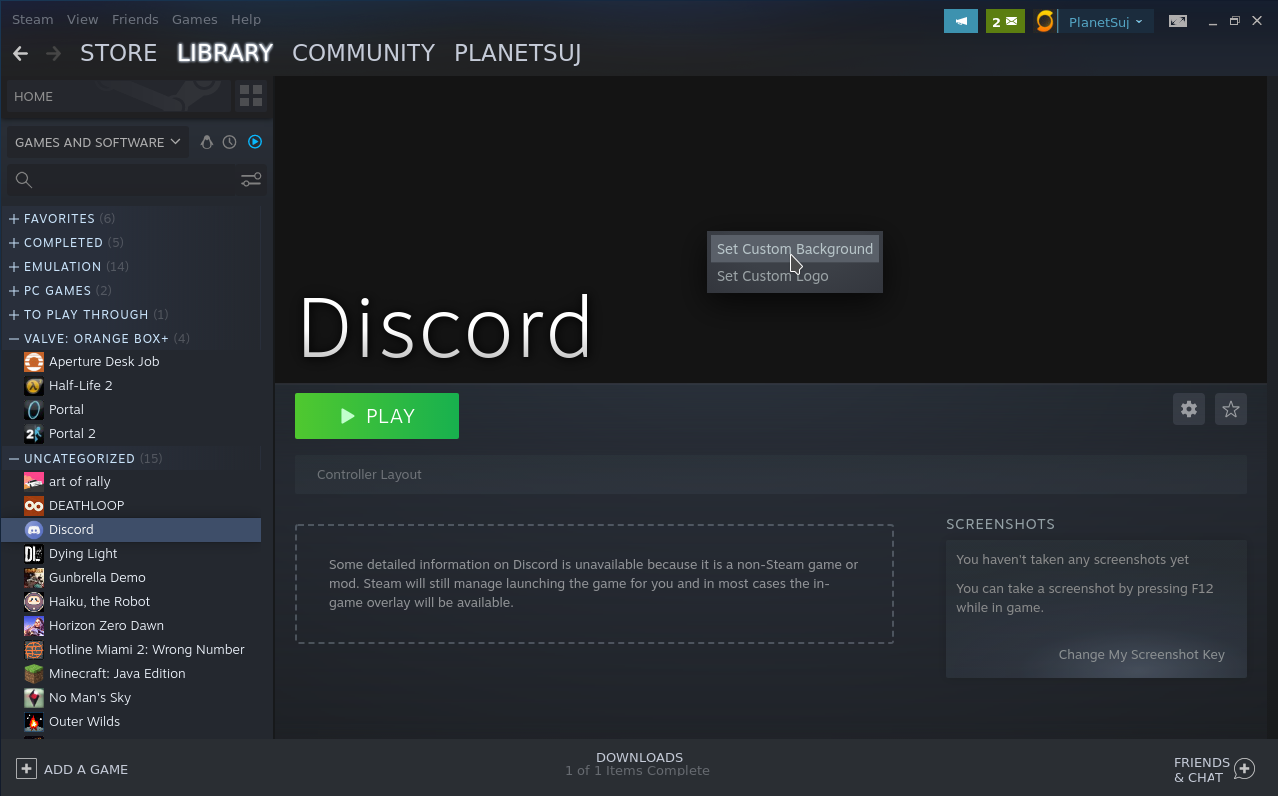
Now for the banner. Exit the dialog, then with Discord selected in the left pane, right-click the banner just above the green ‘Play’ button and select ‘Set Custom Background’. Pick your banner artwork as before.

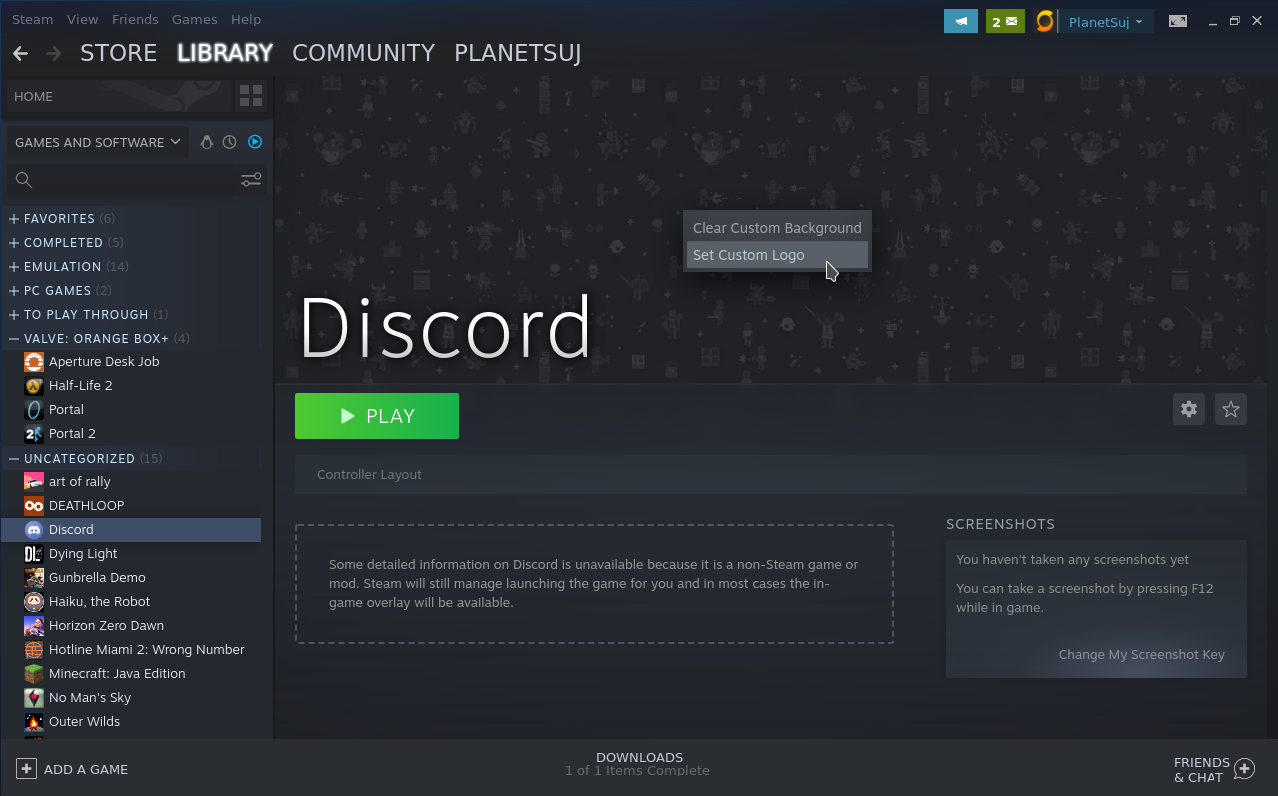
Changing the title is the same as the banner, except this time pick 'Set Custom Logo', then select your title artwork.
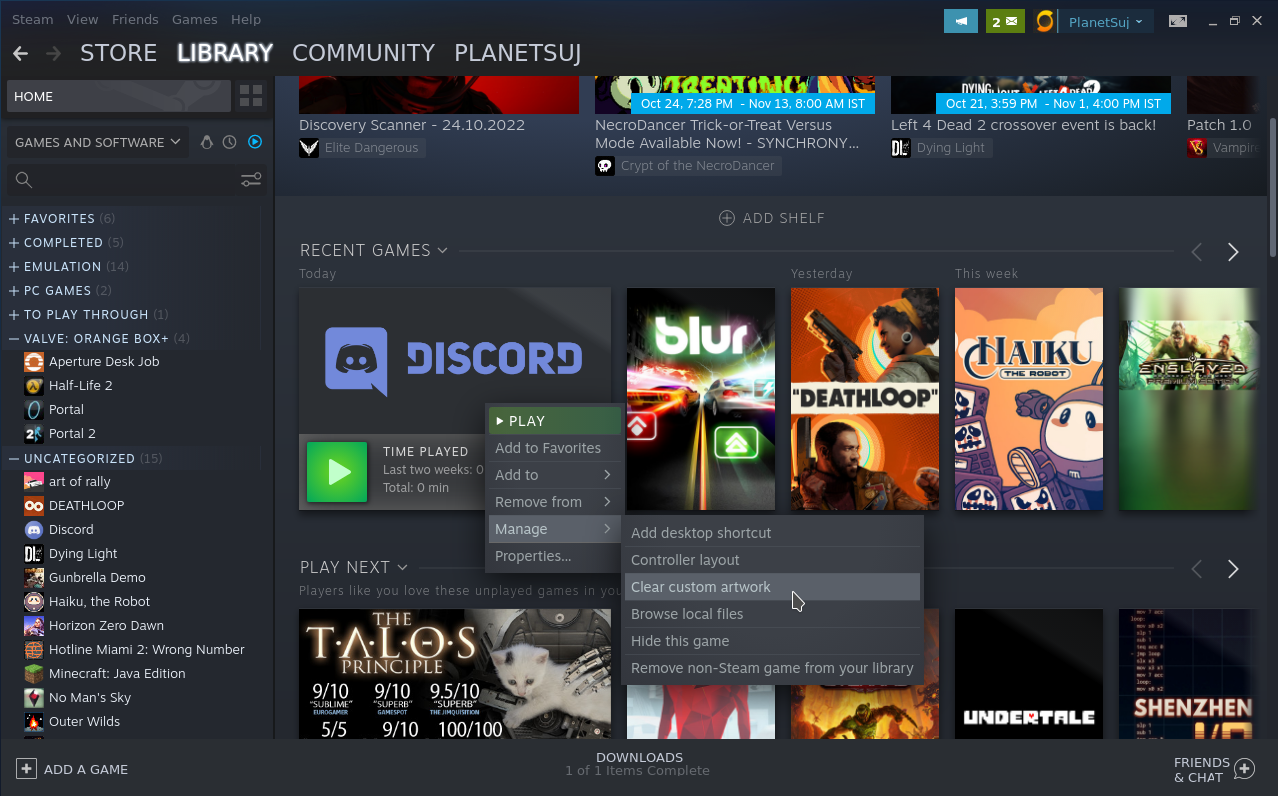
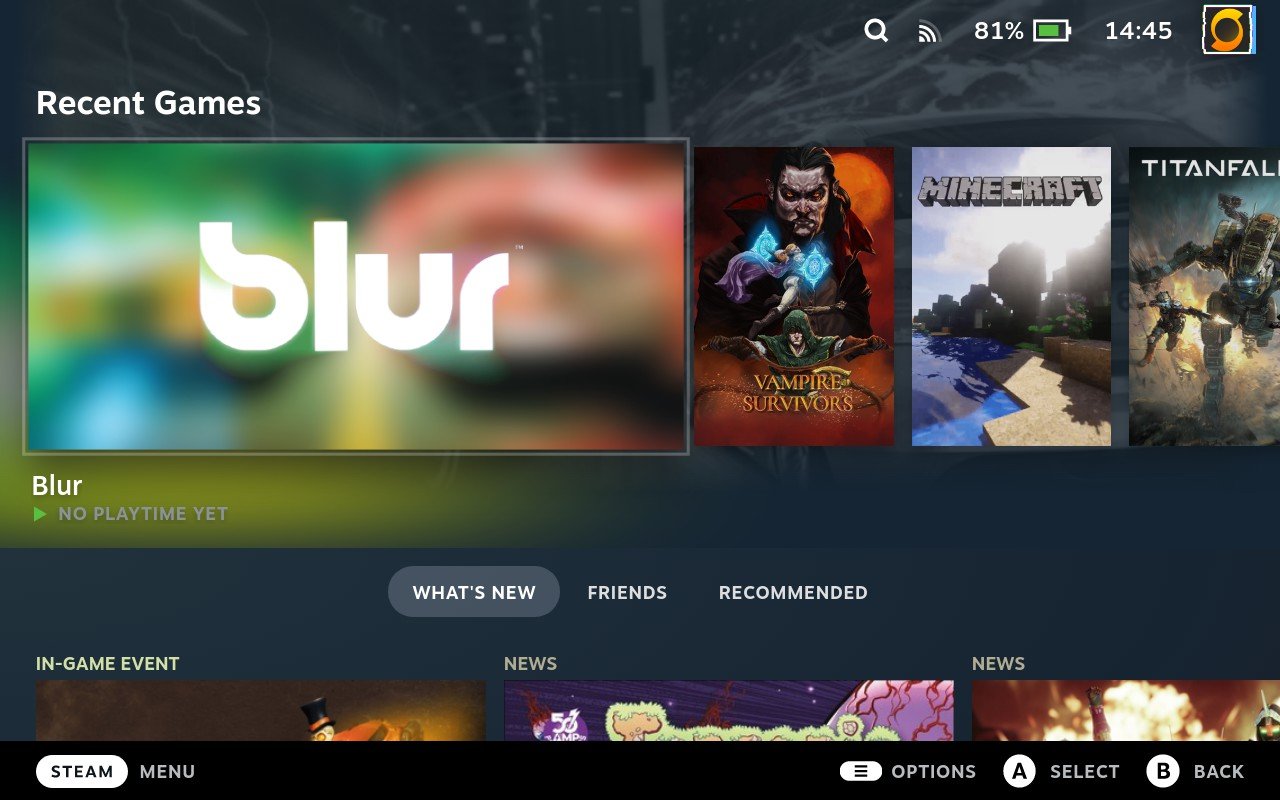
The last two pieces of artwork are the ones I got stuck on initially. You find these under ‘Library’ > 'Home' > 'Recent Games'. If Discord is not the ‘Last Game Played’, open & close it in Desktop Mode first before the next step. With Discord as the last game played, you might notice the title art shows here, and it looks good. But just to be thorough, we’ll change it this time. Right-click the app then go to ‘Manage’ > 'Clear custom artwork’. Right-click the app again and go to ‘Manage’ > 'Set custom artwork’, then pick your splash artwork.
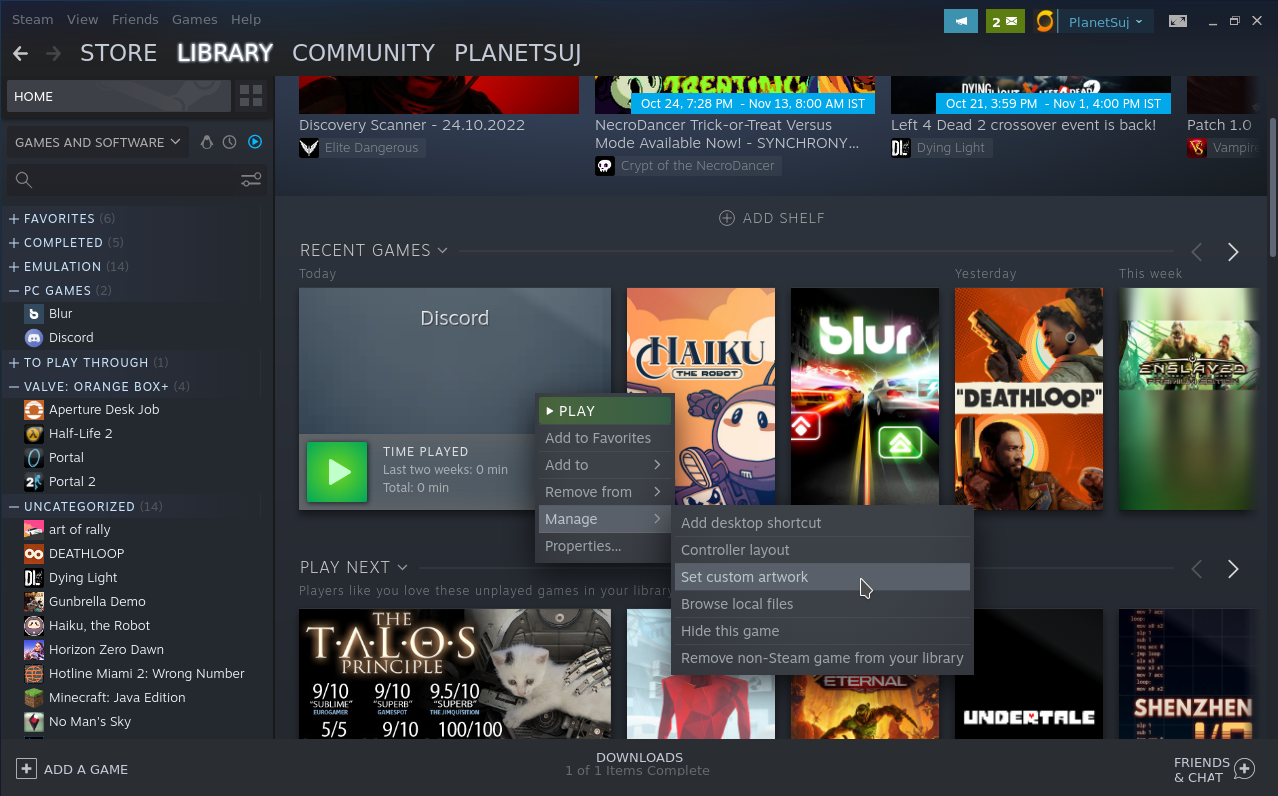

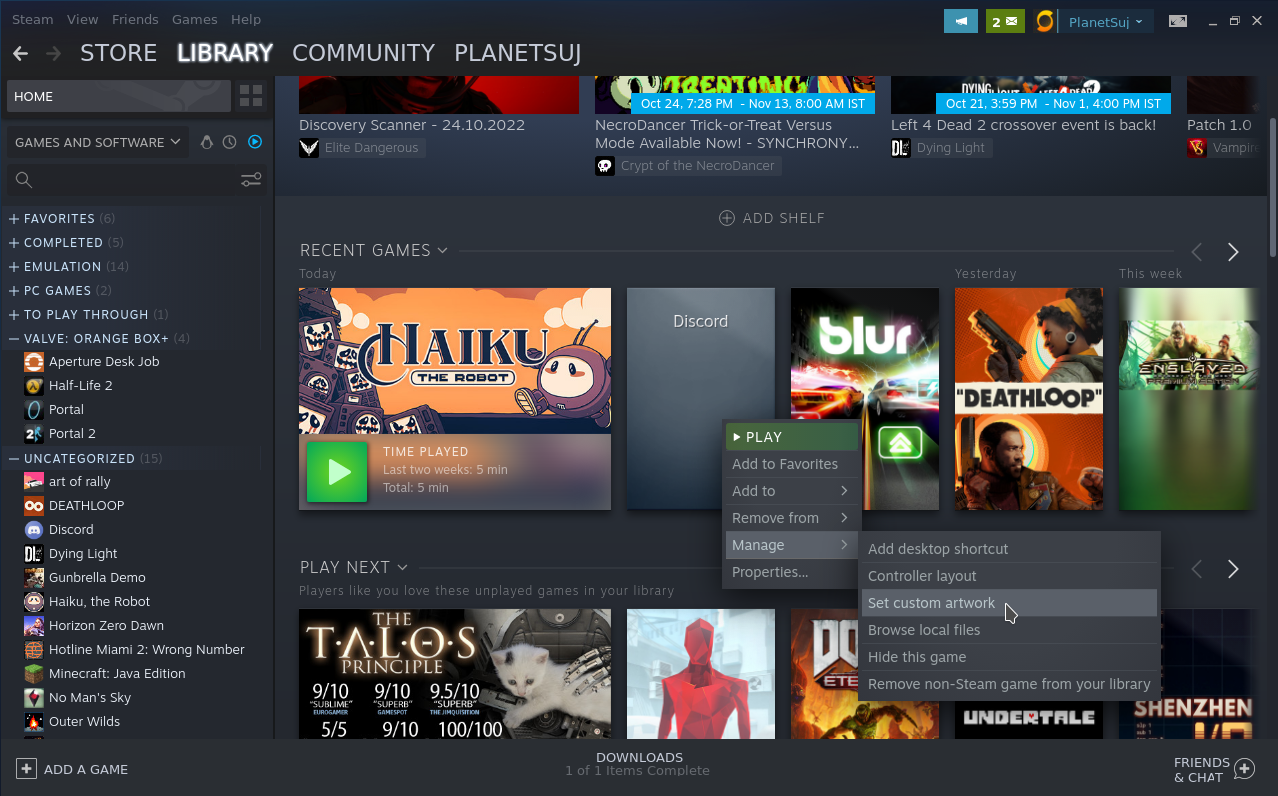
Next, fire up an app other than Discord in Steam then close. If done correctly, Discord should now still be in 'Recent Games' but not as the 'Last One Played'. Right-click the app then go to ‘Manage’ > 'Set custom artwork', only this time pick your thumbnail artwork.
So that should be it, your beautiful finished product should look like this:


Good job, thanks for following this through to the end! Hopefully this should make it easier to add artwork for future apps, but if you do get a bit lost on where to find things, feel free to return here and check out the 'Reference Info for Artwork' section just below.
As usual, check back for more in the future!
Reference Info for Artwork
Artwork Visual Locations (I’ve named a few of these to make them easier to identify):
Icon: The very small picture next to the app name in the left pane
Banner (or Custom Background): The large banner that you see with the app selected, displayed above the green ‘Play’ button
Title (or Custom Logo): Displayed as the game title in the bottom left of the Custom Background
Thumbnail (or Custom Artwork 1): The portrait-oriented thumbnail picture displayed under recent games
Splash (or Custom Artwork 2): The landscape-oriented thumbnail that displays in the place of the thumbnail if the game has been played last
Where to Change Artwork:
Icon: Head to ‘Library’ > ‘Home’, then right-click the app in the left pane. Click properties, then click the empty square under ‘Shortcut’ title
Banner: Head to ‘Library’ > ‘Home’, then select the app in the left pane. Right click the picture just above the green ‘Play’ button and select ‘Set Custom Background’
Title: Head to ‘Library’ > ‘Home’, then select the app in the left pane. Right click the picture just above the green ‘Play’ button and select ‘Set Custom Logo’
Thumbnail: [The game has to have been played recently, but not as the last game played, to show this artwork] Head to ‘Library’ > ‘Home’, then find the game in the ‘RECENT GAMES’ section. Then right-click the game’s default artwork and select ‘Set custom artwork’.
Splash: [The game has to have been played last] Head to ‘Library’ > ‘Home’, then find the game in the ‘RECENT GAMES’ section. Then right-click the game’s default artwork and select ‘Set custom artwork’.
The Ideal Visual Framework:
Icon: 256x256, JPEG or PNG. Picture only.
Banner: 1920x620 or 3840x1240, JPEG or PNG. Picture only.
Title: 876x170 (although this can vary a bit), JPEG or PNG. Text logo and/or Icon only.
Thumbnail: 600x900, JPEG or PNG. Should include app title.
Splash: 920x430, JPEG or PNG. Should include app title.

Steam Deck Docking Station: An Unboxing
As I’ve mentioned in my time with the Steam Deck in the last post, I got a bit impatient. I wanted to try out the Steam Deck as a standalone solution to see if it could replace my desktop. It’s a tasty idea. I made the jump on a USB-C dongle (this one right here) which has served me well so far; it’s an awesome dongle. The unfortunate thing was if I’d waited quite literally a few hours longer, the Steam Deck Docking Station would be released. I’ve just received this now, set it up and and it’s working out as a much cleaner setup.
So I’ve done another unboxing, but I’m wrapping up the post early and letting the video do the talking this time round. Check it out below!

Steam Deck - The Honeymoon Period (With Tips, Tricks & Quirks Along the Way)
In my last post I shared my first impressions of the Steam Deck, alongside my very first YouTube unboxing video. After this I embarked on quite the bender, where I downloaded a fair few games to really put the hardware through its paces. It’s safe to say it turned out to be more than a week in the end! I always feel that for anyone tech-oriented, there’s this beast-mode adrenaline-fuelled frenzy when you receive that piece of highly-anticipated technology that’s finally in your hands, and for the first few days (or weeks) nothing else matters. I call it the honeymoon period!
This will be a more in-depth article than usual, the big one if you will, so if you want to skip a paragraph or two go ahead. If you just want to see the tips, tricks & other need-to-knows, find the text that’s emboldened like this. Come along for the ride while I take you through what I experienced and stumbled upon!
Steam Navigation
It all starts with a bleep on the first power button press, then the futuristic sound and animation transitions into the Valve logo. Sign in at the login screen, then you’re in. Before we go further, I should mention that you're holding a fully-fledged & capable PC; a desktop operating system in your hands. I mention this because Steam (the main digital game distribution and management software for PC, a bit like the Google Play Store or the PlayStation Store), has two different modes: Gaming Mode & Desktop Mode.
Gaming Mode
Gaming mode will be the first thing you see once booted. Valve designed this over a long period of time for TVs and other entertainment-oriented displays, to make Steam a user-friendly experience for sitting on the sofa (or couch for the Americans out there). It’s a beautiful feedback loop of UI visuals and tactile sound and as such, this is a joy to use. All of your Steam games are organised as you originally had them on desktop & are easily identifiable. There’s even a category indicating which of your games are great on Steam Deck. I welcome Valve's new rule for developers to remove review scores on thumbnails, it’s so much cleaner than it was!
Hotkey Cheat Sheet
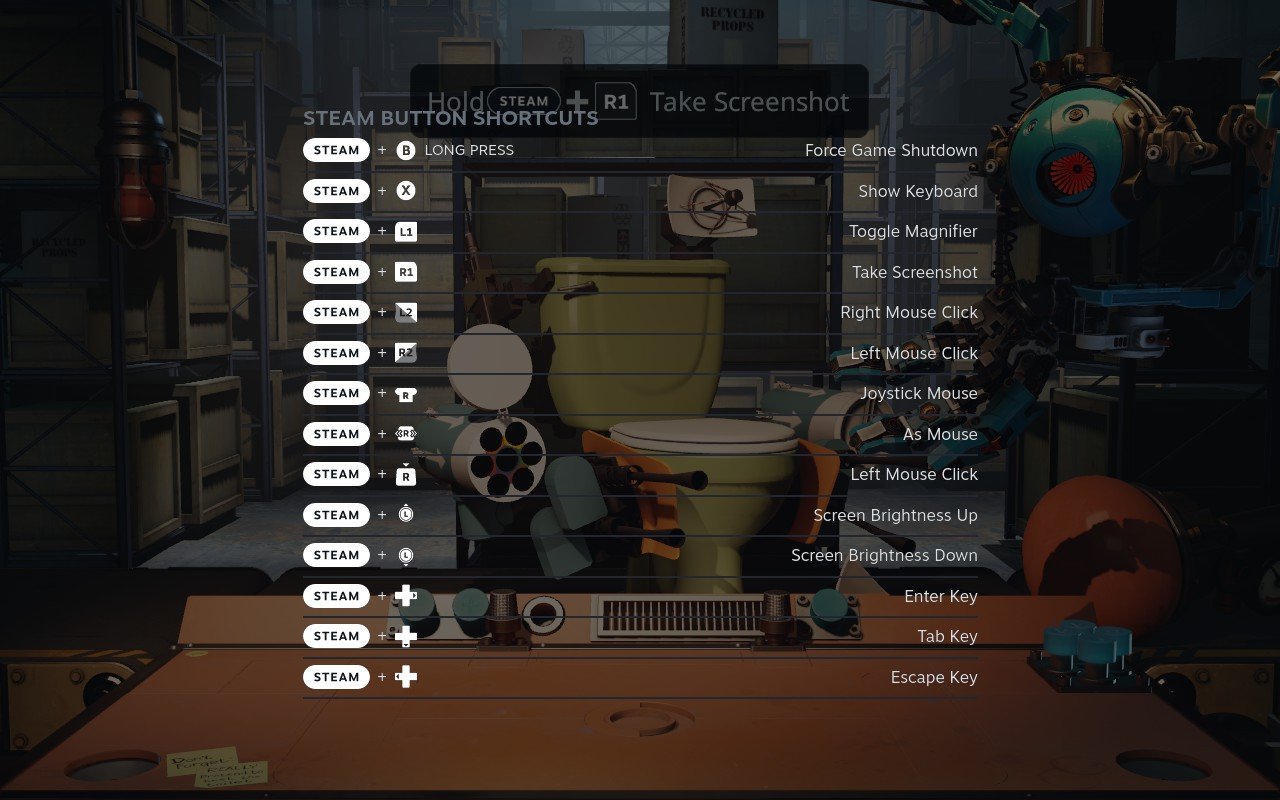
Aside from this, there are a few other ways to get around. The [Steam] button when clicked will take you to settings, account details etc. You can also hold [Steam] down to bring up the hotkey cheat sheet for things like screenshots, brightness up and down, etc. The versatile physical controls give you freedom to move about via joystick or d-pad, and you can bring up a keyboard when required.

On-Screen Keyboard
We are all now used to an on-screen keyboard popping up whenever we tap a text field on a smartphone. However, the Steam Deck does this part manually which may take a little getting used to. You can bring up the keyboard using [Steam] + [X], then type with the touch screen, or move the left joystick to select letters, or even using dual trackpads to select left/right letters and type using two thumbs. The versatility of input is something that constantly surprises me with this device. The only small gripe I had was that sometimes the keyboard covered the field I was typing in, leading me to hide and show the keyboard multiple times for one sentence.

Quick Settings
You also have a Quick Settings menu, accessed by pressing […]. You will use these a lot to switch on/off things like bluetooth & wifi. But there are also a bunch of adjustable features you will not find on any other commercial handheld. For example, changing the refresh rate of the display or adjusting GPU (graphics processing unit) power. Before the Nintendo Switch, battery life was standardised across all games on a handheld. But as handheld consoles moved more into PC-quality, the power consumption levels required by games started to vary more. Having these as quick options then is a great aspect, that exposes core features I would love to have had more agency over in previous handheld consoles, so I could balance battery vs performance on the fly.
I really enjoyed getting to grips with all of these features, and honestly Gaming mode has come a long way since Big Picture mode (an entertainment-focussed GUI that can be launched from the Steam desktop client, which may be replaced at some point by Gaming mode). Valve has been extremely thoughtful with their UI; it was useful, an absolute joy to use and never got in my way!
Steam Gameplay
But enough about that for now, how do actual Steam games perform on this thing? After all, that’s what we really want to test. And test I did. A lot. But we’ll keep it to the highlights as much as possible! Let's get this out the way: I believe the first game you play should be Aperture Desk Job. It will teach you every Steam Deck control possible in the most entertaining way (with some Portal 2 lore along the way!).
As a reminder, the games that can be played on Steam Deck are PC games. They have much more compatibility variance as a result. To make this easier, next to each game in the Steam Store and Steam Library you will find a little tag with the Steam Deck compatibility status, as tested by Valve. A green tick means the game is Verified and fully compatible, a yellow exclamation mark indicates a Playable game with a couple of things that may need work such as small writing, then there are the Unsupported or Unknown games which may have compatibility issues. At the time of writing, around 145 games in the 519 I own (dare you judge my pile of shame!) are verified working. A large chunk of the others (quite possibly half the remainder) were in the playable category. Bear the different gradings in mind as we proceed. The frame rate will be in the top left corner of the images for reference.

Dying Light
The first game I tested was Dying Light (Verified), and it was absolutely stunning. For those that don’t know it is a beautiful marriage of open-world zombie action with parkour mechanics similar to Mirror’s Edge. I completely lost myself in the half hour or so I tested it. It was just as I remember, dare I say even more comfortable on the Steam Deck thanks to the excellent ergonomics. One thing that was tricky at first was that the right bumper was a bit harder to press. That’s significant because it’s the jump/hold/pull up button, which you did a lot. Another interesting thing about this game was in the graphics settings. I noted that they didn’t go to ultra-high, they were limited here. To be honest though, it looked incredible and led me to re-think what these settings mean on a 1280x800 display.

Doom (2016)
I then got round to playing what I wanted to test the first time, Doom (Verified). As mentioned in my first impressions post this game was a rather large 60GB, so I had to wait a while to download it (~3hrs). Once I had this game up though, my senses ignited and I felt that familiar surge of energy as I took up the mantle of Doomslayer once more. The last time I played this was on the Nintendo Switch port, and I made a number of comparisons, after it’s the only other mainstream handheld console of this display size on the market at the time of writing. Firstly, the vibrancy of the Switch OLED display was missed somewhat. That being said, the game looked incredibly sharp here whereas it felt slightly blurred or flat on Switch. Secondly, the joysticks and triggers feel incredible. Forget controllers, the triggers may be the best I’ve used full stop. The difference between this and the almost digital joycon sticks, and the corresponding digital triggers, was immeasurable. Once again I felt completely immersed. Not only that but the Steam Deck trumped this by adding surprise gyro control when your finger touched the top of the right joystick. This gave me that awesome Breath of the Wild style precision adjustment to my shots, which was a pleasant surprise!

Horizon: Zero Dawn
At some point I had to really test the graphics, and a good option was none other than Horizon: Zero Dawn (Verified). This one is renowned for really pushing the capabilities of the PS4, and here was no exception. The graphical settings defaulted to medium, then I performed the old ultra textures trick, which gives much more detail with less 3D geometry overhead. Using the [...] button you can show an overlay in four levels (& off) to expose game performance, ranging from 1 which shows frame rate only, to 4 which is full stuff; temps, memory used and much more for the true enthusiast! Performance was steady here ranging from 35fps-45fps, but this game in particular really tested the battery. Based on fps, I found it best to set the screen’s refresh rate to 40 Hz via the […] button to save battery as it looked exactly the same. Also turned the brightness down to 1/3, however this only got around 15-30 mins more out of it. This one is more of a commute/take your charger type scenario in that case.

Titanfall 2
Titanfall 2 (Playable) was a bit of a surprise to me. As this game was not Verified, a caution warned that some writing may not be readable, and advised on how to use magnifier controls using [Steam] + [L1]. Once I got in though there were no issues, I was racing through the gauntlet in no time! I was also curious to see if multiplayer worked on the Steam Deck, as games that use Easy Anti-Cheat (EAC) – a common software used by Epic games such as Fortnite to prevent hacks – are only playable if the developer has included Linux support, which won't be all of them. I'd recommend checking compatibility on these beforehand. To my astonishment, I was able to get online and found myself in a frantic battle of pilots & titans. Underpinning this once again was the level of comfort. I know I keep mentioning this, but first-person shooters on Switch were notably uncomfortable due to ergonomics.

BPM: Bullets Per Minute
Fine, I admit I did a lot more testing than I thought! Next up was BPM: Bullets Per Minute (Playable). This plays like a musical equivalent of Doom. Every action from shooting to reloading depends on it. This worked pretty well, although on occasion the framerate dropped when loading new assets. It also brought up a different issue: the latency of the gameplay changed when on bluetooth headphones, throwing off the rhythm. This is inherent in bluetooth headphones, but something to be aware of if playing on the go. When trying a demo of a different rhythm FPS, Metal: Hellsinger (yes, there is more than one in this genre!), even calibrating latency settings didn’t hold for long. I therefore recommend using wired headphones if you are considering rhythm games.

Edge: Now Extended
I also tested a few games outside of the Verified and Playable categories. Burnout Paradise (Unsupported) ran like a dream, and I was tearing up the road like a champion. I also tried a little hidden gem called Edge: Now Extended (Unknown), a skill-based action puzzler with just so much character. Again this one worked perfectly so I tried a final one, ESA: Environmental Station Alpha (Unsupported). Unfortunately, this was unplayable as big picture mode didn’t seem to like the Multimedia Fusion 2 game engine this time round. As may happen with others, my experience with Unknown/Unsupported games varies a fair amount. However, I’m tempted to say that the ones that seem to work best have controller support and open full-screen by default. If you’re considering Steam Deck, make sure the main games you want to play are Verified or Playable, with Unknown/Unsupported games being seen as a bonus for now, although they could be supported in future.
Desktop Mode
Once I had my fill, I changed to Desktop mode by pressing [Steam] then selecting ‘Power’ > ‘Switch to Desktop Mode’ (holding [Power] for a second or two then selecting ‘Switch to Desktop Mode’ also works). I then began exploring. To control the desktop you have two physical trackpads either side under the joysticks. The right one by default controls the mouse, and Valve has a wonderful haptic system here (adapted from the Steam Controller), which makes the mouse feel like it’s scrolling like a trackball. The left trackpad is used primarily for keyboard input when it is showing, using dual trackpads with your thumbs to type. Probably worth mentioning that although the right trackpad (used to control the mouse) felt amazing to use, it was awkward to double click as it seemed to scroll no matter how vertically it was pressed. You can change this in the Steam desktop client under: ‘Steam’ > ‘Settings’ > ‘Controller’ > ‘Desktop Configuration’. I’ve changed the mouse clicks to the triggers, but it’s up to you.
For those who might be unaware, the Steam deck runs SteamOS as its operating system, which is based on Linux. Linux is an incredibly powerful and customisable operating system that serves as an alternative to Windows or MacOS. It will always be open source and free for anybody to be able to change to their needs, as originally intended by the GNU Project. Here’s a bit of context on where I’m currently at on Linux & some information, as I know there will be many experiencing it for the first time. I first discovered it on an Acer Aspire One netbook (a very small laptop), as there were two versions; Windows & Linux. This type of choice was unheard of commercially at the time (around 2007-2008), at least for me. Little did I know, I would proceed for the next two years exploring as many delightful Linux distributions I could get my hands on (flavours of Linux customised by an individual or organisation from their original base e.g. Debian or Fedora). SteamOS uses Arch Linux, a system I can tell you that’s notorious for being one of the most barebones and complex installations. You start from the command line (text-only) and have to tell it EVERYTHING you wish to install step-by-step, including things you take for granted such as WiFi and even the GUI (graphic user interface). That’s right you have to even install the visuals!

KDE
For the reasons just outlined and in general, SteamOS is a highly optimised, well-integrated system. Even though I am able to customise using Super User privileges (used to modify powerful things that can potentially break Linux), fortunately I haven’t broken it yet. They’ve done a great job with the failsafes. The desktop uses KDE as its window manager (manages files, open applications, etc.), which makes the start menu, taskbar and some hotkeys behave like Windows. There is a Steam Deck icon in the bottom left that mimics the Start button, showing all apps when you click it. There are icons in the tray on the right for things such as wifi & bluetooth settings. Even some of the hotkeys are the same, for instance pressing the Windows button on a keyboard will open the ‘Start’ menu so you can search via browsing or text input. There's even a window-snapping feature similar to Windows (Mac users are still missing out on this!). For anyone new to Linux, this almost feels like home.

Discover Package Manager
There are a few key differences here though. For example, installing applications can vary in difficulty depending on if they are available in Discover (like the Mac App Store, except everything is free). The standard internet browser is Firefox, instead of Safari on Mac or Edge on Windows. If anything needs to be installed on the Steam Deck from third party places such as the browser, you may run into complications as there are different package types with different base types of Linux. This version of Arch Linux uses Flatpak packages, a type of distribution-agnostic application package. In other cases, you will sometimes need to get your hard hat on, which can commonly lead to using Konsole (a text-only tool similar to Command-Line in Windows or Terminal on Mac). In which case, be prepared to drill deeper if you want to change anything outside of any default options, it’s going to be a rough yet educational & rewarding ride!
Non-Steam Apps & Gameplay (in Gaming Mode)
After exploring Desktop mode for a while, I switched back to Gaming mode, double-clicking the desktop icon. It does take a little while for this to initialise, the cursor characteristically stops moving for a moment while the system transitions, just a little tip so you know you’ve clicked it. Let’s jump into the non-Steam stuff!

Blur
There are very few gamers out there that will know this one, a combat racing hidden-gem called Blur released in 2010. This one holds a very warm place in my heart as it’s single-handedly the most concurrent fun I’ve had playing online. And it excited the inner-child in me when I found a Reddit thread dedicated to getting Blur working on Steam Deck! As I own the PC copy, I downloaded the ISO (DVD image of the game) online then followed the guide step-by-step. It takes you through a very important thing for any app outside Steam: how to add Non-Steam apps (in the desktop client version of Steam: ‘Games’ > ‘Add a Non-Steam Game to my Library’). To my absolute astonishment the game ran perfectly, even better than it did before! I remembered it running at around 30fps on Xbox 360, but it kept a buttery smooth 60fps the whole time at the highest settings possible. The only issue was that the cutscenes didn’t work, but this was an easy fix. The Steam Deck uses a kind of mad wizardry called Proton, a software layer that allows Windows games to run on Linux. You can install & use ProtonUp-QT (from Discover in Desktop Mode) to download a more compatible version of Proton GE if the app does not work correctly (in this case, Proton-7.3-GE-1). You can check compatibility for each game you want to play here. After this I had a very, very happy time playing this classic again!

Minecraft: Java Edition
No journey was wilder than the one I had with Minecraft: Java Edition, but lord do I love the way this ran when I got it how I wanted! Minecraft is an unusual one not to be available on Steam, but that’s just the way the cookie crumbles. The easiest way to get Minecraft up and running is with PolyMC, a launcher that allows for easy management of multiple accounts, mods and resource packs on Linux, as well as a download client. [Edit: DO NOT DOWNLOAD POLYMC. It was a safe Minecraft launcher to use at the time of writing, but has since been compromised by malicious individuals. Instead use an alternative. I have chosen to use the beautiful GDLauncher (via Discover), you can find installation information here. You can also still follow the next emboldened instructions for which mods to download.]. So this part is easy, but anyone who’s played for a while before knows how good Minecraft can look with shaders and mods, and I really wanted to test the Steam Deck! For some reason though, I was confused at how to get there. So confused in fact I tried to go back to what I knew before, which was using the official launcher with an optimization mod called Optifine (the classic way on Windows). Then I made a giant misstep: I went through the Java installation process (as this was required in order to install Optifine using a .jar installation file). This was incredibly painful, as you needed to use text-based commands to install it, and I had to perform numerous Google searches as I kept on running into issues. This is an example of what can happen if you venture outside of Discover. It turns out I was foolish because I could have simply downloaded everything I needed for Minecraft in PolyMC (‘Edit Instance’ > ‘Download Mods’) [edit: changed for reasons above] in GDLauncher (‘right-click Minecraft Fabric instance’ > ‘search for mods’). If you want my recommendation for getting shaders and mods running easily, download the following and don’t ask questions: Fabric API, Iris, Lithium, Mod Menu, Sodium & Starlight. The end product has incredibly clear and extensive graphic options, a drag and drop interface for shader packs, mods etc. and a highly optimised lighting system that is reportedly better performing than Optifine. With all of this out the way, at around 8 chunks render distance and simulation (with Sildurs ComplementaryShaders) I got 60 fps most of the time, something even my desktop GPU even had trouble with at times (OK it’s a dinosaur GTX 970 at this point but still!). I may have taken a lot of screenshots ([Steam] + [R1]). One final note, and that’s the controls. They shone here like never before, and easily gave this game the edge over Minecraft on other controllers. You could have the controls so that the gyro could be used to fine-tune block placement, the d-pad could represent perspective, debugging and screenshots and the left trackpad could have a radial menu to quick-select within the hotbar. The rear-grip buttons also came into their own here, assigning crouch, dropping blocks and chat here was great. Also a note here, if you plan to play games not native to Steam, you will need to find a suitable controller layout on occasion. This can be found by pressing [Steam], then selecting the open game in the top-left corner, then ‘controller settings’. A whole bunch of really handy layouts submitted by the Steam community (regular folks like you and me) can be found here. You can also find an exhaustive guide for customising Steam controls in this awesome post. For the full and labelled control scheme I modified for Minecraft, look out for PlanetSuj!
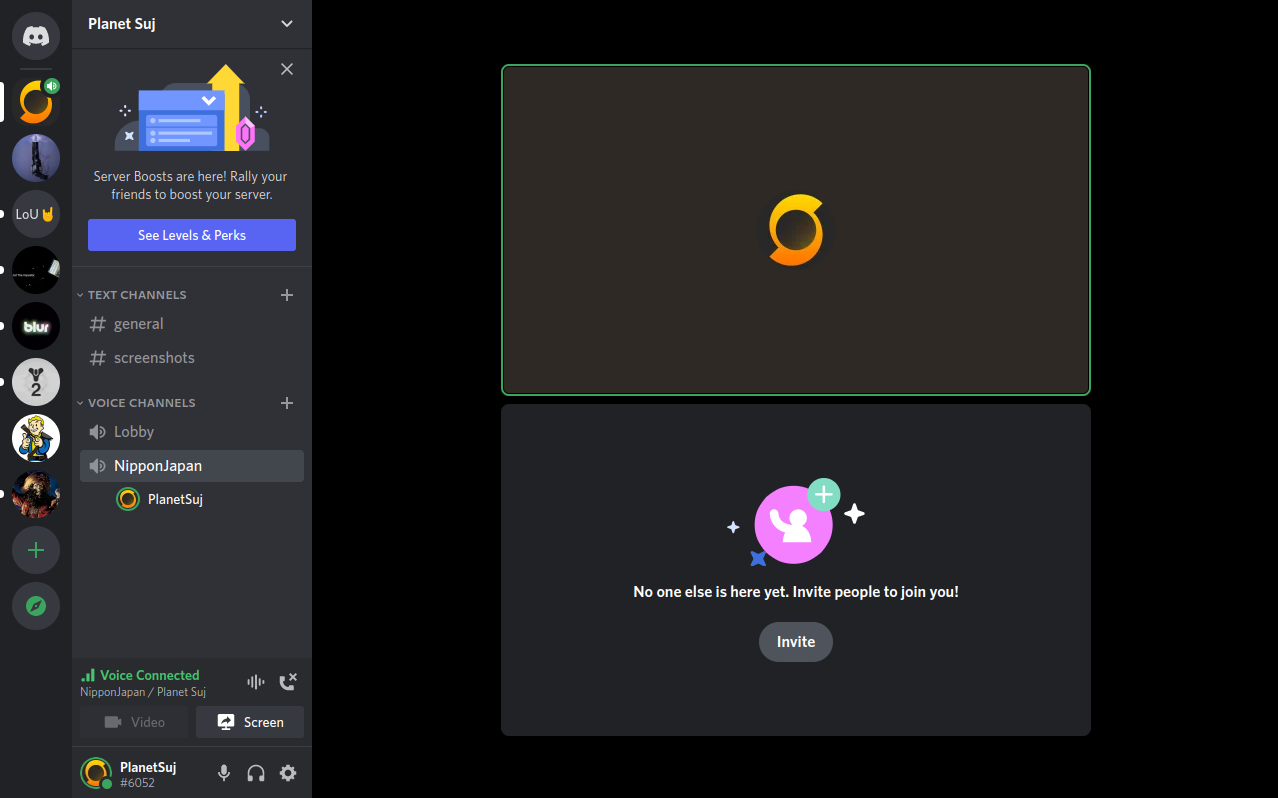
Discord
We all know that every gamer needs Discord to voice chat when online. You’ll be happy to know it was as easy as downloading this via Discover, and once again adding it as a Non-Steam App in the Steam desktop client then logging in. Very straightforward. It also worked both in Gaming mode and in the desktop client – at the same time as playing. This kept on surprising me, perhaps just because of the times we live in with smartphones: the fact that true multitasking was in a portable device other than a laptop. If you wished you could play Spotify, be on Discord chatting and play a game all on the go in one device, now you can! One thing you may notice with some Non-Steam Apps in Gaming mode is that they will start as an application and can only be controlled by touch screen sometimes, which was the case here. Although you may find this preferable over using the right touchpad to double-click even if this option would be available. Another thing to note is that in the same mode I had trouble closing any apps while Discord was open. It appears anything Chromium-based currently causes issues in Gaming mode, resulting in the Steam Deck needing to be shut down with a long press on the power button. Hopefully this will be fixed in future updates. This doesn’t happen in desktop mode however; it just works like any desktop would.

Emulation with Emudeck
Of course we were always going to get to this stage: the grey area of emulation. A small disclaimer here: although you can theoretically play any emulated game on this device, you need to have a physical or digital purchased copy of the game for it to be legal to play in this way. Anything I speak of here, I own. With that said, emulation here is ready in quite literally a couple of minutes. Simply download a 700kb script called EmuDeck, double-click & follow the instructions. Every emulator you can think of will be automatically downloaded, all relevant folders for game rom images created & all Steam art applied so you don’t have to do anything much. I’ve only tried 2 emulators so far (don’t judge, there’s so much that I want to do with this device and not enough time!): PPSSPP (for PSP) & RPCS3 (for PS3).

wipEout Pulse
The game I tested was wipEout Pulse (PSP). I knew this one was going to work as it plays on most Android smartphone emulators, but even so it looked amazing on this screen. It was incredible to finally play at this quality on a display that is in excess of 7 inches. I also modified the UI using an HD remaster which you can find on this excellent github repo (download using ‘Code’ button, then follow the readme file to rename the main folder correctly).

wipEout HD Fury
So I ramped up a bit and tested wipEout HD Fury (PS3). This is the first real time I saw the Steam Deck struggle. Bear in mind that the original PS3 had a six-core processor, whereas the Steam Deck only has four. The fact that this even runs at the occasionally 40-50fps I noted was very impressive. It took time to load at the beginning of the race and when there were AI opponents, or in the constantly re-texturing Zone mode, and it did crash a couple of times, but still. To get PS3 emulation working you also need to download the latest update.pup file for PS3, and copy it to the update folder in each game you play. There may also be occasional times where you need to copy over a bios file, such as on previous PlayStation generation devices. If you’ve never played an emulator before, placing the game file in the respective roms folder is the main thing to do.
Things to Know
It’s been quite a journey so far, so let’s step back from the testing & technical stuff, and I’ll tell you things you may need to know if you’re considering a Steam Deck. There are three models: 64GB, 256GB & 512 GB. I opted for the full-fat, all guns blazing 512GB model. I did this for a few reasons. Firstly, I wanted the fastest memory as it saves you time every time this handheld PC does anything. Second, although you can disassemble your Steam Deck, I won’t feel I need to do this even in the first year to upgrade memory (there’s always the Micro SD card slot anyway). Thirdly, I wanted some headroom in case I want to use this as my primary computer (you heard me right). It’s a very powerful machine, and I have begun to question whether I need a desktop now. Lastly, the anti-glare screen on this model will allow play in more situations. And yes, one of the reasons was that blue Steam Deck logo and grey inner lining. I just want to be the cool kid!
Let’s go into some things about this model. The anti-glare screen does its job; I don’t see reflections and can focus on game time. It does come with a small downside though – because the outside of the screen is etched (microscopically roughened), it is harder to keep clean. Valve recommends just using a microfibre cloth in their care and maintenance advice, and after using a simple screen cleaner I concur with that. I’d also recommend against using isopropyl alcohol cleaner. The 512GB of storage also gives you peace of mind, that 1TB MicroSD can wait for a bit.
On the Steam Deck in general, you’ll spend time adjusting settings to optimise battery life. This boils down to three main things: refresh rate, screen brightness and frame rate. These can be set via quick settings per-game if you wish. The lower these are set, the more battery you'll get (I should patent that slogan!). If you use Desktop mode just be aware that Linux can be complex if you stray away from the default customisations, but it can also be a gift for the true enthusiast! The only problems I suffered was when attempting to log in to Dropbox and Spotify in Desktop mode initially, although I got into Spotify by finally managing to cut ties with my Facebook login and log in normally. For some reason nothing happened when trying to sign into Dropbox, so for now that’s browser-only. Of course, you can absolutely use your device in Gaming mode with Steam games exclusively and not step foot into the Desktop mode.
A couple of handy tips for you here. It’s best to use the rear grips by pressing the button from the back of the device rather than the grips. If you have trouble with these, use this tip to improve your muscle memory over time. Another very simple tip is to move the ‘Return to Gaming Mode’ shortcut to a different folder, then right click and create a shortcut on the taskbar. Not only will your desktop be cleaner, but you can click once with mouse or tap no matter where you are. You can thank me later. Finally, a mod called DeckyLoader can help add functionality to the Deck and make other aspects better. I mentioned before that I missed the bold colours of the Nintendo Switch’s OLED display. This can be improved by installing vibrantDeck and raising the colour saturation, and take it from me it’s very impressive.
The system gets updated regularly, so you will see new features and optimisations all the time. For instance in a recent update, Valve added the ability to change your boot screen video on wake up and power on, using a video in .webm format. This is significant as this was previously an unofficial trick on Reddit, pulled off by changing a code line in a file and placing the video with the correct size in a folder in a certain location. Valve listened to this and added the feature officially, in order to stop people potentially breaking stuff while also adding a nice new feature that was clearly popular. This really heightened Valve’s reputation even more in my eyes.
What Are the Next Steps?
So here we are. We’re finally coming to the end of our journey together, so here’s what’s happening next. At this point, I have tested many things and now begin the assimilation phase. Ever since watching more Steam Deck videos on YouTube, I envisioned a dream setup which revolves around just having the Steam Deck as my everything. I could take it out and play games on the go, then dock it at home and use it as my PC. This brings me to the Steam Deck Docking Station. Anyone that has had a Steam Deck since February, I salute you. You’ve waited a long time for this. I lost patience with it myself and ordered a third-party solution that offers 4 USB ports, HDMI, ethernet and power delivery (to keep the Steam Deck powered by its charger). Irony of ironies, Valve announced it in the evening of that day! After placing my order for one, I decided against it. Then the dongle I had previously ordered arrived damaged, so I got annoyed and slammed down my wallet on the Docking Station. Then after I calmed down I ordered the Amazon one again. My curiosities about both potential set ups are difficult to satiate it seems.
I’ll be using the Steam Deck as my primary game console and PC, really testing its prowess on external displays in both modes, mouse-heavy games such as FTL:Faster Than Light, and Windows productivity apps such as Affinity Designer (one I definitely use every now and again). Perhaps I’ll even try using a different setup: the Docking Station on the TV at some point and the USB-C dongle as a go-between for both my laptop and the Steam Deck. Thanks for reading this far. I hope you’ve enjoyed it, we shall see what happens and I’ll get back to this at some point soon!

VGM Vinyl - The Latest Additions
A pretty awesome set of videogame music vinyls this time round, more info on each of the ones pictured are below!

Doom (2016) - If you’ve checked my previous posts, you’ll notice that I’ve already bought the Doom vinyl collection as one of my first ever set of vinyls. So why have I bought it again? Simple, in a rare event the limited edition 4LP anniversary collection became available at RRP due to overstock. Good thing I got it too because it sold out in one day! As you can see it’s enormous, and even includes a thematic slipmat. Definitely going on the turntable when I get one. Of course, I also just had to have Mick Gordon’s incredible soundtrack in full with no compromises. You can’t see it easily, but if you can squint you can see that red & black murkiness of hell as the vinyl colour.
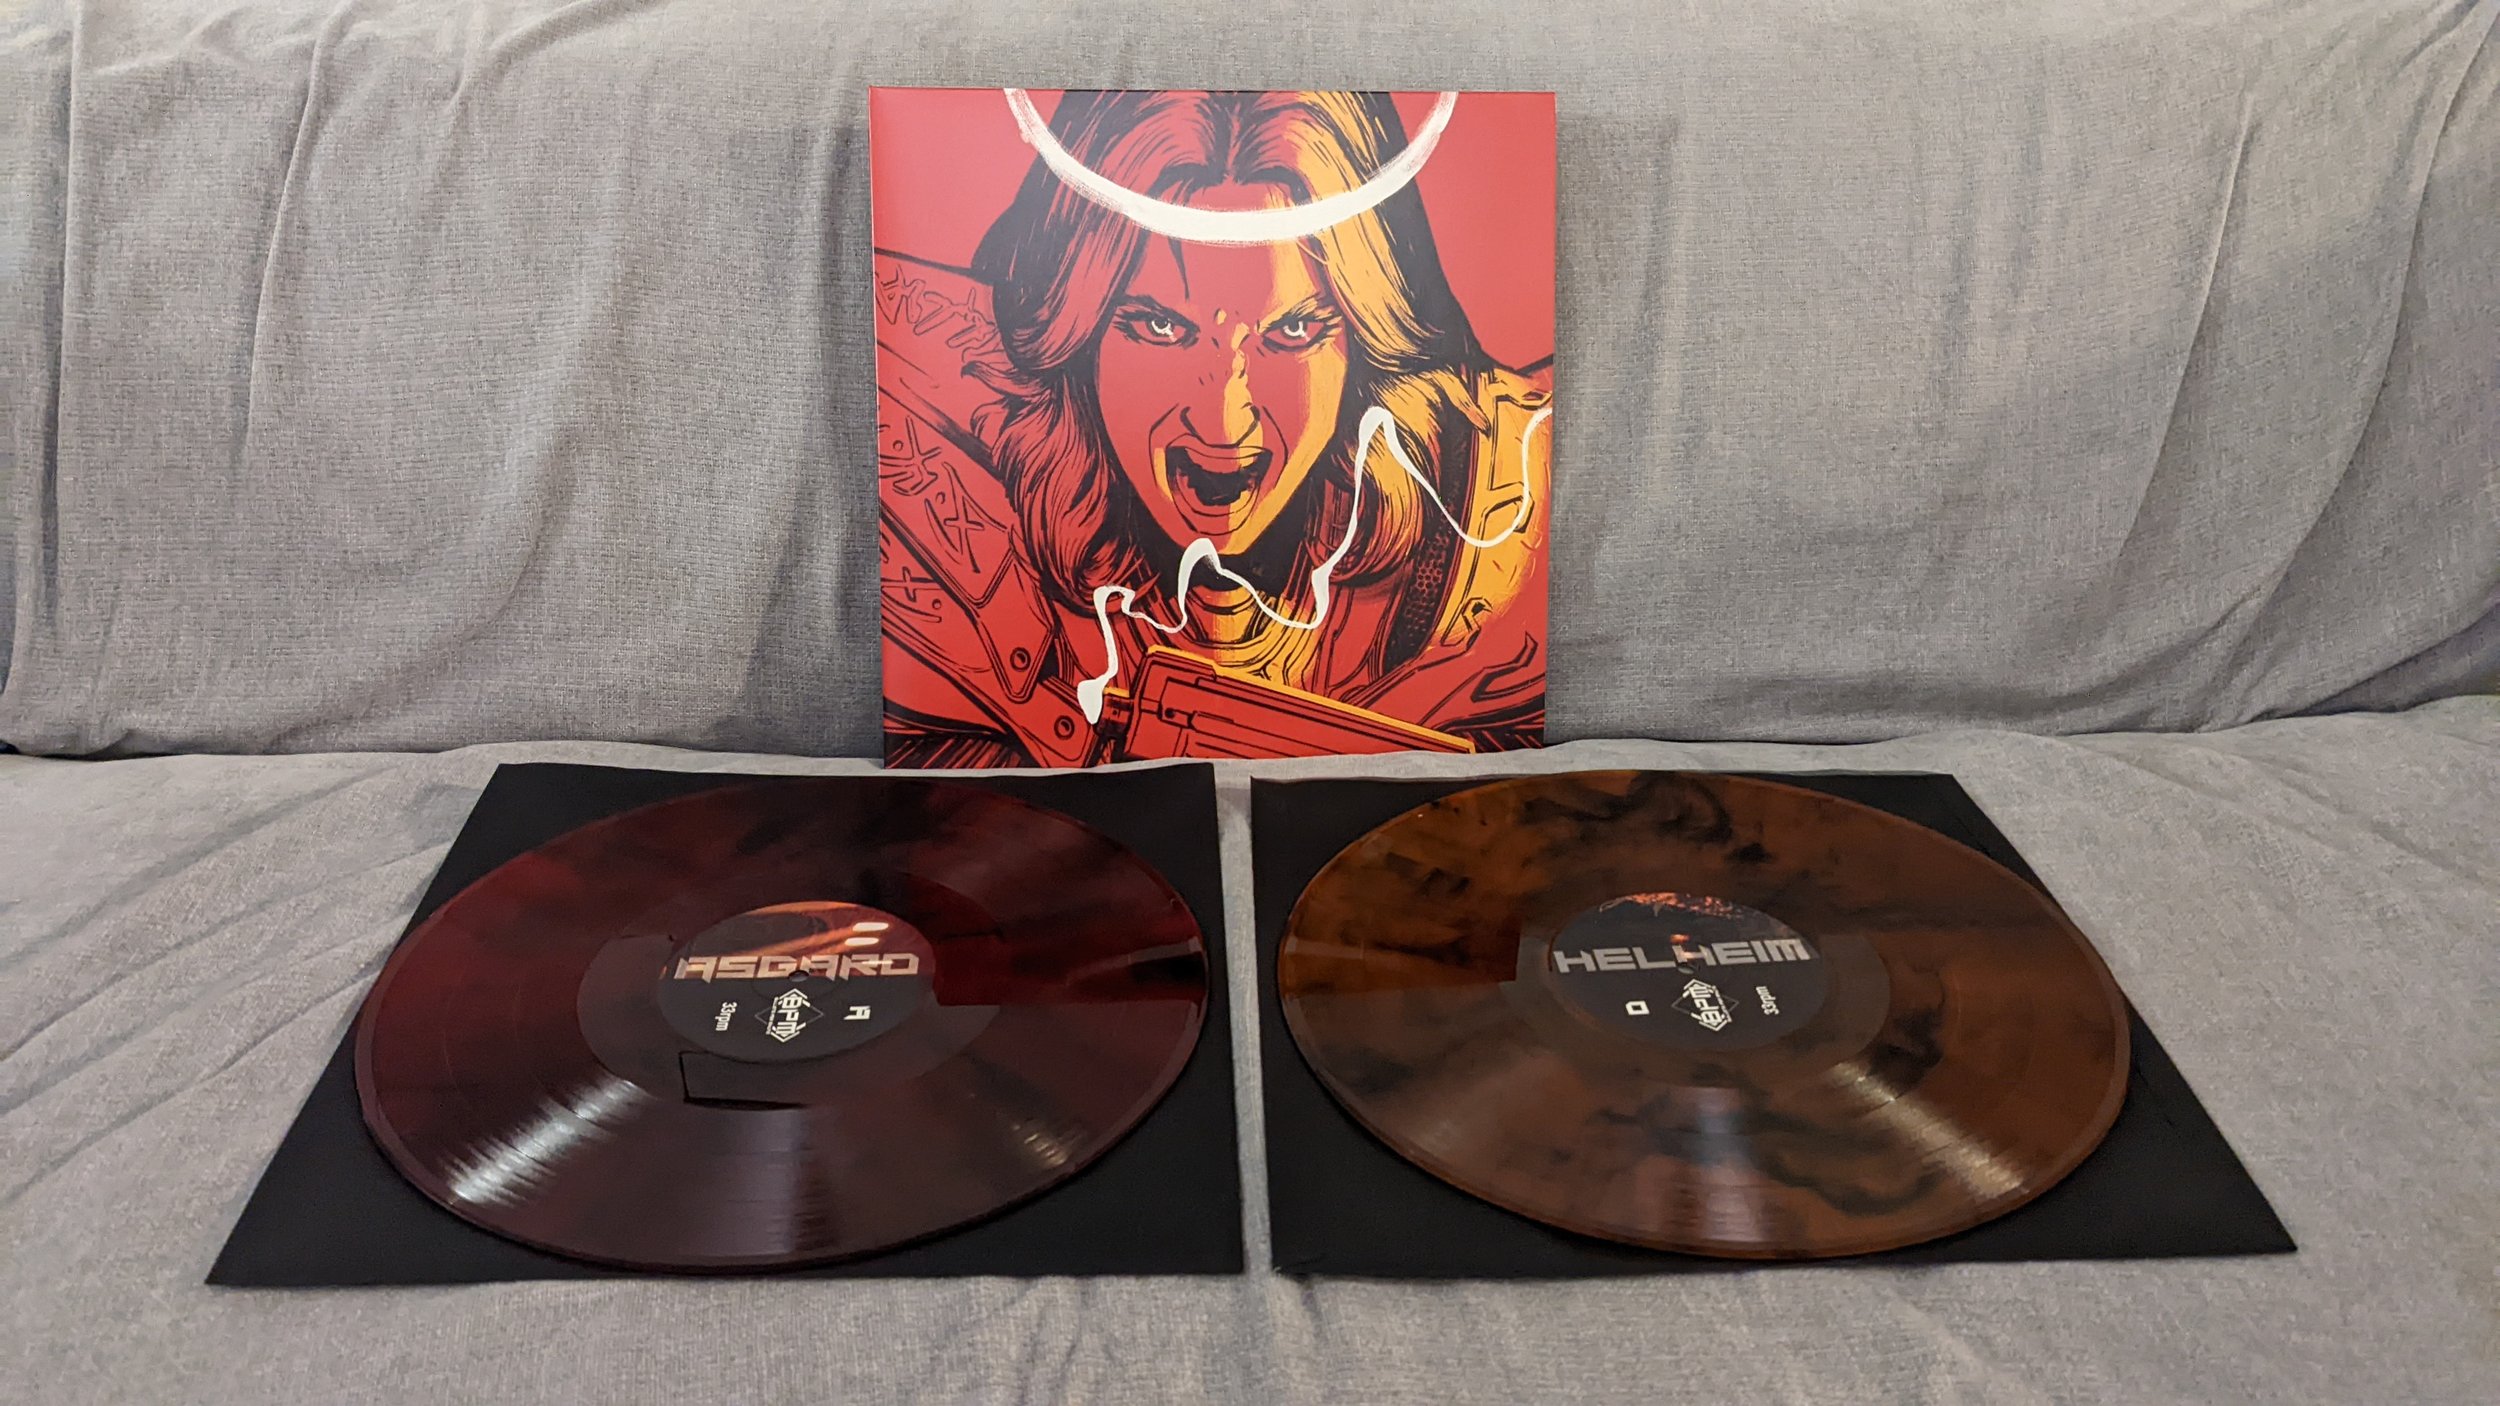
BPM: Bullets Per Minute - Sometimes more affectionately known as the original ‘Doom: The Musical’ within the Reddit community, you take on the mantle of a rather angry valkyrie by the name of Göll. Similarly to Doom, you punish a load of baddies but as a twist on the formula, it adds a rhythmic element. This means you have to fire to the beat, reload to the beat, dodge - you guessed it - to the beat. It can be challenging not to go out all guns blazing as uaually happens in a first-person shooter, but hitting the beat flawlessly & brutalising a room full of enemies is incredibly satisfying. The particular room-based roguelite style gameplay also reminds me of the glory days of Binding of Isaac. The smoky finish is incredible on these, and matches the shader colour palette of the game perfectly. The metal soundtrack is awesome, but for some reason I keep coming back for that whistling tune of Huginn's Shop!

VA-11 Hall-A: Cyberpunk Bartender Action - I’ve already reviewed this game here, but for those that don’t know this is a visual-novel style game with a unique bartending mechanic that is used to influence the story. All this is cleverly explained by the barternder (Jill) herself: “It’s time to mix drinks and change lives”. Although I found that this was less influential than I’d hoped, I did still very much enjoy the game and I kept listening to the soundtrack on repeat on Spotify. Particularly the track named Every Day Is Night. It’s a kind of dreamy-synth soundtrack that puts your mind into the moonlit lounge of a midnight bar, while you sip that cocktail. Good job Garaod!

Thumper - Last but not least we have another rhythmic game, but this one is different. The game is often marketed as ‘rhythm violence’, but I’d class this as more of a ‘rhythm horror’, or ‘rhythm nightmare’. Here you are essentially a supersonic chrome beetle, coasting along at breakneck speeds as varying obstacles speed towards you. All this while the horrifying yet alluring soundtrack builds and builds in intensity and the backdrop evolves with imagery of skulls and uncomfortable shapes. The haptic feedback really kicks in your hand (at least on the Nintendo Switch version), and you can feel your palms sweat and your fingers gripping those buttons while you hang on for dear life attempting to keep up. It truly is one of the most intense experiences I’ve ever had in a video game, and it goes without saying that the soundtrack became essential. And it had to be the limited edition 2016 pressing because it’s very pretty.
I’ve just updated the previous posts with the inner gatefolds and actual vinyl pictures, as they look too good not to be there. Check out the updated posts under the vinyl section in the archive. That may be it for a little while with the vinyls, as only more expensive ones seem to exist on the list at the moment. More in other areas will be coming your way soon!

Steam Deck - An Unboxing & First Impressions
So in my last update, I had a great time at EGX. One of the most exciting moments was when I played a game where you quality control toilets (Aperture Desk Job). Doesn’t sound like much until you notice the ammunition pipe above the toilets with bullets shifting through it. Then a smoking toilet comes out and things just escalate from there. This demo serves as Valve’s introduction to their marvel they released little over a year ago, a wonderful device called the Steam Deck.
This is made with the express purpose of being able to play all of those juicy Steam PC games you’ve amassed over the years, as well as being a device that was yours and yours only. Something you can hack as both software and hardware. I mean Valve even released a teardown video that you definitely shouldn’t do (any Portal fans hear Glados yet?). For those that don’t know, to get a Steam Deck you have to first reserve it. You then get an email back that gives you a window of 72 hours to purchase the device. Once I received this, every night was like the night before Christmas as a kid; I couldn’t sleep because I was so excited. In what must have been a joke, I received an update from the courier that said they would deliver the device on the day - just when I was waiting in the queue to play it at EGX. You can’t write this stuff! Needless to say I was a little distracted from that point onwards, knowing that this was waiting for me at home:
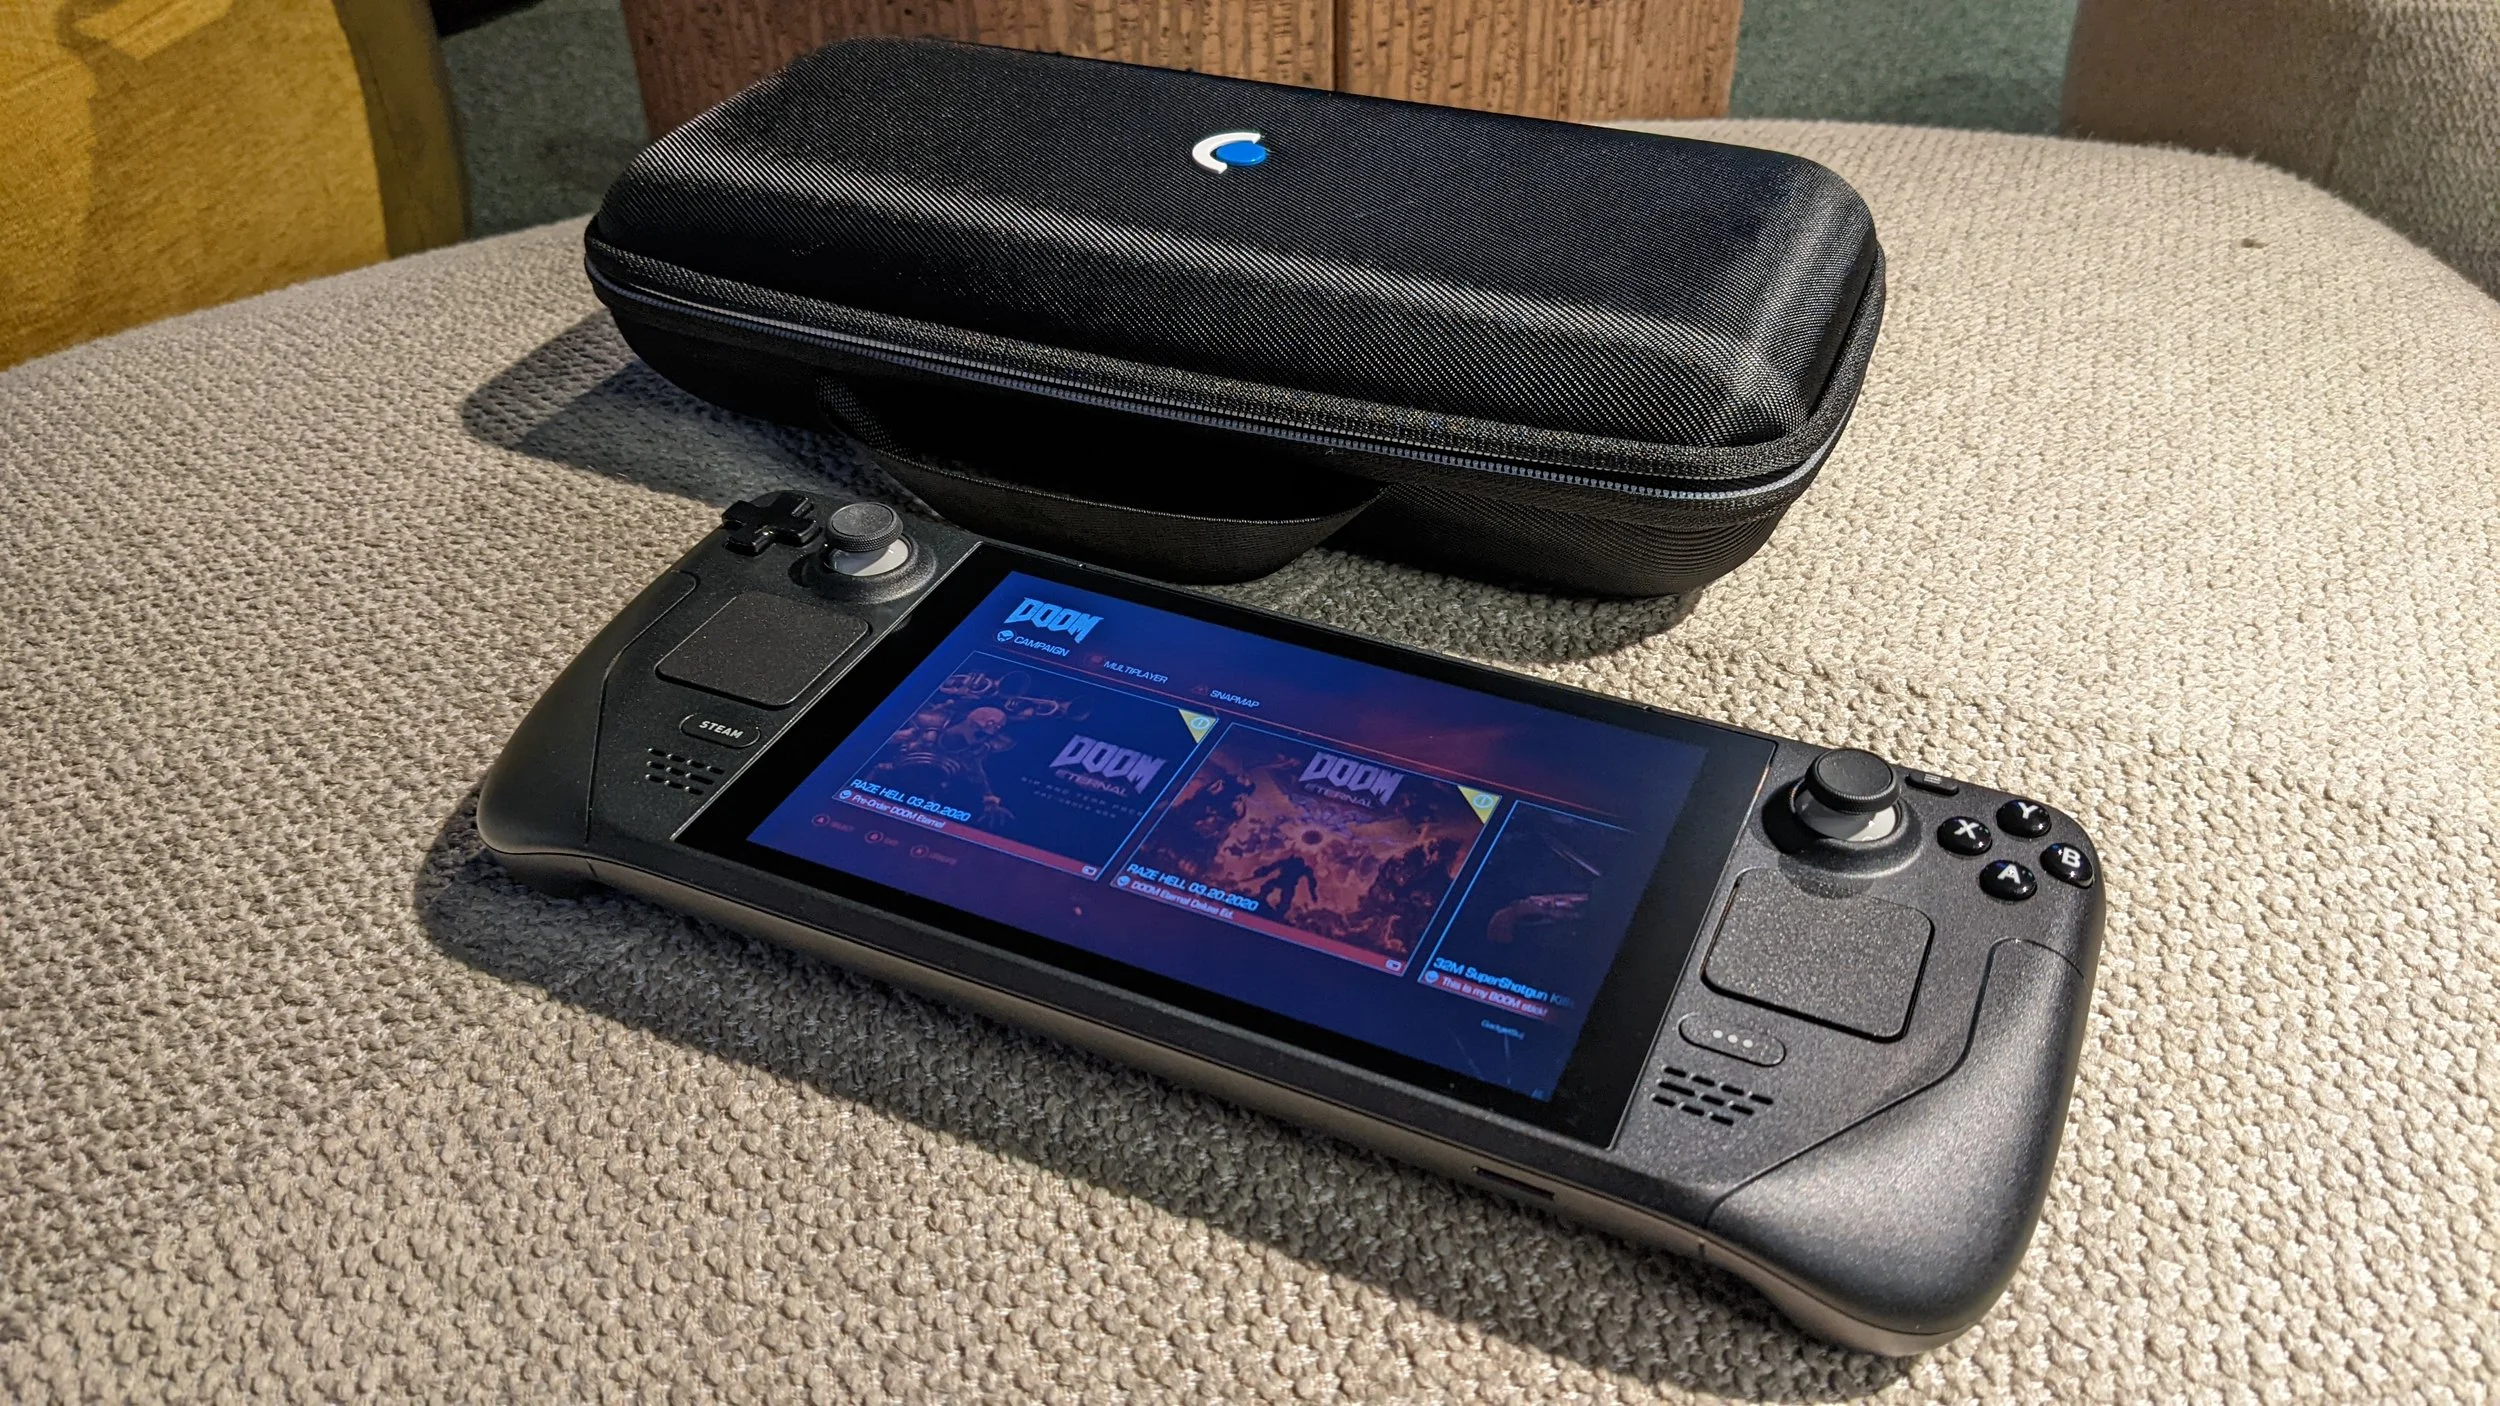
There are moments in your life when something comes along and forces out that inner child. This is certainly one of them, in fact I haven’t put this thing down for just over a week and put this blog to one side to really get into how this device performs. My thoughts and dreams have been consumed by this so let’s get into it!
Unboxing & First Impressions
I wanted to do something special as soon as this arrived: my very first YouTube unboxing! Check out the video below:
Apologies for the quality of the video, should have been more ready for when the Deck dropped in! As you’ve seen this is a truly beautiful device. Picking this up for the first time, despite it’s size, when you had it in your hands it felt just right. The controls all felt perfect to press with full unencumbered analog triggers for once (I really missed this with the Nintendo Switch, as they are digital and just didn’t have that feel). The grip of the controls just fit perfectly and the large size of the device just seemed to vanish as you prepared to enter the game world. It was also very light, yet very sturdy. On a more personal note, something about that acidic plastic smell of the device just eased me in to the divce and accentuated the experience for me. Maybe it felt nostalgic in a way.

Switching the device on, I was greeted with the smooth animation of the valve logo and the nice sound jingle of the Deck. The screen looks nicely detailed, slightly less colour than the vibrant display of the Nintendo Switch OLED, but then again cuts had to be made somewhere with the incredible price tag to quality ratio. Navigating around the menu you really got a feel for the solid presses of the D-pad and the front-facing buttons. The bumpers and rear-grip controls will take a little getting used to as they were a little harder to press, but this will help greatly with some PC games where more controls are required. The dual trackpads have a pleasant haptic feel and for the instantly switchable desktop mode (yes this is a full-blown Linux PC underneath), they also reminded me of a trackball mouse. The touch-screen was nice and responsive.

The first game I played on this was Dying Light. It was going to be Doom but the download size was a whopping 60GB, and I’ll be honest I was getting impatient. First impressions on this were evident: my jaw was dropped the entire time! After playing ports of PC games on Switch, which now has less specifications than some smartphones, the clarity was incredible. There wasn’t any cloudiness or resolution switching optimisations which were required by the Switch due to hardware limitations. The environment outside was breathtaking. I also noticed with the game being Steam Deck Verified (a special tag Valve gives to games when they have been given the once over to check they work perfectly with the Deck), that the graphics settings were limited. To be honest though, you don’t need ultra-high resolution on a 1280x800 display and it felt just like how I remembered. The controls were an absolute dream and I once more felt very immersed in the beautiful, fictitious city of Harran. Long story short, it worked beyond my wildest dreams!
This post came out a little late, so very soon I’ll be posting my experience of the first week with this awesome little device. Stay tuned!

EGX: A Grand Day Out
For those that don't know, there is a massive event in the UK for all the gamers out there, known as the Eurogamer Expo or EGX for short. And it is very popular, as the early access line (on Thursday I might add) demonstrates:

It's no wonder then that many developers and publishers, even hardware manufacturers want a piece of the action. But of course there was one place I wanted to look for first if you know anything about me from this blog.
The Retail Zone
Of course I had to see if there was any tasty vinyls I could get my hands on, so I pegged it there first. Unfortunately, to my disappointment there was no resellers present. On the plus side, it meant I could focus on other stuff. Like these Pokémon terrariums:

Made by the lovely folks at Bespokemon they were a nice detailed little world that you could place on your shelf. Here's a close up:

Later on, there were a few other vendors visited but of course for me I had to check out some custom keycaps.

Anyway moving on, as there wasn't much else for me what with the vinyls making a no-show, I thought it might be a time to you know, play some games!
The Main Gaming Zones
There was one game I wanted to play, the main raison d'être for EGX this year: Sonic Frontiers. If you don't know, this is an open-world Sonic the Hedgehog game that has been highly anticipated since the gameplay trailer. However on my way to the retail zone….

Well that was a problem. Someone even joked the queue looked like the Dreamcast logo; it even looped past the first circle where the queue started! Therefore I decided to go to the next important place: the Steam Deck Zone.
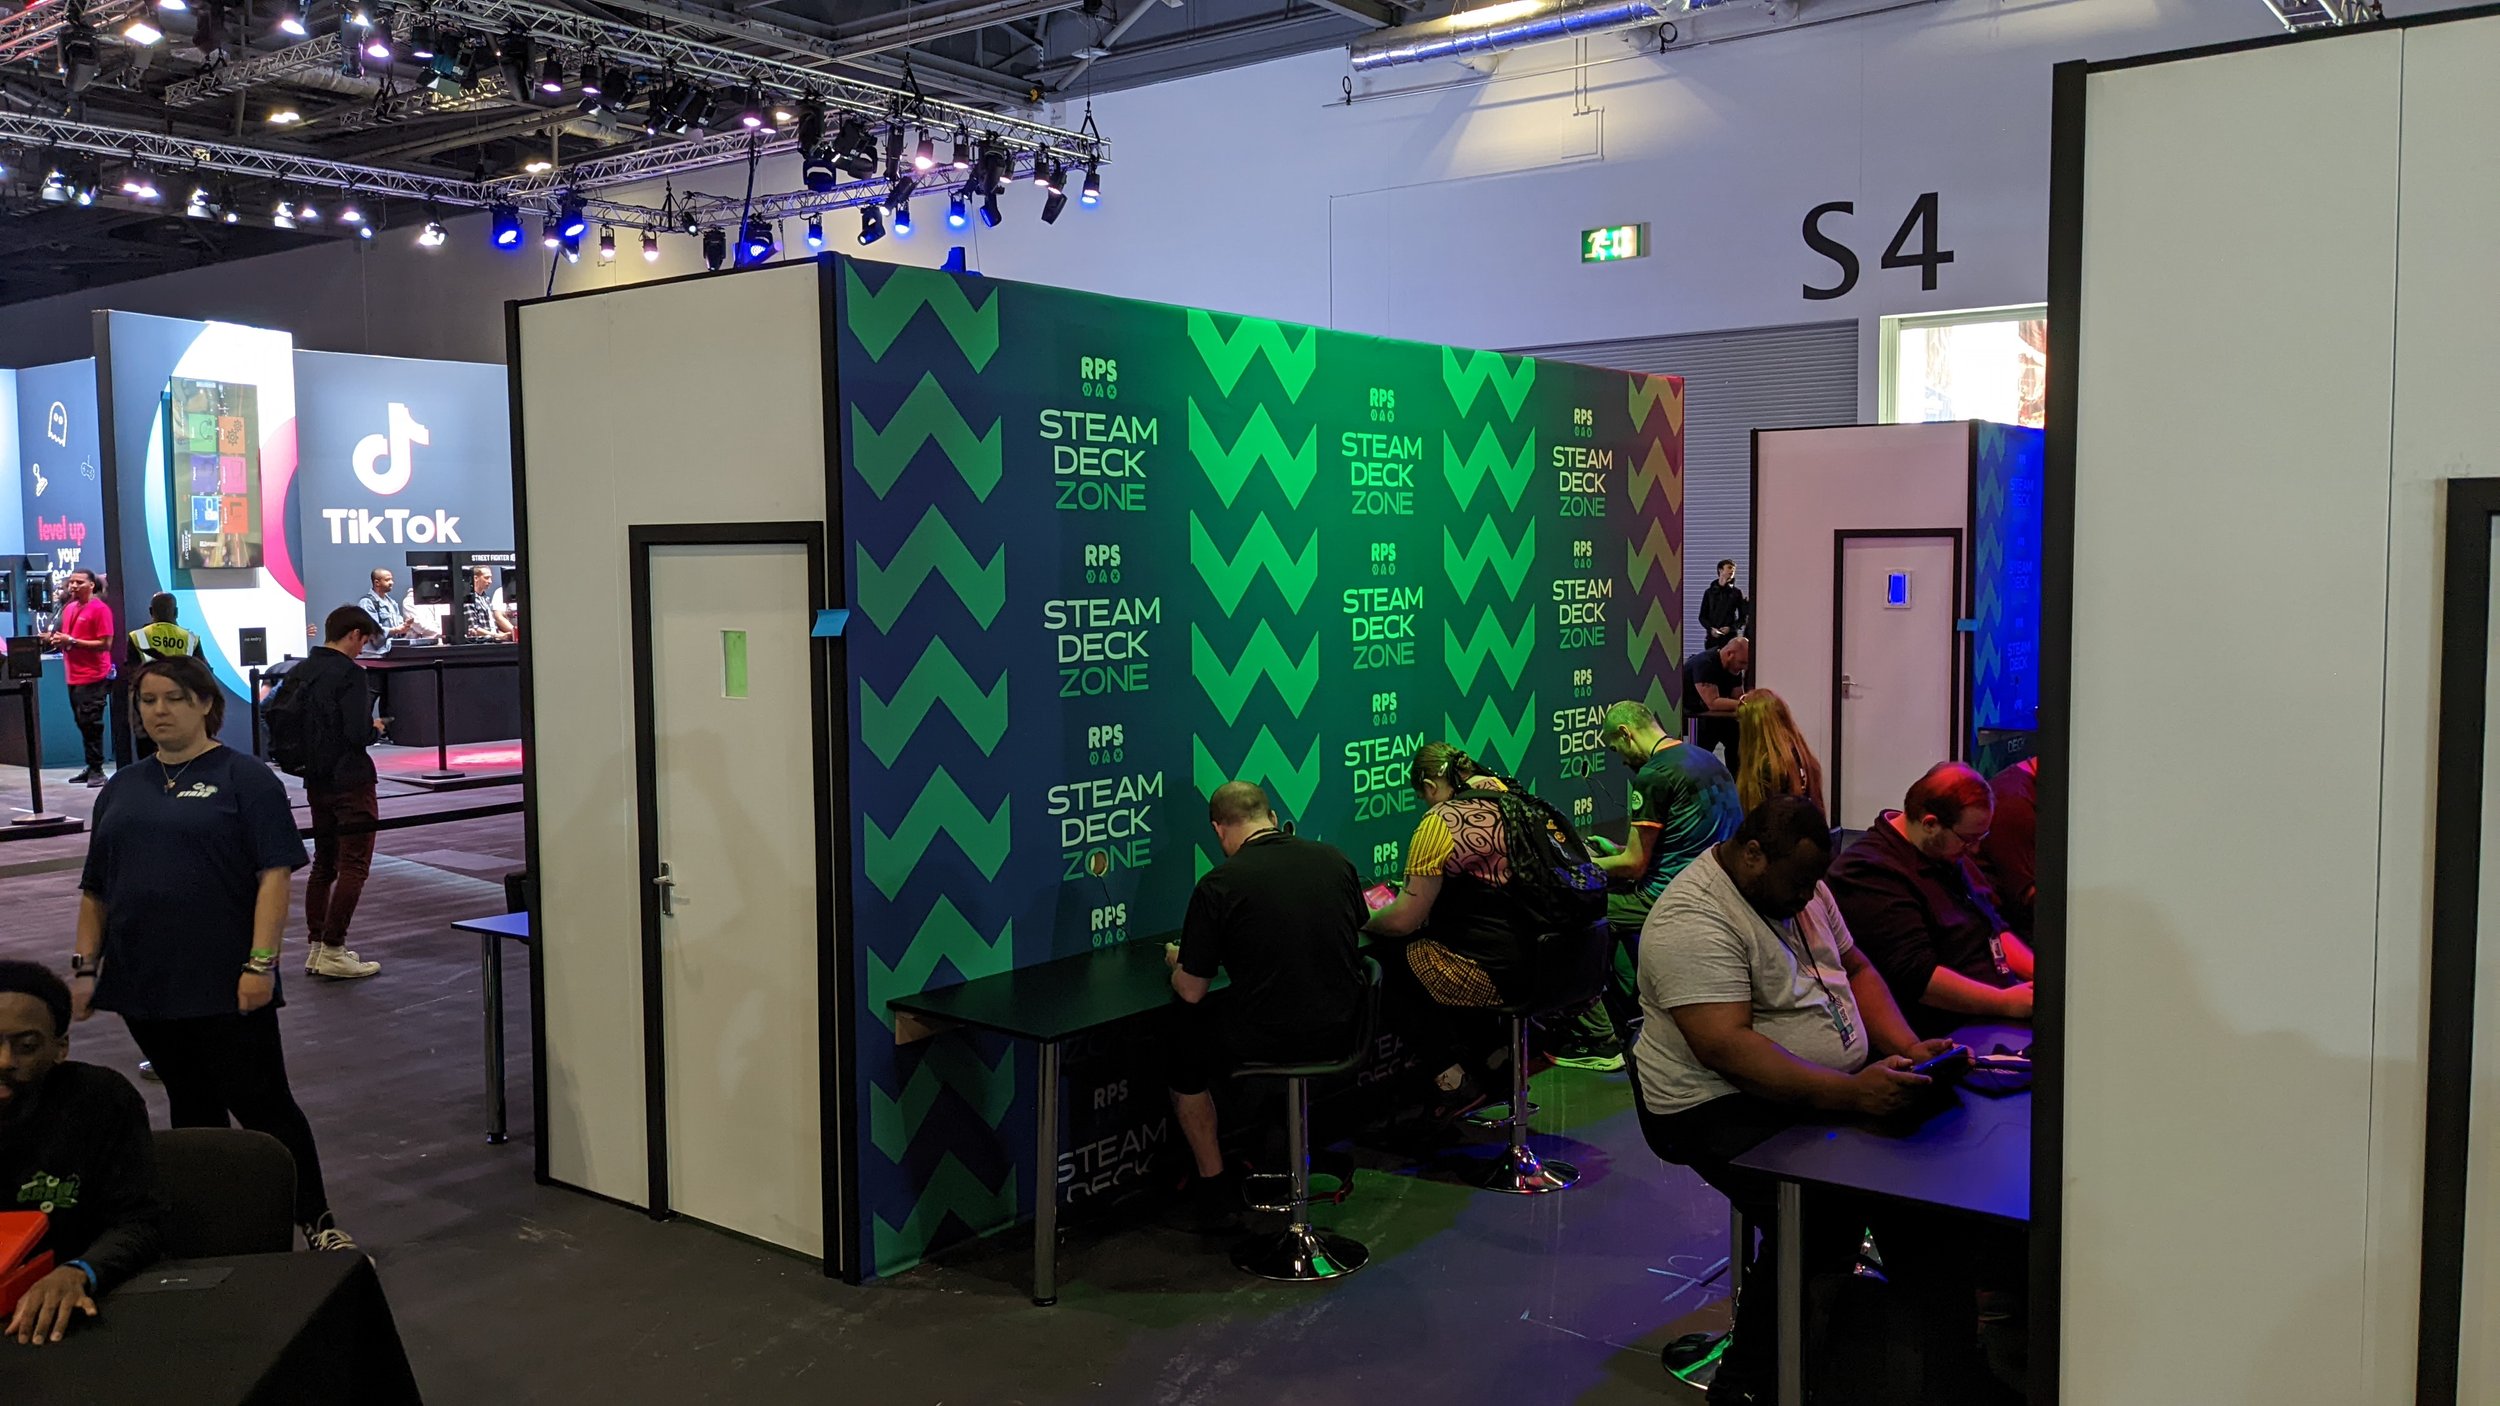
This is a device I had been waiting for for nearly 3 months, essentially a handheld gaming PC, however it also has extremely versatile controls what with the different input styles. Rather ironically, Evri (the courier about to deliver my Steam Deck) sent a text that I'll receive this by 2:30 PM while I was waiting in the queue. You can't write this stuff! Anyway, I got to the front and immediately got into the first game anyone should play on the Steam Deck: Aperture Desk Job.

It's a 20 or so minute demo taking you through all the controls of the Steam Deck, in the most entertaining way possible. In true Valve style, the first thing you do is quality test toilets. You then notice a pipe above the toilet that says ‘ammunition’ with bullets flowing through it. Putting that together with the picture above, and you know you're in for a good time! This was certainly my highlight of EGX.
Later on I found a stand hosted by TikTok, which held a few secrets.

I found some machines here that played both Sonic Frontiers & the brand-new Street Fighter 6. Finally getting to play Sonic Frontiers was great. There are some new combat features, and I was slightly annoyed that I got killed by a powerful ninja-like enemy during the demo. Still stings me as a Sonic fan. I also had a go on Street Fighter 6 which was a beautiful, inky reimagining, although my history of that game did not disappoint: I was terrible at it! Unfortunately I don't have pictures of these, check out some trailers online for gameplay.
I did also briefly visit the Retro Zone to check out some retro Sonic games as well as play a bit of Guitar Hero. Spoiler: I was rubbish. Moving on…
The Manufacturers
There was a fair number of exciting showings from the hardware specialists. Let's just have a bunch of pictures:
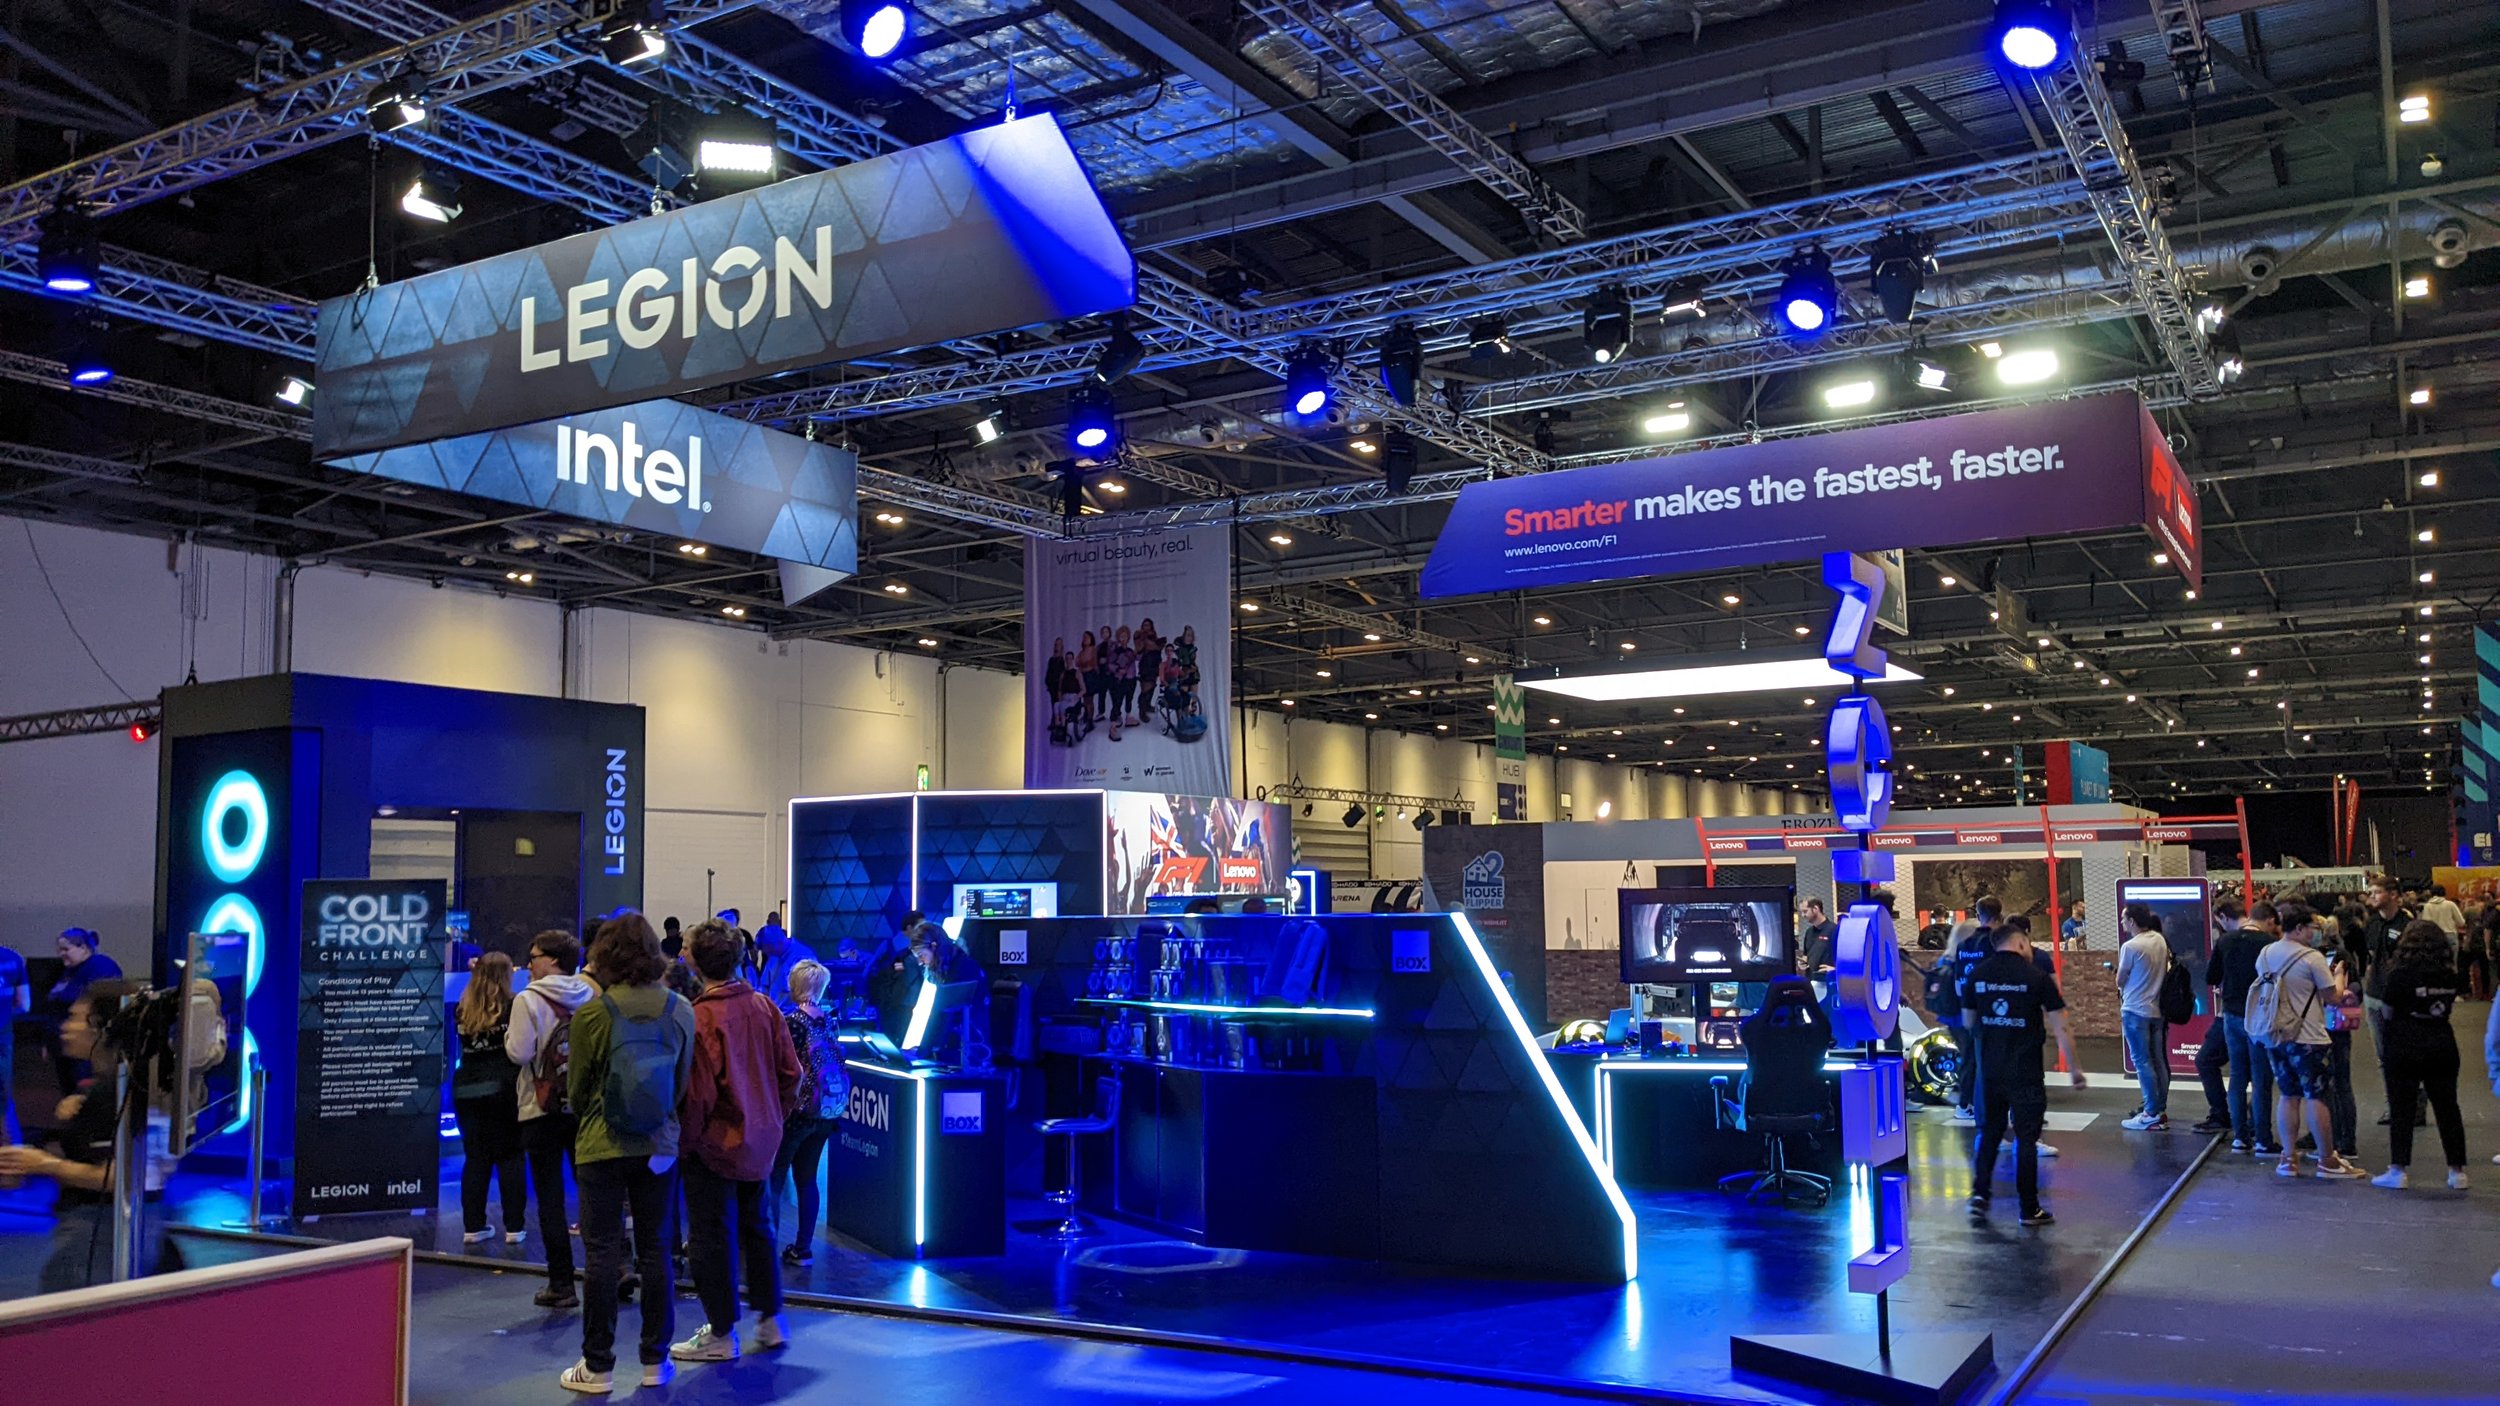


All custom PC needs are catered for here, custom towers, keyboards and all sorts. The Lenovo stand had some kind of fun competition for any Crystal Maze lovers where you leap for the paper in a fan room, although this one was shaped like a Legion tower which was eye-catching.

The Chillzone (or Horizon) stand had a lot on show from VR with the Vive to custom PCs to accessories.

I also came across some awesome Cooler Master keyboards. They are 60% of a regular size, and this has arrow keys which they usually don't. This Cherry Red keyboard was discounted from £85 to £35. I even got one of my friends to buy one. He's still trying to get me back for it!

Last notable thing was the Asus ROG Flow Z13. This is a Surface Pro style tablet with a full fat graphics card in for gaming. It was epic to see in the flesh.


The Rezzed Zone
This zone was all about the independent game developers, as usual. They also had plenty of variety as usual, I got up to a lot here. To give you an idea of how fruity it gets, this was just placed in the centre with no explanation.

I played a numerous amount of games here and they were all great. I kicked things off with a fantastic in-progress anti-gravity racer called Dune Riders. Anyone who has played the wipEout series frantically will appreciate the attention to details with the physics. For me it even outdid Pacer, which as far as I know had ex-wipEout members.

There was also a very charming RPG called Eastward which had a glorious and quite charming art-style, reminiscent of some of the moving lofi pixel art backdrop GIFs you may have seen on Pinterest and Instagram. The mechanic of switching between characters for different attacks was pretty cool.
In between these was a terrific zombie shooter called Sker Ritual that took the legendary CoD Zombies and distilled it into a standalone game. This was complete with perks, doors, a gun shop and my favourite part, Lucky the dog (or the Mystery Box). It's rather unfortunate I don't have pictures of that, guess I was having too much fun!

The last one I played was a one-button ninja game called Ninja or Die. This had an unusual mechanic of having one button for both jumping or attacking. You aimed your ninja to parkour, and avoided dangers to slashin while leaping. And it was heaps of fun!
Here are some pictures of other stuff around EGX for your delectation:


That's all folks, stay tuned for more!

VGM Vinyls: Some PSP (& PS3) Nostalgia
A few new vinyls are in, harking back to a period between 2005-2015. Here they are, from left to right:

Loco Roco - One of the happiest little games I've ever had the pleasure of playing on Sony PSP (PlayStation Portable). Here you unusually use only about 3 controls, none of them on the d-pad(!). You use the shoulder buttons to rotate the world itself and send your rolling and singing companion from one side to the the other. Of course with a happy game there has to be a happy soundtrack, which in this case has most lyrics in a gibberish language that actually sounds really good tonally. There's a lot of variety in the genres and some soles even have your chosen Loco Roco singing along!

Far Cry 3: Blood Dragon - An awesome DLC for Far Cry 3 (which incidentally is my favourite in the franchise with one of the best villains of all time, Vaas). This one is different in that it's a shorter take that's reckless and a huge parody as if injected with comical values of testosterone from 80s action films. The cutscenes are ridiculous (complete with 16-bit sex scenes), the protagonist openly mocks the tutorials, there's lasers and laser dragons everywhere. There's even an assigned button to flip the bird! It also carries a really punchy synthwave soundtrack which invokes anemoia (nostalgia for something that never happened).

Lumines - A rhythmic block-dropping puzzle game, almost like ‘Tetris: The Musical’. This unique title debuted on the PSP and was really good for those commutes. You have a grid that's 16 blocks wide, and a scanline passing over two bars at a time, erasing any blocks that form part of a square. The blocks themselves consist of two colours, and led to some frantic placing to get as many squares as possible while you race said scanline. It goes without saying that the music gets into your head over time, and although more repetitive keeps that vibe moving as you zone in.
There will be more vinyls soon, but also a trip to the fabled EGX (Eurogamer Expo) hosted in the UK. Hopefully there will be much to play and experience, as well as some secret limited edition vinyls!
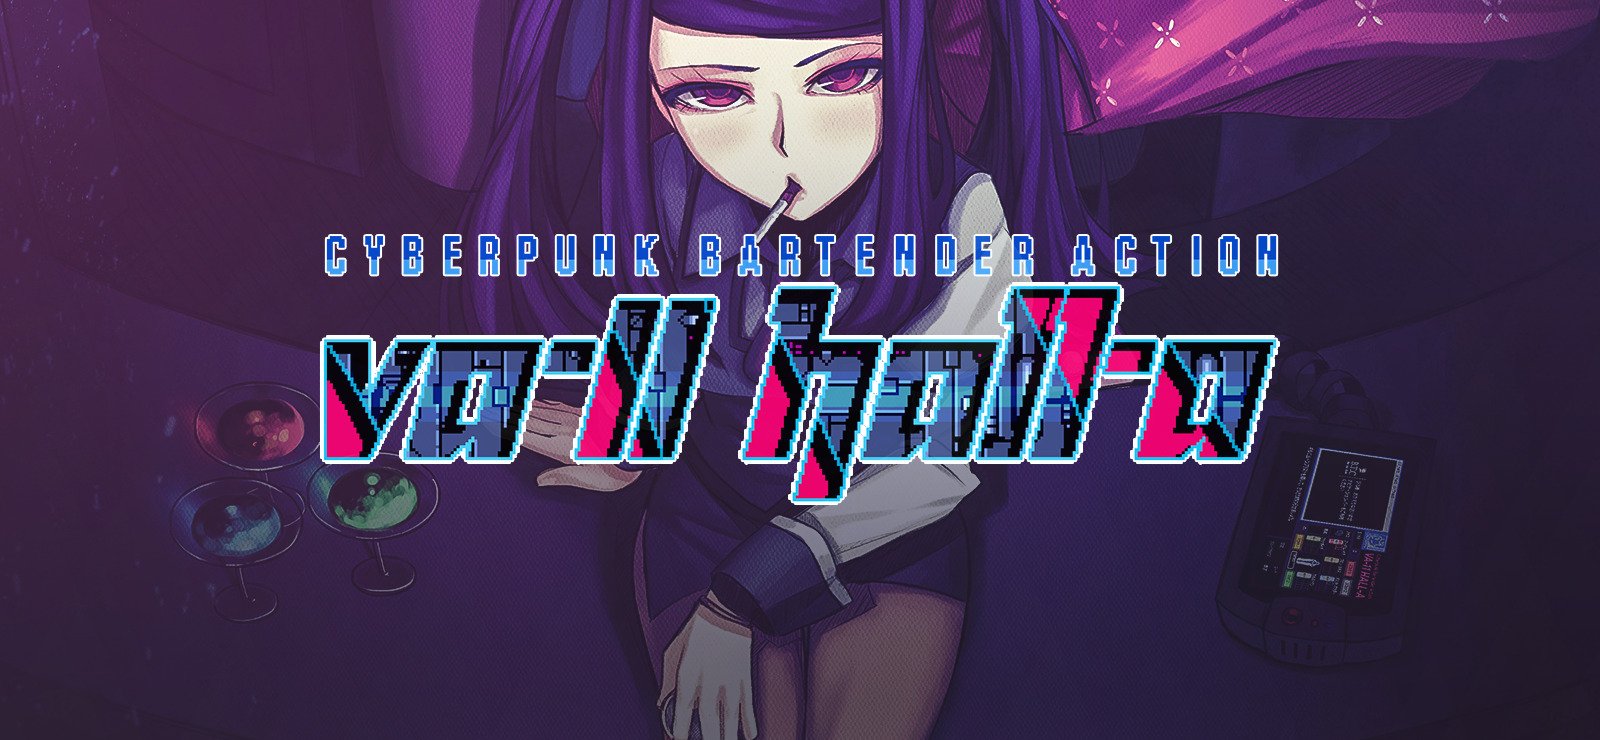
VA-11 Hall-A: Cyberpunk Bartender Action - In Review

There comes a time in everyone’s journey when they need to take a step back for a moment. For whatever reason things just aren’t coming together and they let their mind drift. Quite often in film (or in my case on Netflix), this is where they enter a local bar and have a one-to-one with whoever happens to be serving drinks at the time, while they work through their thoughts. I often romanticise the idea of playing the neutral bartender character in series such as Bartender or Midnight Diner, offering sage advice or the perfect drink to help out a client. And at least for the second part of this, a certain game exists by the name of VA-11 Hall-A: Cyberpunk Bartender Action (or Valhalla as per the bar name).
This game takes the formula of bartender & client heart-to-hearts, and switches it up by positioning the bar in a cyberpunk dystopia in the year 207X. By correctly utilising mixology, you are able to change the way the dialogue branches as well as how well you are rewarded. The time setting allows for some interesting conversation on deep philosophical topics and clients don’t hold back (as well as the bartender sometimes), more so than in any other visual novel I’ve played. Get ready for a night to remember as we shake up some conversation (and earn some tips in the process).
The First Night

It all starts off with a basic refresher from a fellow colleague by the name of Gillian (or Gil for short). You play the role of a somewhat dry (sometimes childish humoured) bartender called Jill. She sometimes refers to Gil, as even some clients do, as John, because he has a bit of a ‘John’ face (a running joke that always made me snigger). She seems a little distracted however, as there is a lot going on, including an impending rent payment due else eviction looms. Dana (Jill and Gil’s boss) also makes an appearance with a mysterious unconscious figure draped over her shoulders. Jill is unhappy about this, as if they wake up all hell will break loose. Dana asserted that Jill will just have to deal with it when it happens.
Once the tutorial is complete you then serve your first client; a highly chauvinistic chief editor for an online newspaper. Here you get your first initiation on how cutting the dialogue is by making him a big beer. The first time I made a small one by accident, which prompted him to say something along the lines of: “No I want the beer big, like my dick!”. Turns out you got initiated into the cutting dialogue in the game, which is one of its biggest strengths. If you didn’t make the same mistake as me, you’ll definitely get this from the next client.

One aspect I did find slightly odd during the tutorial was that Gil was testing Jill on making drinks, instead of the more authoritative Dana, even though she was the one that was bar-trained. Directly after the tutorial which he delivered in a somewhat authoritative way, he then becomes the butt of the joke for virtually the rest of the game.
At some point the unconscious customer wakes up, then starts demanding to know where they are. Of course this does not go down well when they are told the bar name: Valhalla. Of course they then start getting panicky, so you are tasked with fixing a good strong drink to calm her down. This introduces you to the intoxication aspect of the game, which is controlled by how you mix drinks. More on that later.
Let’s Set The Mood
During your first night as a (hopefully successful) bartender, you set up a playlist on the jukebox for your shift, and there just so happens to be a rather extensive amount of music available to create the ideal mood. For my personal taste, there was a lot of suitably dreamy synth work as if for a starry night. I also loved the intro song Every Day Is Night. Hearing this every time a shift was started was almost a ritual in itself, along with Jill’s catchphrase: “It’s time to mix drinks and change lives”.
To go with the music, there is also the highly anime-inspired art-style of the game. Each character is beautifully and thematically drawn, with a constrained set of colours in the palette to align the style, almost like an improved version of NES graphics. The neon signage behind the customers was also pretty cool. I liked that you can change the TV channel, which of course I always changed when possible to the famous Robocop reference: “I’d buy that for a dollar!”.
If I had to level a criticism here, although there is considerable joy in the freedom of being able to change your music for the night, I would have liked this to change or be interrupted more frequently to intensify game events or dramatic points of conversation. Perhaps it’s the Ace Attorney player in me but as an example, it makes the music much more dramatic during tense moments, but also more curiosity inducing while probing a witness in the courtroom. I felt it added more gravity and I’d like to have seen more change here, if only to add a more diverse set of moods to the story. This is particularly relevant with the White Knights, a group of self-proclaimed protectors from a questionable corporation called Zaibatsu. Events did happen, and there was music in the jukebox relating to them that was never heard, which could have been used to accentuate the story.
Chemical Mixology

Let’s dive into the main part of the game that you have control over; mixing drinks. At certain times during conversation you will be asked to mix up a drink for a client. Sometimes these are very straightforward and you can just find these by name in your Drinktionary, or through other categories such as flavour, type & bottled drinks. At times the request might be more ambiguous or obtuse. They may ask for something sweet or maybe girly, or there may be a rare time when you require a special bottled drink for the job. Sometimes, the client will request the ‘usual’, which can cause a small state of panic on occasion as you attempt to cast your mind back. The one client that stood out to me however was a chap called Virgilio. The question mark on his head says it all and you will find your frustration with his requests piqued.
The first aspect about the mixing system is that there are only 5 ingredients here each with unusual chemical-based names, although the one you will likely remember most is Karmotrine (which measures alcohol strength). You also have different methods which involve ageing or serving on the rocks as well as mixing or blending drinks, which mean different shaking times are required. If this is played on a Nintendo Switch, there is also haptic feedback to indicate timing. If a mistake is made the drink will turn into a complete mess, which simply means chucking it out and trying again.

However, while it is relatively fun to mix drinks, I do have a couple of issues with this system. Although the game is by-and-large pushed as a relaxing game, formed of around 80%-90% dialogue and story (very much expected being a visual novel), I can’t help but feel that there needed to be some penalisation for time and/or mixing drinks wrong in the moments you are required to be the bartender. Something like less tips if you took too long or less wages for wasting ingredients. Or perhaps even a special ‘Professional’ bonus for not even looking at the Drinktionary to make the drink. Correctly doing this would give some satisfaction to the player when they nailed the order.
As an example from another visual novel game, the Ace Attorney franchise (where you play the part of a defence lawyer) breaks up dialogue using a cross-examination mechanic. Here you point out inconsistencies in witness testimony based on what you’ve heard and the evidence that’s been presented. Failure to do this would result in one of 5 chances to be struck off, the eventual result being game over with a verdict of guilty. This encourages you to dig deep during trial, as you want to nail it as a professional lawyer just like you would want to nail mixing the drink as a professional bartender in order to avoid penalties and master your craft.
One final small gripe is that you can’t tell how well you’ve done until the end of the night (made up of two sections with several clients in each). I would have liked a little feedback during and just after mixing, so I could identify mistakes more frequently to learn and improve. At present, the only info displayed is the company earnings, which doesn’t help understand current individual earnings for Jill.
Now For Some Me Time

Once the night is over, you now know how much money has been made and Jill heads back to the flat to chill out. Here you can do a few things such as scroll on your phone, head to the shop or later on change up your flat using Nanocamo (again on your phone but worth a separate mention).
On the phone, you can catch up on the latest articles from various sources in a familiar way. For the latest journalistic news there is the Augmented Eye. There is also the Danger/u/ thread which reads similarly to how a discussion does on Reddit. Here the users seem to take all angles and sometimes come up with bizarre things that don’t even fit the thread - pretty realistic then. These are well-executed as they help to really build out the lore and current events, adding more flavour. I also found the bias towards the surge in waifu video game popularity to be particularly entertaining. I also loved it when Jill had amusing conversations with herself also playing the role of her cat, Fore, in relation to whatever article was being read at the time.

Later on, you can purchase customisations for the flat using an app called Nanocamo. There is also a shop where you can buy items for the flat, as well as a few secret items that can be unlocked in the bar. You can see a nice little animation to the right picturing Jill in her flat as the customisations get added. A word of warning here however, money is tight in this game and there is significant financial overhead. Occasionally, on returning to the flat Jill will require the purchase of an item, otherwise she will be distracted the following day. More on that later on.
People & Stories
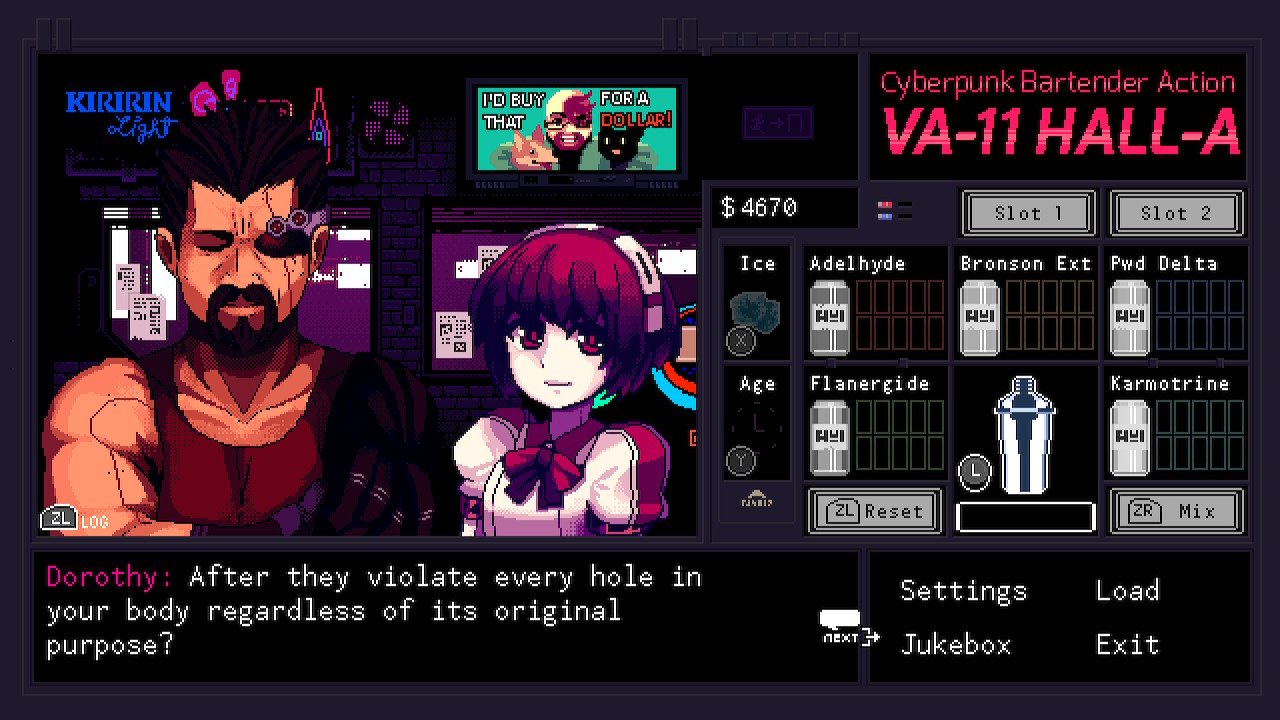
Throughout the entire game, a large variety of clientele will grace the bar. They arrive with differing perspectives and problems, which come together to form the big picture of life in this dystopia. An interesting aspect is that they are largely on the human to machine scale, with some having a higher percentage of robotic prosthesis than others. Lilim on the other hand have been created to be fully mechanical, but have gradually evolved in their computations to start to beg the question of whether they can be regarded as human or not. Sometimes clients even transcend different species. There’s also a particular client that holds a Seinfeld easter egg, which I thoroughly enjoyed. If you’re a fan, you’ll know it when you see it!
As mentioned before, the dialogue does not hold back. There are a number of highly mature and sometimes taboo subjects such as prostitution, underage fetish and physical objectification. An example of this is how Jill objectified one of her female friends called Alma, a cybersecurity consultant who she incidentally also fancied. Jill often cracked jokes about the size of her breasts, which later on prompted other characters who couldn’t remember her name to simply refer to her as ‘titty hacker’. Sometimes moments like these can make you spit out your drink. I certainly found the cutting dialogue to be one of this game’s strengths. Also extra points for the ever-cheerful lilim (what we know as an android) called Dorothy who is always a joy to engage with, although it probably won’t be for the reasons you expect!

Of course, as this is also a game about mixology, how you mix drinks can occasionally change outcomes in the dialogue. Adding more karmotrine to a drink may cause a client to spill the beans. Or serving the perfect drink can cause them to open up to you more. This can even unlock more endings down the line (yes this is a game with multiple endings). If during the night time chillout you failed to buy the current item to stop Jill being distracted, you will need to pay even closer attention to what the client says, as you will not be able to refer back when the Drinktionary is on-screen. You usually get a final hint on-screen but this will be unavailable if distracted.
The ideas in this game are pretty good then, with a lot to enjoy. However, I do feel that there is not enough gravity or sway in the dialogue depending on how you mix the drinks. Although you can get a few extra lines of conversation from mixing more Karmotrine into a drink, this happens only very occasionally and has little (if any) lasting impact on how the story plays out. So although dialogue does branch a bit, it’s only temporary most of the time. I feel more could have been extracted from the idea of intoxication, where different drink types or flavours hold different behavioural qualities. This way, you would try to engage with the character more to influence their mood, adding more depth and understanding.

This brings me to my final gripe about the game, which surprisingly is that for the most part, I didn’t feel as invested in the characters as much as I wanted to be. And there is a wide range of characters. For this, I’ll need to compare it to an old title, Hotel Dusk: Room 215 (a hand-drawn visual novel with film-noir style investigative mechanics and dialogue originally created for Nintendo DS). It’s a tale about an ex-cop, now a door-to-door seller, who spends a night at a hotel. Over the course of the night, he gets to know the guests through subtle questioning (old habits I guess).
A variety of people are encountered similarly to VA-11 Hall-A, from a brattish child to a headstrong owner to a mysterious silent female figure. Once enough info was gathered, the squeeze was really put on them later to get their full story. The atmosphere intensified and with successful probing they would eventually buckle under the pressure. There was also increased weighting on your decisions here, as choosing the wrong option would result in a game over. Whether it was the art, writing, the increased intensity during a squeeze or the way the dialogue gradually pieced together their story through questioning, you really found yourself understanding and empathising with the characters. You sometimes wished that you didn’t have to push them so hard, but needed to do so to find out the truth about the hotel, which as it turns out is more connected than it seems. You really get to know and feel for the characters and I would have liked to have felt a similar affinity to the characters here. Sometimes it’s more like you just have to take their word for whatever they say, instead of really feeling it.
Summary
This is a game with some great ideas; being the go-to bartender and mixing drinks is satisfying as well as the people and stories. Glitch City is built up well through interactions with both conversations with clients and news feeds. There are genuine moments of shock and laughter with some of the cutting dialogue that are highly enjoyable, and the clients are memorable & well-drawn. The variety of music available is broad and some of the more introspective moments in the dialogue are great to be part of. However, I do feel said ideas could have been squeezed a bit more. Penalising the player for incorrectly mixing drinks would give opportunities for them to learn and master their craft, and lead them to better understand and grow a bond with clients. This with more nuanced intoxication control could have influenced dialogue in more fluid and meaningful ways. Lastly more interruption events and curve-balls in both dialogue & music would test the player, introduce some peril, and give opportunities to really seal that bond with clients.
All this being said, the best thing to do is give this one a go. It’s an experience worth taking if not for the moments that can catch you off guard and allow you to play that role of bartender for a while!


VGM Vinyls - More New Additions
More VGM vinyls have arrived, it’s always exciting to see these in the flesh! More info about these is below:

Sonic Mania - There have been many Sonic games played over the years (it’s one of my most beloved franchises as a kid). This one however is very special, it is a faithful attempt at what a sequel would have looked like on the original hardware, but it is also by far the most quintessential 2D Sonic experience outside of the originals. In fact it takes some of the original levels and adds some incredible mechanics, not to mention any Sonic fans will notice a tonne of easter eggs such as Game Gear sound effects during a particular boss battle. The nostalgia and happiness of my inner child was unmatched! But it also adds small but substantial changes like extra animation frames making the rotoscopy of the characters look even smoother, and other details such as depth of field with lost rings. Considering all there was prior was the disappointing physics of the Sonic 4 series, this was a welcome breath of fresh air. Of course, the soundtrack is also fantastic. It takes the original feel and elevates it to Sonic CD quality (being one of my lesser favourites, the soundtrack was nevertheless notably kick-ass). A little bit gutted that the reimagined Lava Reef Act 2 music isn’t on this, but still it’s worth having. Particular note to Studiopolis Act 1, one of my favourites!

140 - So I have a confession: I have a penchant for audiovisual and rhythm games, having been a drummer at one point. An interesting twist is this game, so named because of its tempo. It’s a very minimal, yet (as far as I can tell) unique type of platformer where all moving elements are synchronised with the soundtrack. This means timing and patience are key. Because of this, the game gels together really well as a cohesive and pure whole, giving a short (around 1-2hr) experience that is memorable, and for a pretty cheap price.

Nuclear Throne - Few in the indie developer community around the mid 2010s would not have heard of the legendary name of Vlambeer, the developers of this game as well as others. They were responsible for two main things for me; making a press kit much easier for independant developers to produce, and for their presentation on the ‘Art of Screenshake’. On the latter, they put forward the idea that you can turn up the screenshake to 11 everywhere, as well as add many other over-the top elements such as huge bullets and ricochets to make a game more exciting. No game expresses this ideology more than Nuclear Throne, a roguelite twin-stick shooter with ridiculously over-the-top risk and reward action, where games can end as quickly as they began. You can even use one character to explode corpses! The soundtrack is incredible and gives the game a sort of wild west mercenary-for-hire vibe that could also be sung as an anthem around a campfire.
That’s all for now, stay tuned for more!

VGM Vinyls - New Additions
Some new vinyls are just in! A little more info about these is below, Going clockwise from the bottom left:
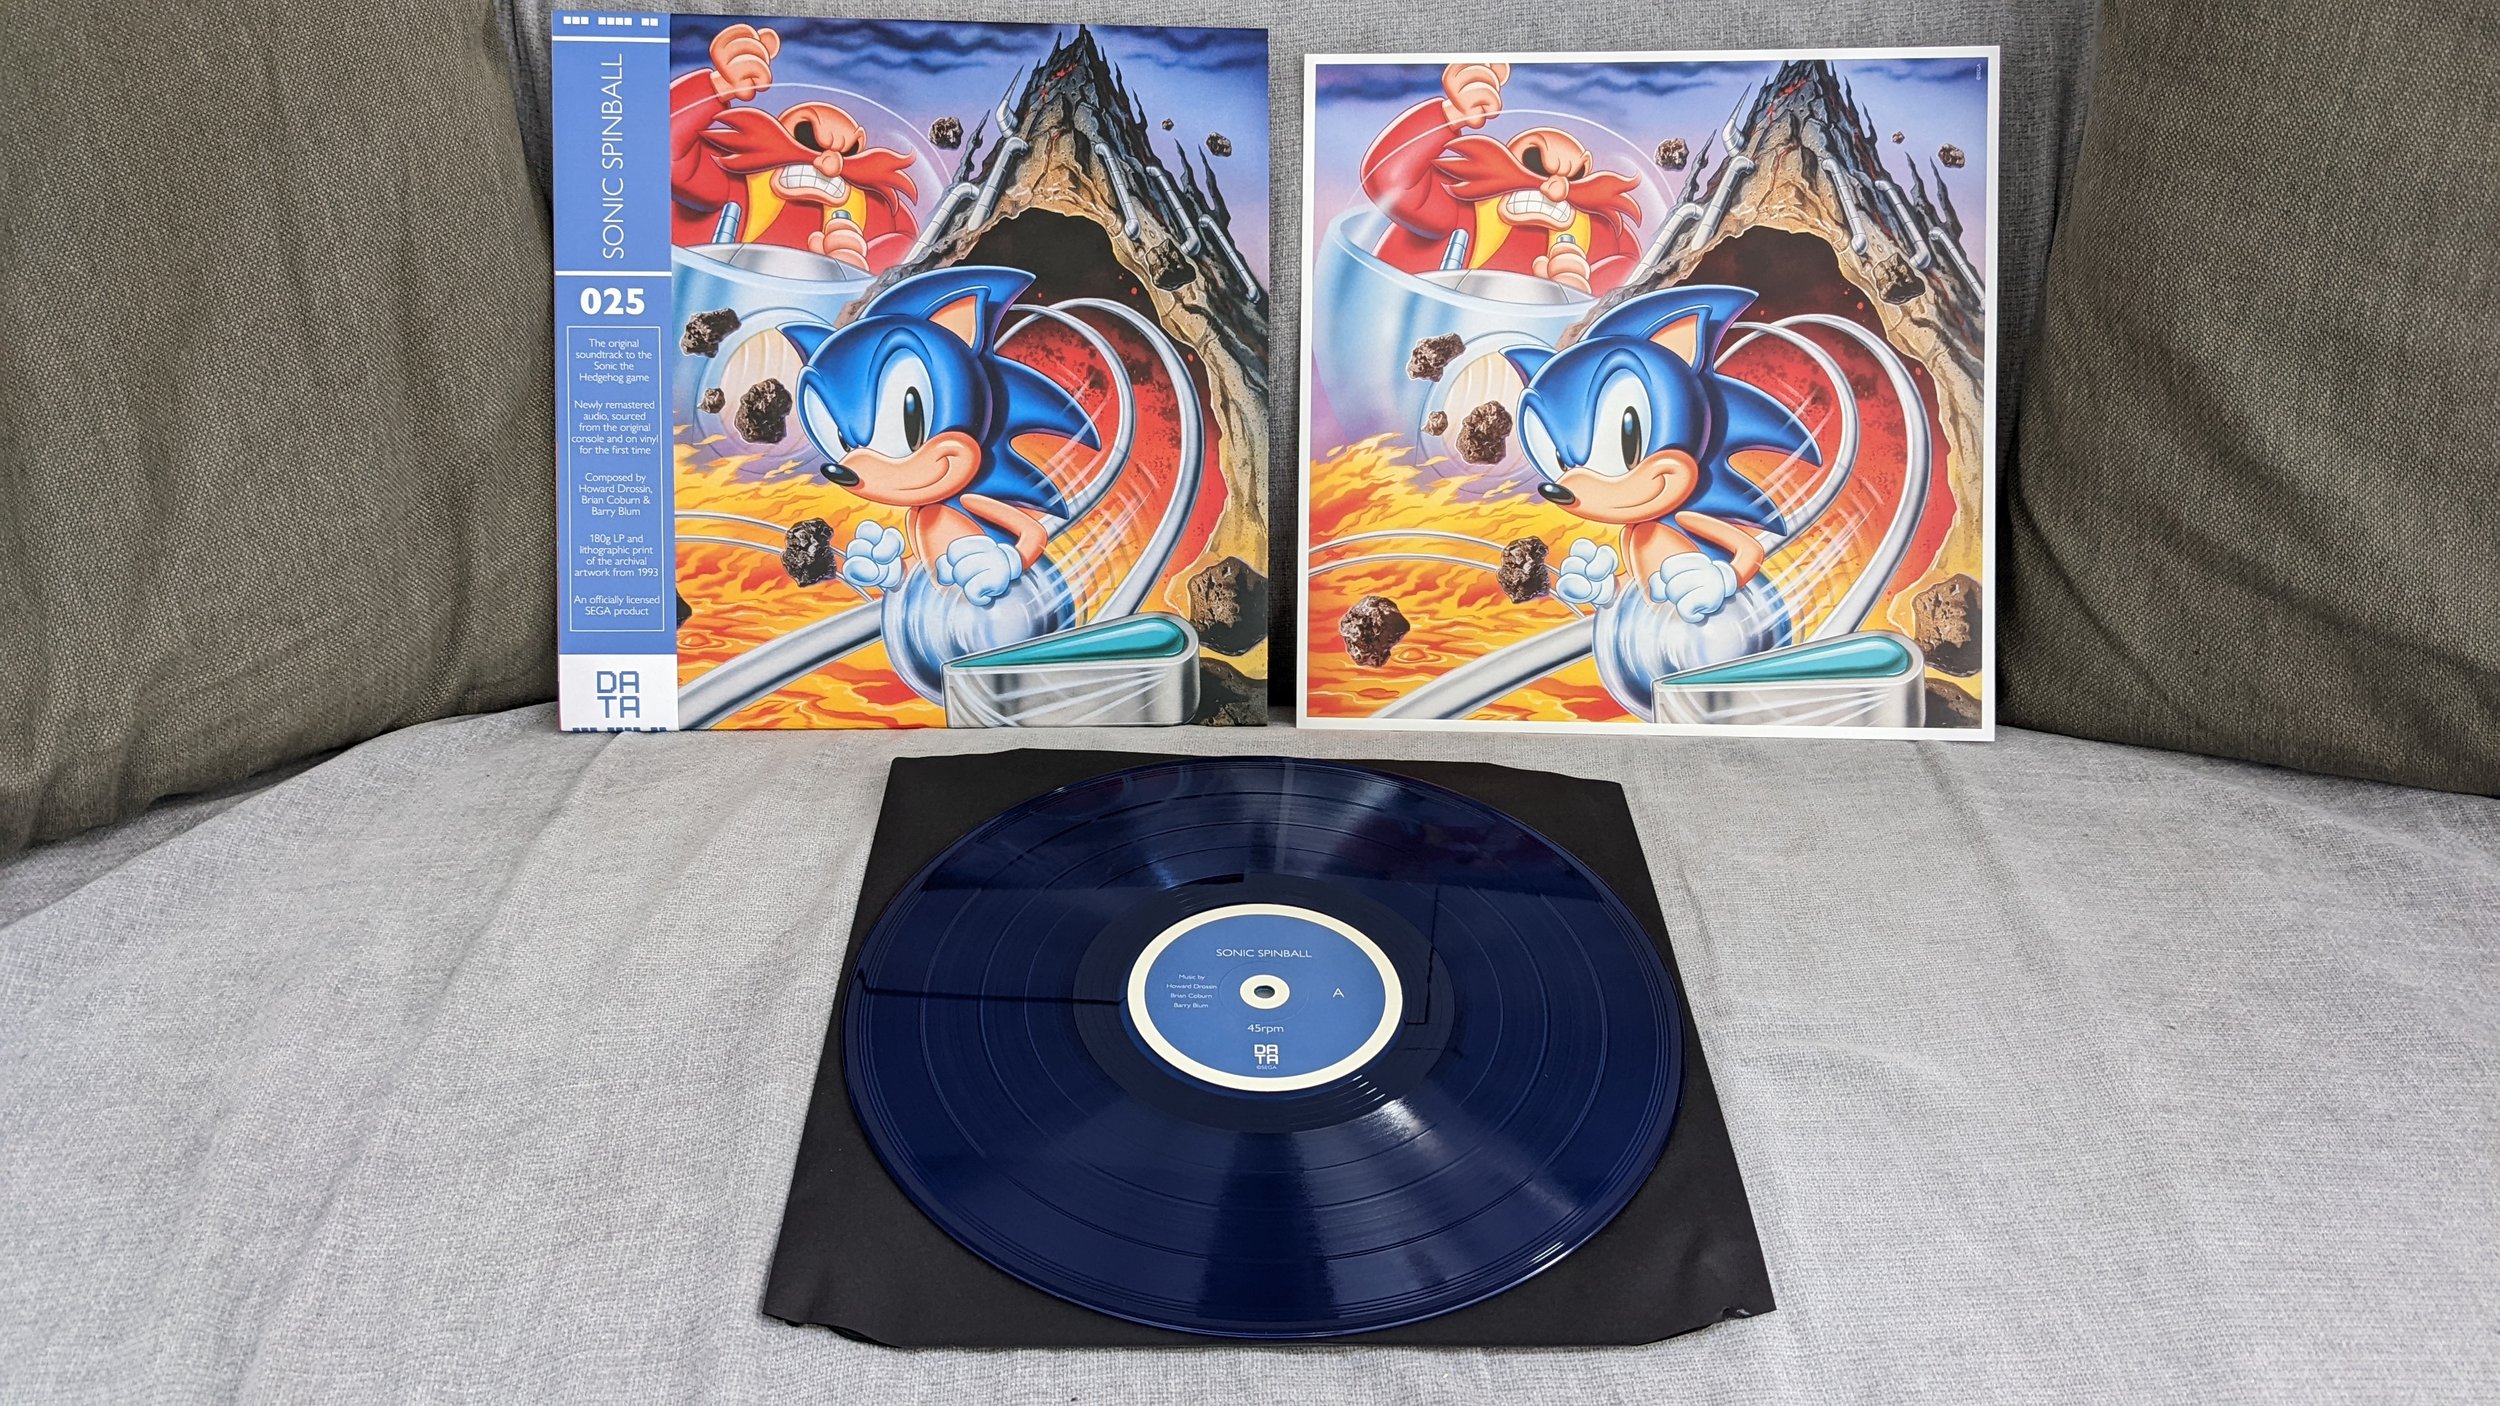
Sonic Spinball - Gaming started for me with Sonic the Hedgehog on Mega Drive (or Genesis). I was a massive fan boy of this franchise. This was one of the unusual entries where Sonic in essence became a marble in vertical pinball-style levels. This was also merged with a couple of platforming areas to create some unusual yet satisfying ricochet action. It also had kick ass almost rock style music, in true Mega Drive style.

Axiom Verge - A 2D adventure game that will greatly satisfy both Metroid and sci-fi fans. The level design is very glitched & the way you can scramble enemies with a ray gun to change their characteristics is so much fun. The soundtrack is very deep with some chiptune elements, however it comes out as a very rich, deep, dark and in a way soulful. The huge amount of weapons were also fun to use.

Axiom Verge 2 - A sequel that initially feels very different to the first outing. Here there's a lot more exploration over combat. Although it takes longer to get into this one, some of the great mechanics from the first are here and turned up to 11. Also, the soundtrack is incredibly beautiful. Helped by the voice of Mayssa Karaa, Monsoon is one song that moved me in so many profound ways for reasons I can't quite put my finger on.
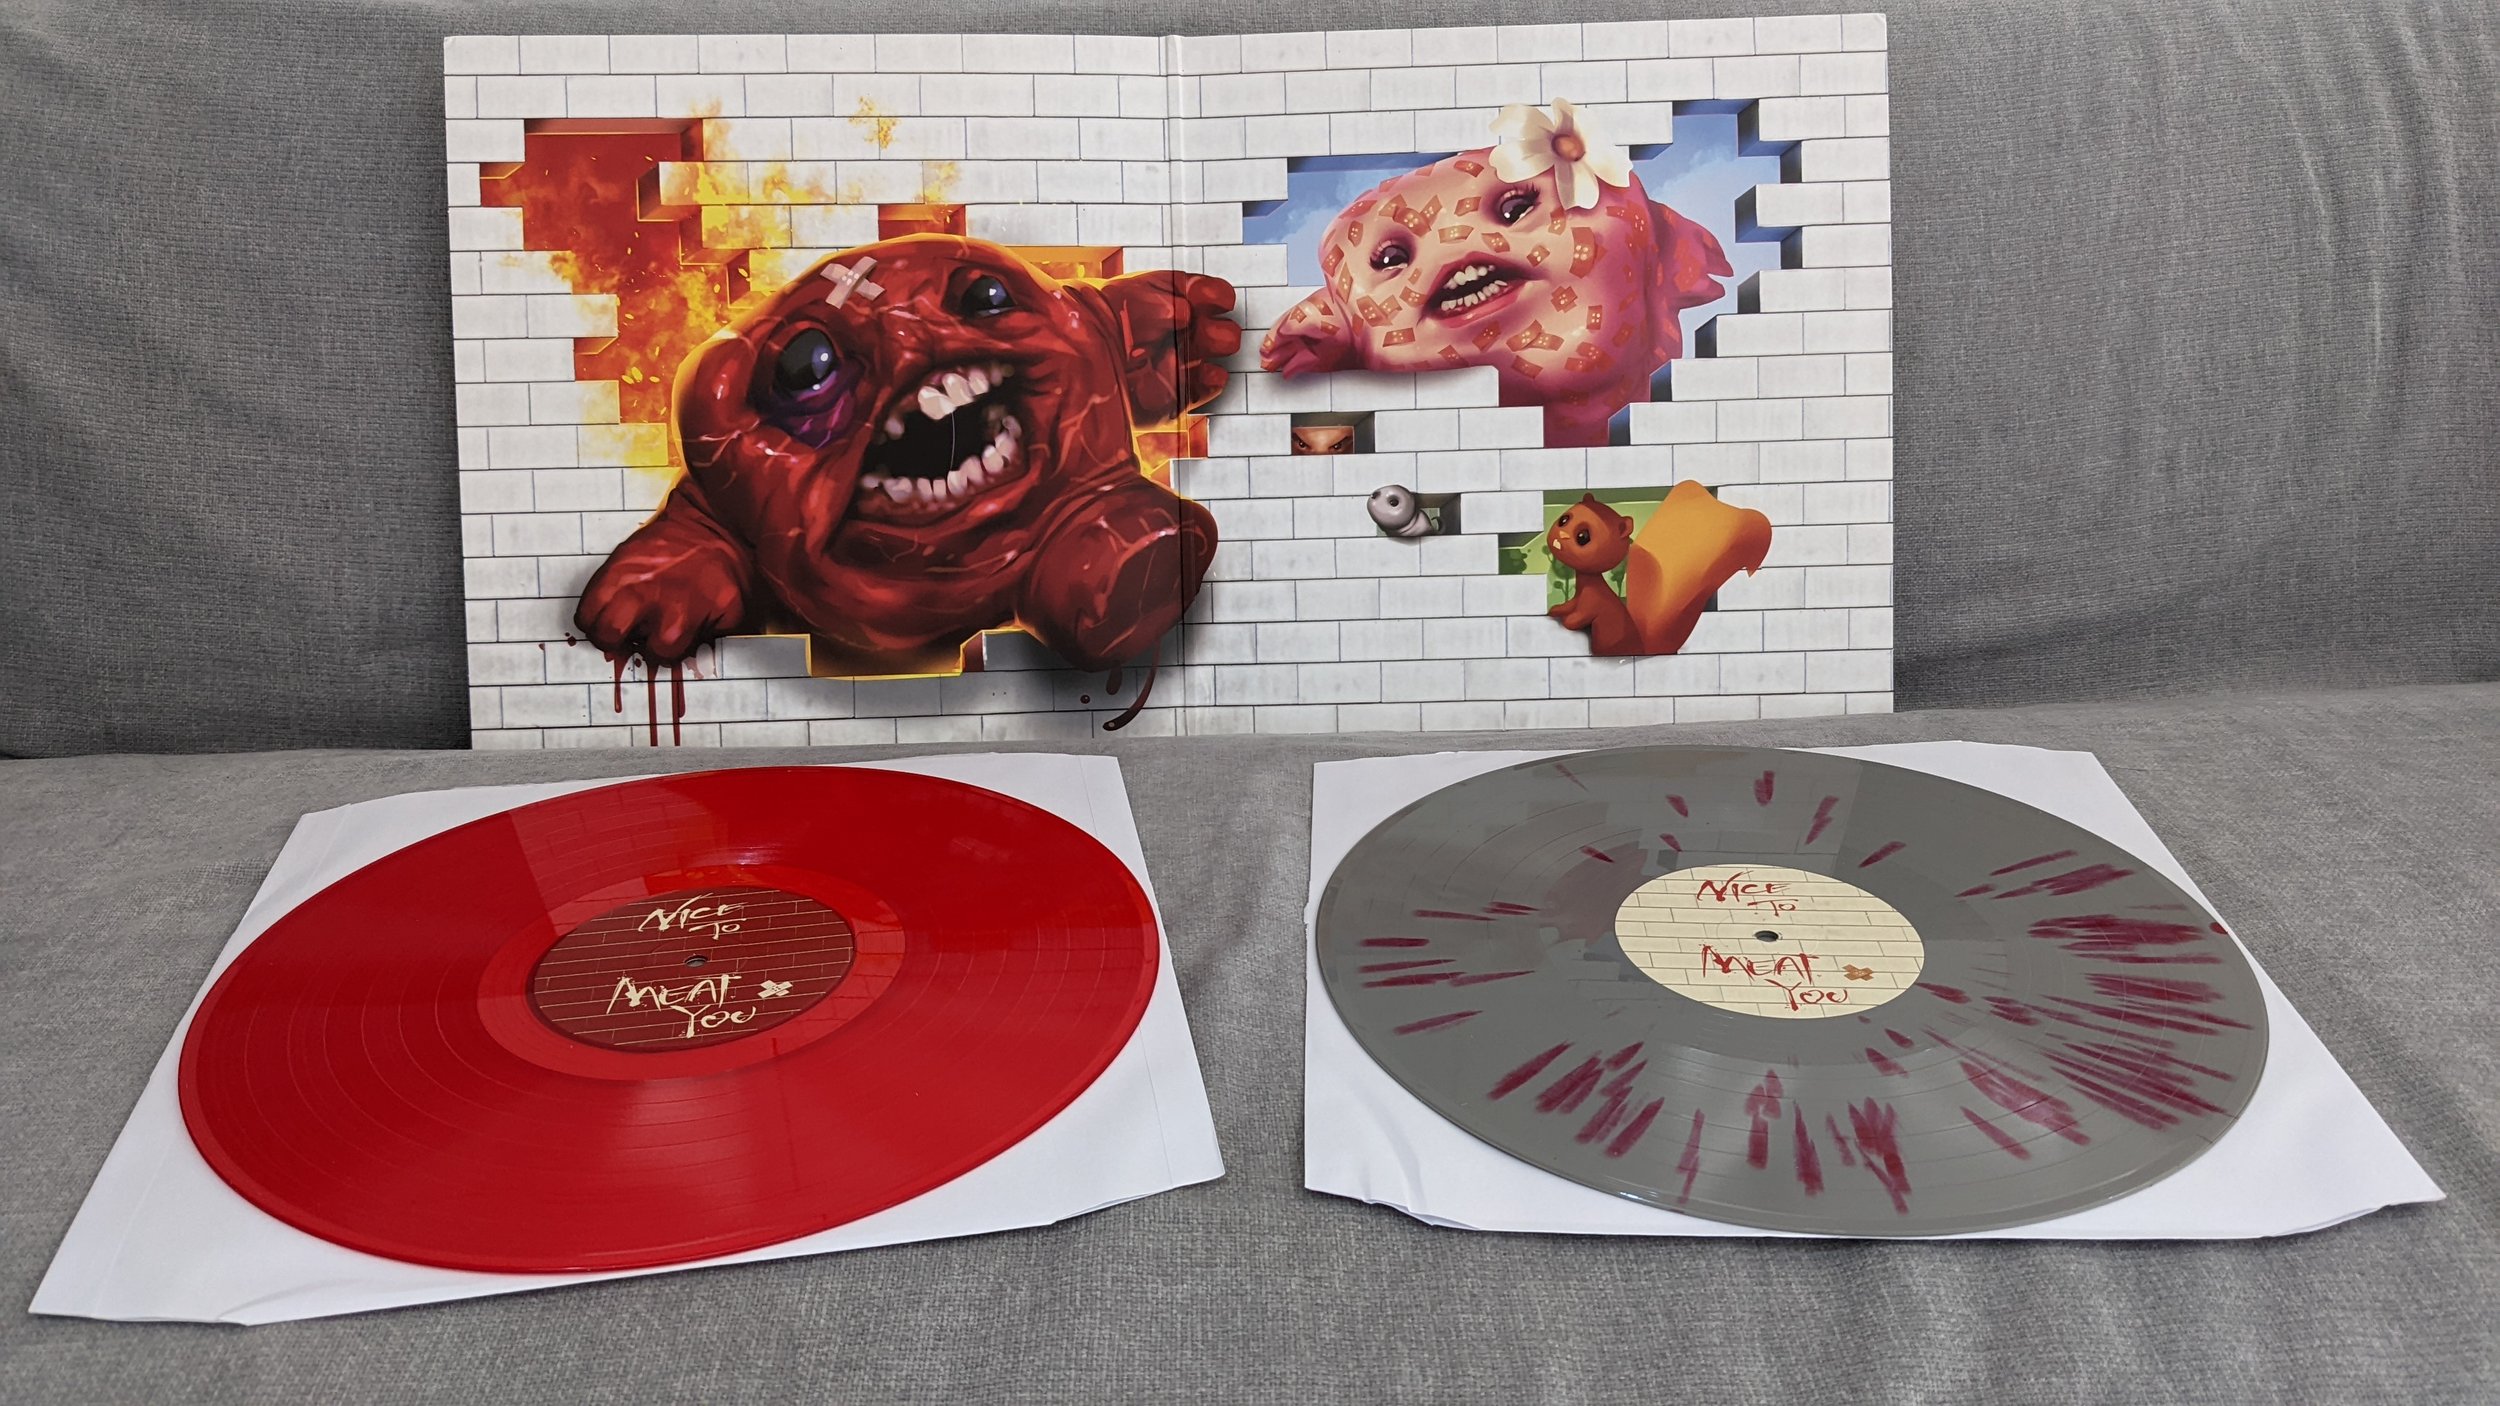
Nice to Meat You (aka Super Meat Boy) - This game needs no introduction to those in the indie scene around 10 years ago. It's a brutal, insta-death platformer with saws galore and incredible gore. I mean the protagonist has no skin and gets hurt by salt, which should give you some idea as to the theme. The soundtrack is by the legendary Danny Baranowsky and earlier versions of the game feature the music. Unfortunately it is not the same any more, which makes this all the more valuable. In terms of sound, it is gritty and almost foreboding, but also full of energy.
For now, this is what's arrived. Stay tuned for more!

Superbrothers: Sword & Sworcery EP - A Hidden Gem
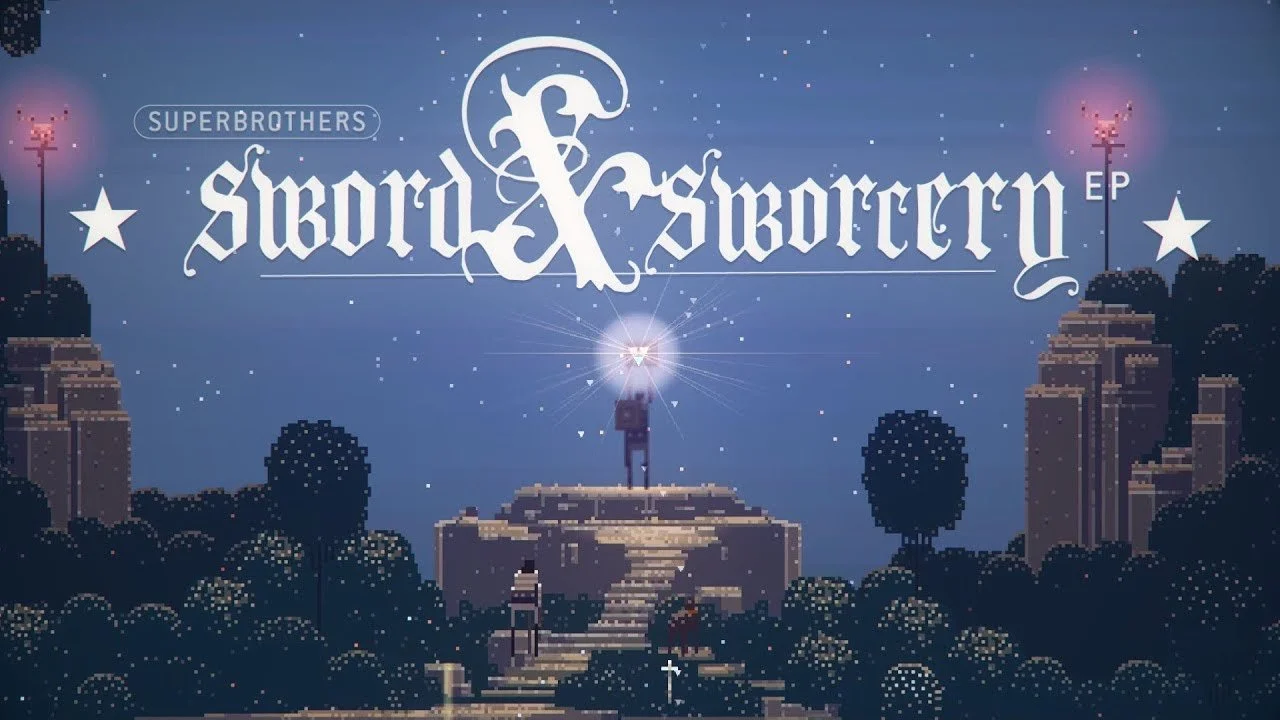
There is always so much choice when it comes to finding new gaming experiences. On top of the ever-steaming hype train, there is a huge number of smaller game studios fighting to make a name for themselves amongst the established behemoths. This may also in turn lead to an enormous pile of shame (otherwise known as a large library of unplayed games a player may own, possibly due to promotional discounts). As such, certain games become obscured and regrettably never get played. This is of course a great shame, so I will now take steps to try to rectify this problem. Let’s get into our first hidden gem known as Superbrothers: Sword & Sworcery EP, first released in 2011 for iOS.
Any fan of adventure games such as the Zelda series may appreciate the difference in the way this game approaches the genre, providing they have an open mind. In a way, it also has something for point-and-click adventurers. It applies a very strong audiovisual element and a somewhat laid-back style of dialogue towards a more serious ‘woeful’ errand the main protagonist is to carry out. It is quite an interesting and unique departure from what we understand in video games. This will be a shorter post than the prior reviews, as this is to give a flavour of what to expect rather than an analysis. As we are now in session; let’s go on a small adventure.
To Adventure! (In a Super Chill Way)

The game introduces itself in a rather unusual way. Before you stands a rather pixelated gentleman, indicating that you will now take a session of therapy. Just before this, this part is introduced as an EP (around 4-7 tracks or shorter than an album), alongside vinyl visuals. The stage is set for an otherworldly experience. Our main protagonist comes forth, who forms part of a war-torn people known as Scythians (maybe in reference to Hylians?). The first thing you will notice is that you can feel every footstep and every rustle, even every movement of the equipment on your back. The attention to the audiovisuals is very precise. If you play games without headphones, seriously stop it and treat yourself this once.
One of the first characters you will meet is a fellow (funnily enough) called Logfella. As your character notes, he seems cool. He acts as your guide for a couple of areas while you get to grips with how to navigate your adventure. This is one of few games I will likely talk about where there is a PC version as well as mobile. The movement control of this game focuses on tapping an area of your screen or holding down a spot to move your character, or in the case of PC to click or drag an area.
The combat mechanics are also introduced. To initiate this at any time simply right-click on PC, or turn your smartphone portrait. You simply carry a sword and shield, timing these to defeat opponents. Nothing fancy. This is also used in conjunction with some interesting and slightly puzzling mechanics. Towards the end of the first ‘session’ you will have learned most of the important mechanics and what to look out for, which is often convoluted but in such a way that it’s just a joyful moment discovering them.
Audible Art

I’m going to mention this again and be super annoying, but seriously wear headphones during this experience. The meaning will become clear in how the visuals and audio blend together.
Onto the graphics for a moment. These are (at least to me) quite reminiscent of the Commodore 64, albeit with some non-pixel-constrained art blended in. It is actually quite astonishing to look at and really creates areas that are begging to be walked through. You can really feel the bushes and trees swaying and the animals running away as you get close.
At times, you will use the Song of Sworcery to change your perception of the areas, which can be found not only by looking but also listening. At first you will be required to use this to summon sprites, but it’s not that easy. Each time you attempt to summon, the ways to make them appear are different each time, usually signalled by audio and visual cues from the area. Once you do find them however, there is a satisfying sound as your taps (or clicks) ascend them into the heavens.
Then there is also the music. It’s best described as having a very indie/cosmic feel, something you may hear in a musical akin to something like War of the Worlds. This fits the events of the game, perfectly capturing the otherworldly vibe and stage of the story. One particular track stands above the rest for me, for reasons I can’t quite put my finger on; Prettiest Weed. If you have YouTube or Spotify handy, feel free to give this one a listen, although I would recommend playing the game until you run into it near the end of the first EP. You will know when it hits and it will be glorious.
The Woeful Errand

The main story is tied in somewhat with the combat mechanics. This, at least for me, is the way that I felt the game had the most impact. It is somewhat traditional in gaming to keep fighting to make your character stronger, purchasing upgrades to make them more badass, consequently making the game easier. This game takes a different, more haunting approach. It will instead take away a heart from your total vitality as the game progresses, weakening your character and making combat more difficult over time. This more than anything signifies the burden the protagonist has to bear as they continue their quest.
Along the way, you will meet characters (some you will fight) and even have an opportunity or two to change how the story turns out. The way the game plays feels like you are going with the flow, and as such different faces come and go along the way. Also, if you ever get lost during the woeful errand you can simply take out your Megatome and look through each character’s current thoughts. This may give clues on what to do next. Extra points for how casual the dialogue is from the protagonist; it definitely made me chuckle at times.
At this point I will leave the rest to you, as I feel it would be best to play through this experience being entirely present. Think of this as a warm-up to the main event; it’s best not to spoil things too early!
Summary

SB:S&S EP is a game experience best played with your full attention. The marriage of audio and visuals through a decent pair of headphones will give you a memorable adventure. It will also haunt you in some ways with the flow of the story. Initially this was designed with a touch-screen in mind, but can also be played just fine on PC and consoles. It is an inexpensive, short adventure somewhere in the 3-4 hour mark, so allow a small amount of your time to completely lose yourself!
P.s: As a bonus, here’s what the real life vinyl looks like. It even glows in the dark!

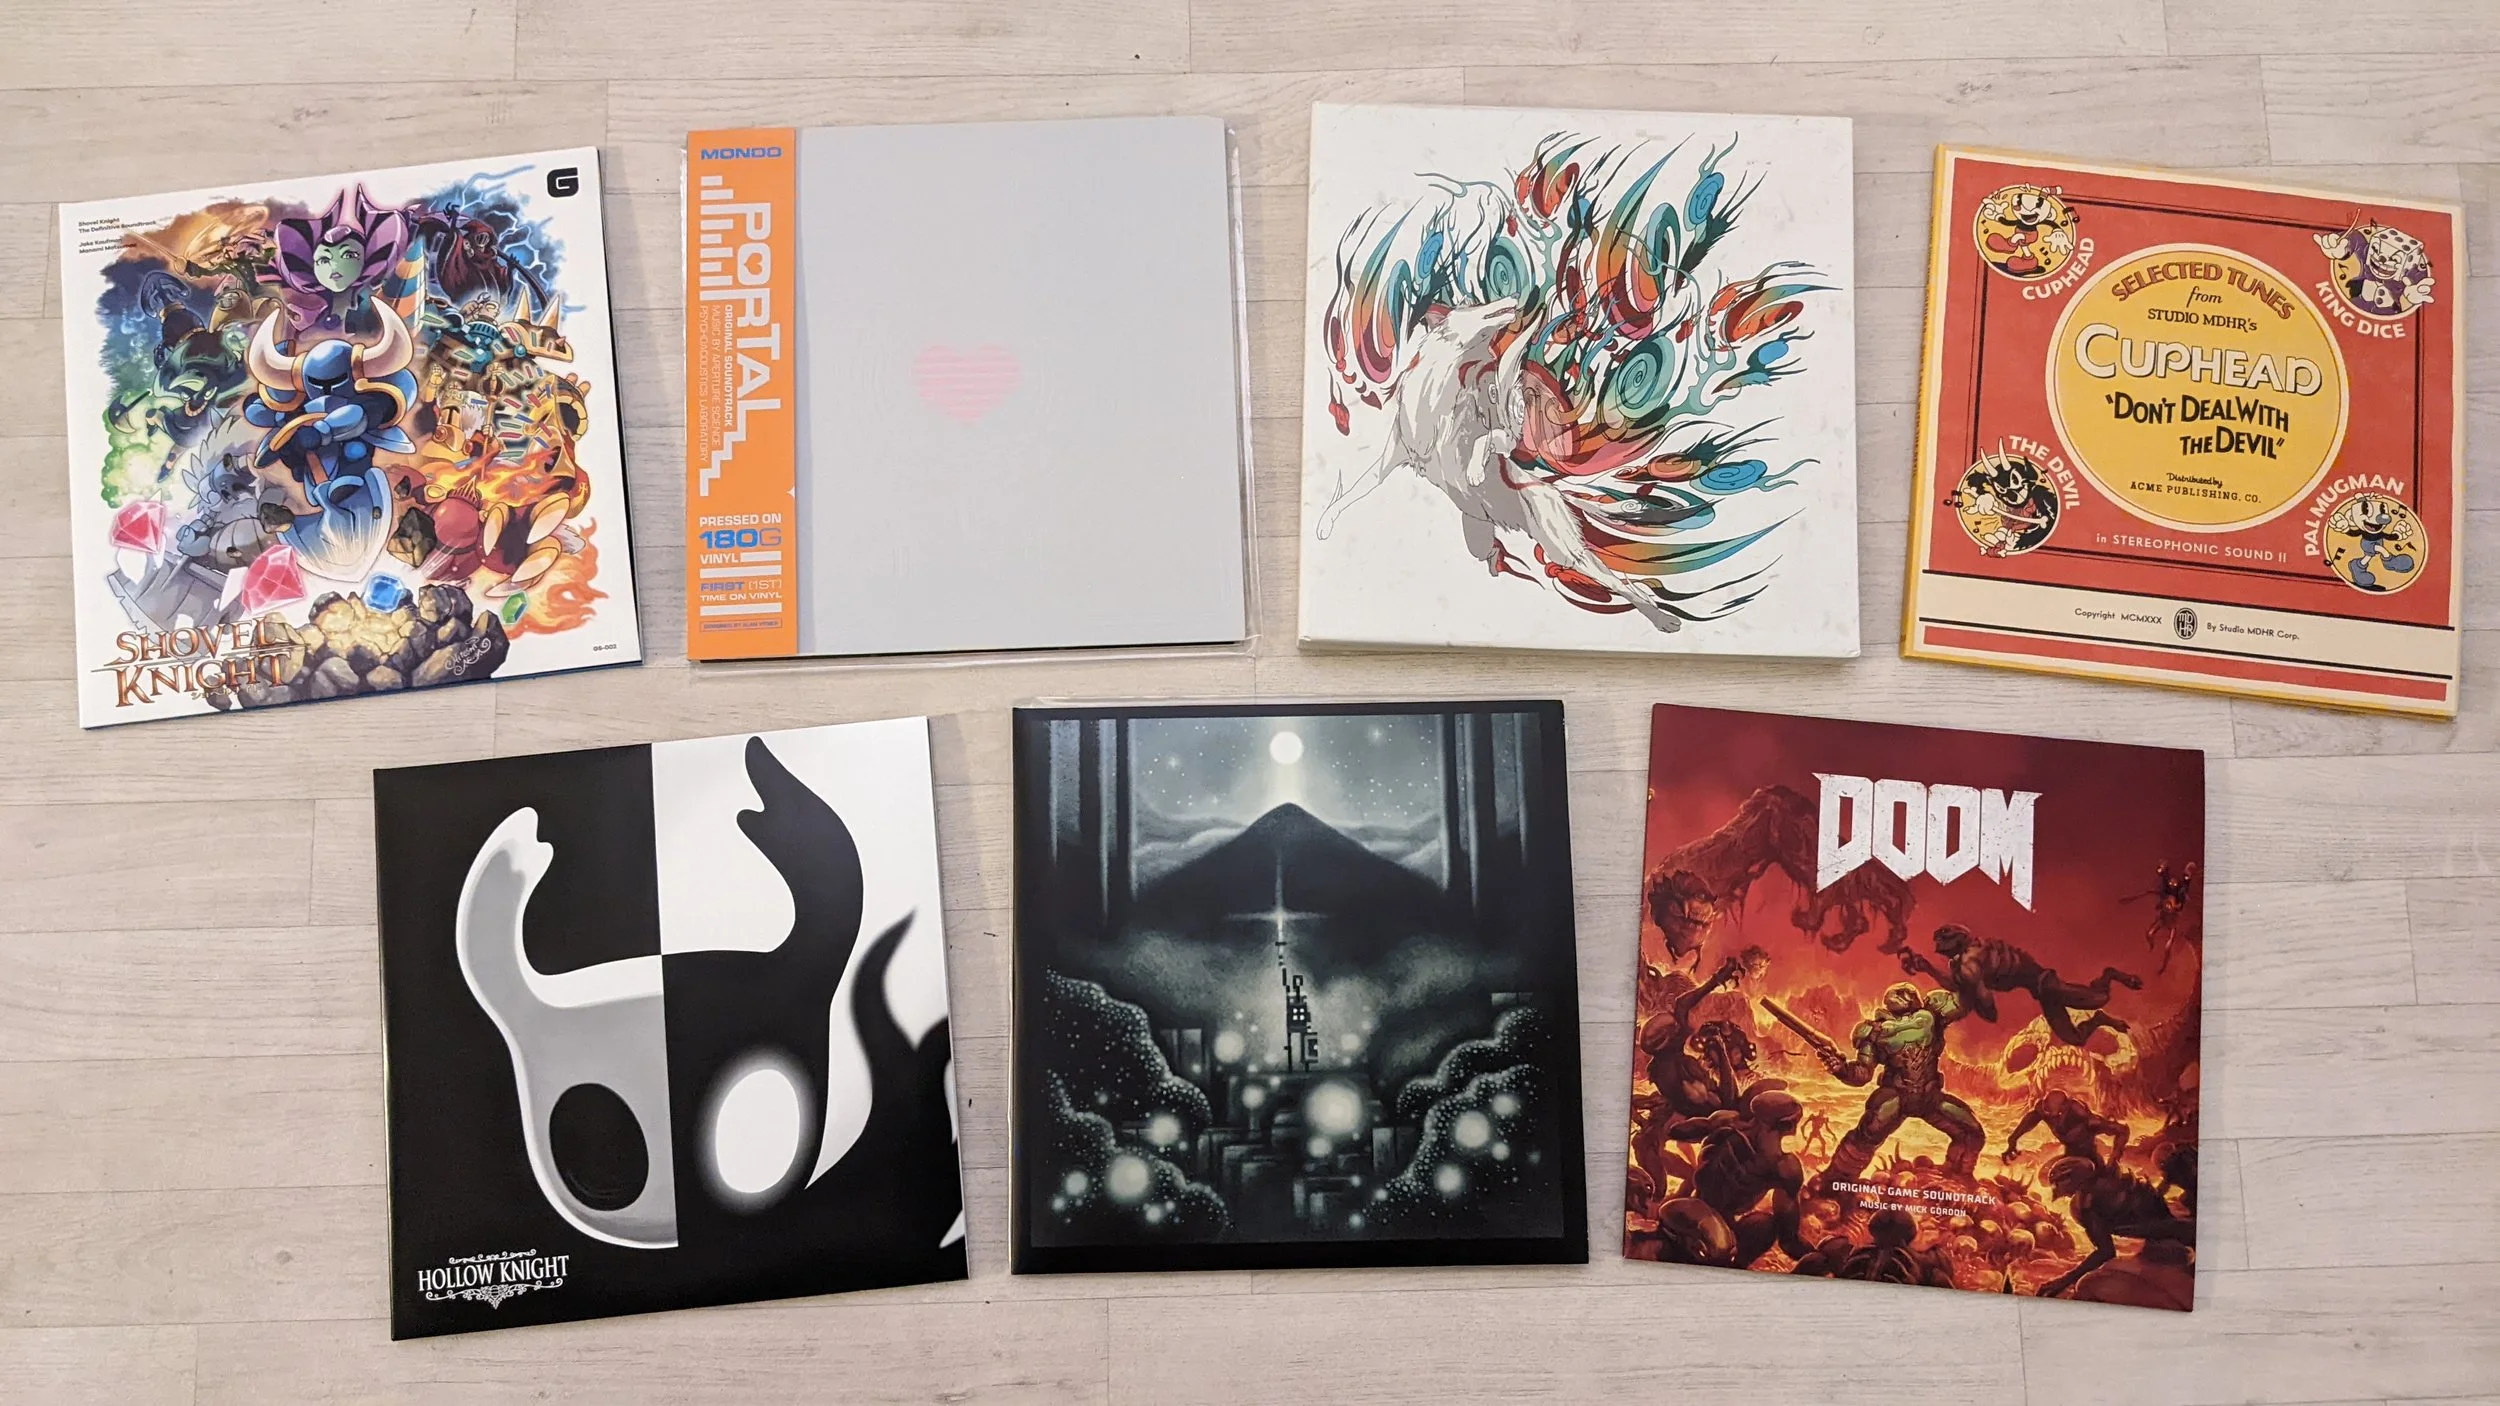
VGM Vinyls - A New (& Dangerous) Hobby

As mentioned in a previous post, I have played through quite a few video games over a period spanning decades. That being said, I’ve never really had a need to commemorate them with collectibles; bobble head figurines and special edition game cases never really appealed to me for some reason.
However, something has changed recently. Since writing reviews about games and getting into them once again, I’ve felt a new and reinvigorating energy about gaming in general. They have provoked me to really go in depth as to why they are great, and I in turn realised that there are some truly astonishing games that should never be forgotten.
My father (who is no longer with us unfortunately) possessed a small vinyl collection and introduced me to amazing music such as David Bowie’s Space Oddity (1972 version). I can also tangibly say that a great video game tends to have a great soundtrack. And I love a good soundtrack. So of course the logical next step was to start collecting video game music (VGM) vinyls.
Here is what I’ve started with so far:

Shovel Knight - I’m not usually a fan of chiptunes……..I know I’m a terrible excuse for a gamer. That being said this is most probably the most uplifting chiptune soundtrack I’ve ever heard, for one of the most fun and rewarding platforming adventures. Really gets you ready for some questing!

Portal - This is one of the first games I ever played on Steam while it was still young. It’s a portal-jumping first-person action puzzle game with a memorable antagonist. This was part of a collection by Valve called Orange Box, which featured some of the most critically acclaimed games of all time such as Half Life 2 and its two further episodes. The end credit song will definitely be played on repeat.

Okami - Probably the most important and beautiful video game ever made in my opinion. Every step is a breath of fresh air, the main mechanic is to this day one of the most unique I have seen, and for longer than a decade it topped my favourite games of all time list and likely still does. It is by far the most expensive out of the lot; a jaw-dropping £450 spent. However it is also the very game that ignited my now undying interest in traditional Japan as well as being quite possibly the most beautiful collection of vinyls ever conceived alongside some astonishing ukiyo-e artwork.

Cuphead - This game has a very unique 1930s animated aesthetic that is beautifully executed. It’s also one of the most frustrating games I have played. Be that as it may, you just want to keep on going just see what the next boss looks like because they all have gorgeous animated movement. The soundtrack is also quite unique in the field of video games.

Hollow Knight - I have already gushed over this game in a previous review. Quite simply, I believe it to be quite possibly the greatest game of all time, as the only issue I found was slightly harder difficulty. Everything else was ambitious, well-executed, full of variety & memorable. The soundtrack is incredibly immersive and beautiful, perfectly capturing the essence of each dramatically different area on the map.

Superbrothers: Sword and Sworcery - An obscure game that can be considered very ‘indie’. It’s a chilled out, in some ways zelda-esque audiovisual adventure with laid-back dialogue presented in quite an artsy way. It is short (around 3-4 hours), but it is also a haunting adventure that will remain with you. It’s quite an experience.

Doom - An over-the-top metal soundtrack that really gets your adrenaline pumping while you rip and tear until it is done. You can really envision the shooting and glory-killing of the various hell monsters, in a roller coaster of arena battling while you traverse facilities to end the torment.
I do have some ground rules however. Firstly the game has to have been played and there has to be some great memory or story attached to the game. Secondly, the soundtrack actually has to sound good or unique. Thirdly, I will be opening and eventually playing these. I can then consider purchasing. A vinyl can be the most gorgeous ever made, but if there is no memory or story of it, then it’s an empty purchase.
As more vinyls come in, I will have some more opportunities to talk about some great and sometimes obscure games. I’ll also show these opened up, as VGM vinyl is greatly eye-catching. Keep checking back for more.

Stray - In Review

Very occasionally, there comes an experience that manages to stand out from the rest. A fresh take on a beloved genre, if in this case there’s anything to immediately compare to. The magical thing about games is how they can draw you into wonderful environments that have been lovingly handcrafted to tell a story, or just allow you to wander about and explore. Sometimes, however, they can also help you to transcend even species, allowing you to walk in their shoes and change your perspective. We now come to a personally highly anticipated game of mine; Stray.
My interest stemmed from a GIF I came across on Twitter codenamed ‘HK’, all the way back in 2016. This showed something quite unbelievable to me at the time; some of the most incredible graphics of a cat walking a dark backstreet and climbing pipes, in a cyberpunk dystopia inhabited by a robot or two. Unreal Engine 4 graphics were a new thing to me at the time and I believed initially that it was a movie; the shadows, animation, lighting and reflections all looked realistic. That is until I saw the word ‘game’ inside the tweet. Now it is finally fully-realised and receiving serious acclaim across the board. If I have piqued your curiosity (and hopefully not killed you), it’s now time to delve into an adventure of epic (yet small) proportions.
Peering Out From the Balcony

Our nameless ginger protagonist starts their adventure doing what cats do best: looking outside while in a cat-loaf stance. Unlike many other games it will take a moment for you to adjust to what’s going on, as there is no HUD initially and there are only cats (the expected trope being that these are usually non-player characters). You approach the others and interact, performing cat-like actions like rubbing up against each other and meowing (yes, there is also a separate button for that). It’s hard to emphasise how good the feline animations look here. Let’s just say cat lovers will be left with no other option other than to let out a brief “awwww”.
With all the pleasantries out of the way, our gang ventures out into the beautifully overgrown concrete landscape, leaping over ledges, pipes and railings. For me this evokes gorgeous post-apocalyptic vibes akin to a game like, say, Enslaved: Odyssey to the West. As our team ventures on, you learn the various types of ledge to look for using the one-button system. Being somewhat a platforming connoisseur myself, I found myself wanting to perform the actions individually from each ledge grab to which direction to point. After some quick-thinking scenarios later on, in hindsight this was probably the best system to maintain the pace of the game. The gang flows from one platform to the next, without a care in the world. Suddenly, our protagonist makes an unfortunate misstep. Desperately trying to cling on to the ledge with their claws, our other felines can only watch as our furry friend gradually loses grip and plunges into the darkness below. The resulting ‘meow’ is both haunting and horrifying, making you feel almost helpless.
Fall From Grace

After crashing down into a garbage dump at the bottom of the darkness, our furry friend gradually wakes up. Now alone, injured and limping (it’ll be okay cat-lovers, it’ll be okay…) our protagonist finds themself inside some kind of concrete sewage structure with metal doors. You see some cute little pinkish creatures rustle out from a garbage bag and scurry through a gap under a metal door. You follow, leading into the darkly lit abandoned environment you’ll be in for a while. Here you fine-tune your ledge-spotting abilities, learning that if you meow the game will help to hint at the next bit. You may notice, once again, how well animated your feline friend is. Every time they line up for a ledge, they are either reaching down to prepare for a downwards jump or winding up to prepare for a leap upwards.

The other aspect you may start to notice is just how much the game plays on your knowledge of how felines move as well as their little habits. No doubt here you may find the urge to perform one of their greatest hits. You may notice some paint cans are a little close to the edge. Wouldn’t it be fun to just…..push it off? So you do just that, nudging them to your heart’s content. Then you notice a glass ceiling that you can’t quite get through to. You know you need to….after all the signs you’ve been following all this time are inside there. Then you notice another paint can that’s precariously balanced just above it. At this point you know what to do; you send this paint can packing and hear the glorious crash of the glass below. A well-executed part of this game is that it encourages you to think like a cat to solve puzzles, or maybe as you’ve seen around the internet, with quite entertaining results.

After a while jumping from ledge to ledge in this beautifully crafted dystopian landscape, you run into those cute little critters from a while back. Then they start staring at you. Then there are a huge number of them staring at you. The vibe changes and you let out a small hiss while backing away. Suddenly, the pace changes and before you know it you are all-out sprinting in an effort to get away from these critters, who have a surprising amount of speed and leaping power to attempt to latch onto you. This frenzied chase lasts a while until you are finally able to make your escape. The audio here really got my heart racing; it never fails to carry tense as well as exploratory moments.
The Paranoid Slums

After reaching safety (for now) you end up strolling down a dark, peaceful alleyway with doors either side in a downtown neighbourhood. You then come face to face with the locals; robots with quite human behaviours. It appears that they may have become accustomed to running away from small things (the pinkish critters perhaps?), and they don’t hesitate to lock themselves away on your arrival. During your travels, in an abandoned flat, you will have located a small adorable floating drone called B-12. This drone serves as your companion to help communicate between these bi-pedal droids and our furry friend, as well as having their own story arc. Once you have made peace with the locals, you learn more about the mysterious pink critters. It transpires they are a special form of bacteria that went rogue, evolved and developed the ability to even eat through metal itself, known only as the Zurks. You also learn of a particular bi-pedal entity called Momo. We’ll speak more about them later.
For now, there is a gloriously modelled area to explore known as the Slums. Any cyberpunk fans will absolutely love the dark alleyways, neon signs and Kowloon-inspired rooftops. You leap from place to place, largely solving small puzzles (sometimes with hilarious results) and scavenging certain items. You will also find yourself having conversations with the locals quite a bit. At any time after they first speak, you have the option to show them an item. If successful, this will progress you further. It’s largely a great system encouraging you to remember points of interest, although my only small gripe is that at one time it feels as if you’re simply on a hunt for items and not much else. This game also has mainly stealth elements with no combat in sight for the most part. That being said, the game I had been playing most recently has been Dead Cells; a very fast, very mobile combat-based procedural 2-D adventure with lots of loot and abilities. I probably just had that itch having not played something narrative for a while.
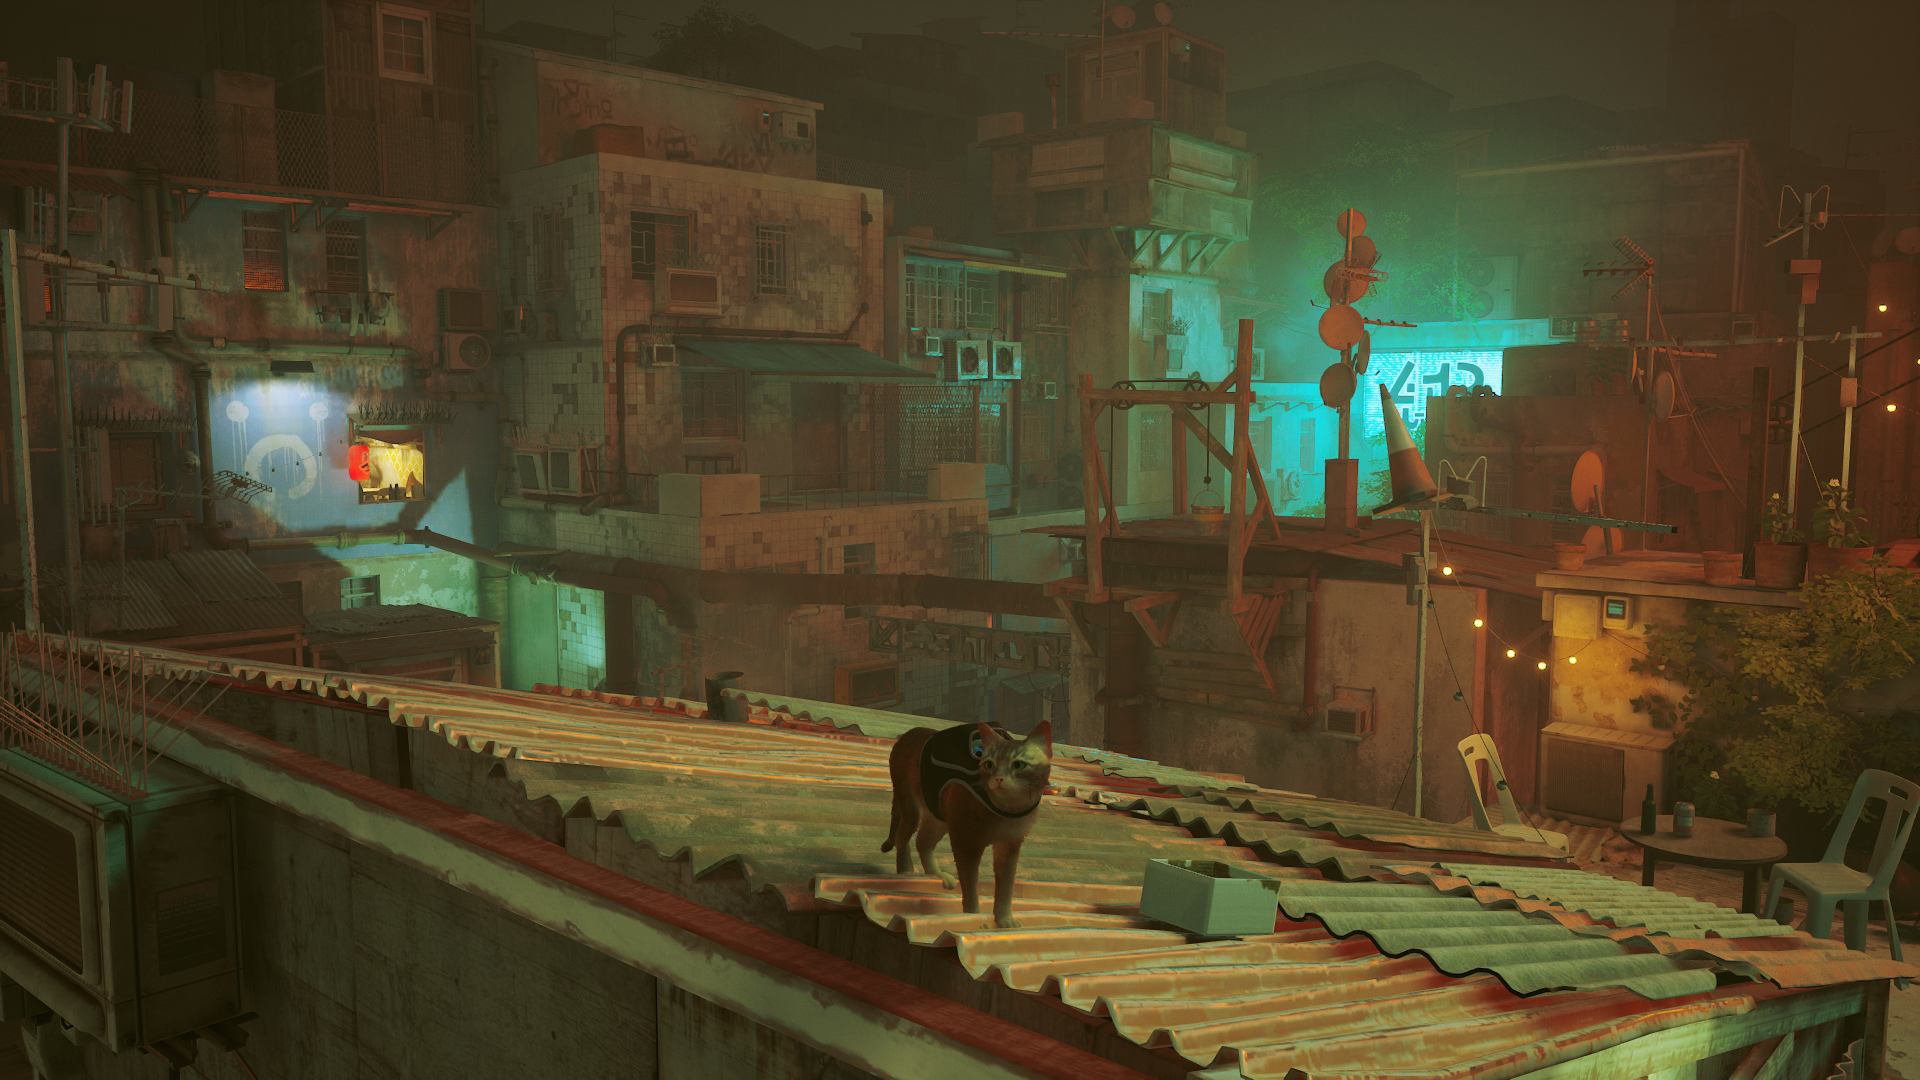
This brings me to an important point about this game. If you are somebody who loves a combination of collectibles, combat, abilities etc. you may find yourself somewhat disappointed here. This adventure is more of a narrative piece and although there aren’t that many items, everything has its place. At most you have 8 pieces of sheet music for a fellow with a guitar and a bunch of memories to recover for B-12. None of this is strictly necessary as the only rewards are badges that get attached to the jacket our ginger friend bears, which don’t serve a purpose later as far as I can tell. Speaking of that jacket though, one of the most entertaining cat behaviours (the moment which made me laugh out loud) was when B-12 makes the jacket appear on our furry friend. Any cat-lover can relate to this, but when the jacket appears, our stray hero doesn’t appear to like it and their body bows down at the rear as if trying to dislodge it. Also there are many other fun little cat behaviours to be found, such as scratching sofas and rugs. The charming moments that catch you off guard are numerous in this game, but I’ll save some for you to discover for yourself!
The Outsiders’ Mission

Let’s go back to the main mission of the game. Our friend Momo is part of a collective who call themselves the Outsiders. When you first meet Momo however, he seems quite troubled and almost at the end of his tether, as the others have not been seen or heard from for quite a while. Their collective mission is to get to the outside world by any means they can find. It turns out the stars in the sky are not real, astonishingly enough I didn’t notice this. They are concentric circle constellations and it turns out they are lights on a very large ceiling containing the city. You get on to find and return notebooks of the outsiders, found somewhere in the slum, to raise Momo’s spirits.
If at any point you happen to get lost in the rooftops, it’s important to remember that crucial ‘meow’ button. Lights and other apparatus will light up to hint at the place you need to go. As you adventure on, there will be memory points along the way that B-12 will be able to use to remember things. Both you and B-12 will learn more about how life was before the machines, helping to flesh out the environment we find ourselves in. I’d like to mention here that there is not only the slums either, there are other places you will visit as you progress your quest.
You’ll come across areas such as an almost 1984-esque policed city and other areas that are actually quite terrifying. The one thing that will keep striking you is just how beautiful, detailed and varied the environments are. When you walk inside a flat or bar or shop, everything from the textures to lighting feels so varied and meticulous, making them unique to each other and always hitting the right mood in association with the character(s). The other thing that makes it different here is that the details are on a smaller scale. The environments can afford to be smaller and more effort can be injected into the smaller rooms. I frequently found myself in awe and took so many screenshots that it was unexpectedly difficult to pick the right ones for this review!

As an example, a particular bar I walked into later in the game had a few bi-pedals sitting at the counter, some small wooden tables to the right and a pool table to the left. I spent a few minutes checking out those tables as they looked downright real, and had that mahogany wood finish you usually would see in actual bars. You can leap on those tables, the bar and even the pool table. You can walk on top to ruin the perfect ball set up and swat the cue ball around. Anyone that has met me knows I can never turn down a game of Cat Pool.
At this point it becomes quite difficult to continue as I would not wish to spoil important plot points; the game is largely narrative driven after all. However, if you would like to know some profound thoughts I had on this game after finishing, read on.
Endgame Epiphany (SPOILERS PRESENT)

You will know when the time comes, but an opportunity to visit the controlling tier of the city will become available. By the time you have learned all that you have, you may experience a sense of shock as you enter an incredibly clean and functional environment, still operating with robots for numbers as names as per their programming. As you walk through here, you feel a strange anger consume you. Here there are no Zurks or other dangers, and as you walk you continue to learn that every other level was left to fend for themselves. Once you hit the main control room, it is time to open the lid to the city. This is where the outside finally opens, and it is a truly epic event.
Once I had completed the game, I had to stop for a while and think about everything that happened during this adventure and had a couple of realisations. I had come to think about how a lot of games I play are generally incentivised by collectibles and other trinkets. This game took an opposite approach in a way; the items, characters and the parkour system were all there to further the narrative in a focused and uncomplicated way, which served to immerse you more deeply with less distractions. There was no fear of missing out here. And if that wasn’t enough, at the end you realise that you, a mere feline, somehow did all this. You saved an entire generation of sentient beings, solving a centuries long problem that they were otherwise unable to themselves!

Even though the game was generally speaking shorter than other adventures (took me just over 6hrs to complete to a satisfactory level), at no point did I feel distracted and everything felt very pure and justified. I was left thinking about all those poor citizens that now feel as much as humans, and how they were left discarded and forgotten. But I was also given hope for them and left with a heartwarming (although in a way bittersweet) end.
Summary

This game is a masterpiece in its own right. It successfully puts the player into the shoes of a (particularly smart) cat that never strays far from its core formula. Every behaviour moves you in some way, manifesting itself as everything from joy to sadness, producing many moments of relatability to anyone who has ever owned a cat. The environments are vibrant, detailed, unique and very much alive, working well with the brilliant cyberpunk-esque vibe created by the sound. The characters are genuine and you find yourself caring a lot for them throughout. For anyone that may want combat or incentivised collectibles, this won’t be for you. For everyone else however, take a moment out of your time to treat yourself to this unique and satisfying adventure of a certain stray feline that defied all odds to become the unexpected furry protagonist we never knew we needed. I sincerely hope this adventure is experienced by you too!


Blasphemous - In Review

Imagine for a moment the most divine picture you can. No doubt you’d be envisioning objects such as a holy grail, or a celestial group of beings whose mere appearance opens the heavens, or maybe a spontaneous miracle or intervention in a time of great need. Now imagine this as what we would consider the opposite of beautiful, a parallel universe where suffering in physically tortuous ways is considered penance for one’s own guilt. A world where the general ideas of what is considered a miracle are in fact something much more extreme, in order to help attone those who wish it upon themselves. You may now be able to visualise some of the unique ideas behind Blasphemous.
This is a rather satisfying largely combat-based adventure, that makes you feel every strike and parry. With the enemies far from being crawlers as in other games of the same genre, it throws you straight into the deep end against a backdrop of some of the most glorious sprite work to grace your screen, with imagery that is certainly not for the faint of heart. It’s time for us to take our pilgrimage through the beautiful yet grotesque world of Cvstodia.
Arise From the Pit

It all starts with a ritual that manifests all sides of the soul, in a somewhat nebulous start to the game. The main protagonist (perhaps?) rises from a pile of corpses, eerily similar to themself. You’ll find your character referred to across the land as the Penitent One. You make your way forward through the first area; Brotherhood of the Silent Sorrow. The immediate aspect you will notice is the astonishing artwork. You have a vast hand-painted, yet pixelated backdrop that creates quite the foreboding landscape.
Heading into the next area, the corpses continue and you are met by your first opponent which just so happens to be a mini boss. You have only just awoken and played for a few minutes learning how to jump and slide, and are already face-to-face with the Warden of the Silent Sorrow. This is a baptism of fire and although you may perish a few times, this will awaken your senses. Healing using biliary flasks, and reviving using your nearest prie dieu (I still had to Google the spelling of that), you finally defeat your quarry. The Penitent One fills his helmet with the blood of his fallen foe and sits it over his head. Heading further still you come across a character who will narrate at various points by the name of Deogracias. You learn that your character’s penance is that of silence, which explains the blood-filled helmet (and also means your character will not speak for the duration of the game rather tidily). You are tasked with undergoing three humiliations to progress through a sacred door. By the way, if you are having trouble following any of the terms used in the game, bear in mind this will continue to be a common theme. While highly immersive, you may be prone to forgetting things on occasion.
Road to Albero

We head onwards and immediately notice that this stretch feels a lot like the Castlevania franchise. Here, the smaller enemies start to present themselves. Combat is generally great, with a fair few options to take down your foes. There are a few types of enemy present to practise attacking from the right angle, using low attacks and practising the highly satisfying parry counterattack, which requires good timing. You can slash in nearly every direction - except downwards. Coming from Hollow Knight, this may have thrown me a few times. Sliding can be used to enter small gaps or dodge away or even through some opponents, which is really well executed for the most part. My favourite move is found slightly later, where you thrust through your enemies with your blade while sliding to take them out, even from across the room. Makes you feel like a badass when pulled off.
If you’re a bit lucky, your foes may enter into a stunned state where you will be able to then perform an execution. These are satisfyingly gory and varied, not unlike fatalities from the Mortal Kombat series or glory kills from the rebooted Doom franchise. It is worth mentioning though that these have sometimes resulted in being hit by another opponent or falling down a hole due to the animation playing out. A bit of care is needed for these.
You have a few aspects to consider in combat. First is most obviously your health or vitality. A blue bar also measures your fervor, used for special moves mainly. There is also the number of biliary flasks. You can use one of these at any time to heal by smashing one over your head, which takes a short time to execute. If you find yourself lacking in fervor, you can always hold the secondary move button to slice yourself. This sacrifices a little vitality; a hail Mary for when you need that little bit extra to pull off that move. Should you perish at any point, a guilt fragment is left behind which keeps a bit of vitality and also reduces the fervour bar a bit until collected again.
When you reach the end of the first stretch you enter the central hub, a small sanctuary called Albero. You will notice more and more as you return from your adventures that this appears to be the only place focussed on healing rather than penance. It is here you find a few rooms, starting with an altar. Here you are able to purchase combat upgrades using any tears of atonement (the in-game currency) received from slicing enemies. You learn of your weapon’s name, the guilty blade known as Mea Culpa. “The virtue of Mea Culpa hath ascended” will appear after a haunting animation of handing over the blade to the altar statue. Once again, sometimes the game may get lost in the lore and doesn’t explain some terms. It took me until I found a few altars to realise that as well as increasing the amount of upgrades available, my blade also got more powerful with each one found.
Into the Beyond

It’s now time to venture out deeper into the world of Cvstodia and progress our mission. We’ve already covered how beautifully illustrated the backdrop is, and this carries with the areas you now have access to. For example, you have a basement area, altitude-pushing snowy peaks and a rather large almost canyon-like area. There are also a number of others.
For the unversed, my recommendation is to first travel to the basement area; Mercy Dreams. This will introduce you to various traps, combat and agility tests. If not already that is. Particularly in this game, you have the freedom to choose which path you take first, as there are many areas even before the sacred door. This is a good time to talk about the dexterity of the character; the general agility of the character is great in most cases, if slightly awkward in others.
While exploring, unlike many other adventures you can perform ledge grabs. On the surface this seems like a good idea in case of a misjudged leap, or maybe to accentuate those held breath moments. This can however cause a few problems during combat, which the game has in abundance. In the heat of battle your main instincts to get out of danger will be jumping or sliding, with the latter not always possible in the case of, say, a shielded foe. On accidental ledge grabs from a jump, you are left open as you cannot attack while hanging.
Ladders are a welcome addition in any metroidvania and they perform their duty here; you can indeed ascend or descend comfortably. There are a number of issues here as well however; first is that you cannot slash or use any ranged moves to take out enemies that may be beside you. This means you need to jump off to slash and risk falling into potential unknowns. Like spikes for example. And unlike a game like Hollow Knight, you will die instantly if you are unfortunate enough to become impaled. This can be a regular annoyance when exploring, as each time it sets you back to your last prie dieu. And on occasion the guilt I left behind was on the spikes, meaning spending tears of atonement to resolve them as they were otherwise irretrievable. But going back to the ladders, there is another strange glitch whenever a flea-like enemy leaps into one or if you were to sword slam through one. In both cases, there is significant sticking.
Another annoyance initially is pitfalls, which also equate to instant death. You run into a lot of these in the altitude-pushing Graveyard of the Peaks. Again, there are other 2D adventures that simply place you back just before you took that jump, such as Guacamelee (another combat-based outing). In all fairness though, there is actually some clever reasoning behind this one. More on this later.
Trinkets & Curiosities

Each area on the map presents its own set of challenges, from inaccessible places to challenging boss fights. It stands to reason you will also come across some trinkets along the way to help out. And there are a lot more trinkets here than in most adventures.
Along the way you will pick up special moves, which are known as Prayers in game. You then have Relics which change the way the world is perceived, which helps in traversal. Rosary Beads are a set of abilities that can be combined in many ways to augment your character based on the amount of empty bead slots available. Quest Items are a mixed bag of curios such as keys and other items that could potentially be blessed to grant new abilities. Mea Culpa Hearts can be inserted one at a time as a sort of deal with the devil, usually making the blade stronger but at a cost. Abilities are, in a rather ambiguous manner, relating only to abilities that can be upgraded at the Mea Culpa altar. Collectibles throughout the playthrough are only bones, quite a perplexing name as it implies there are different kinds of items.
The way your inventory is laid out is imperative in any metroidvania. Ideally it would be something that is quick and easy to reference as the map tends to be quite large, and you have to remember where to go to make the most of new items or abilities. As such, you’d usually have two menus as a base; a map and your current abilities. Blasphemous handles this differently given its item mechanics, with a mixed level of execution. I’ll elaborate on this more.
All of the above menus are present in separate tabs, nice and clear to see in this way. The abilities (not just the ones under the abilities tab) are plentiful and provide some nice interactions. The rosary beads are not unlike Hollow Knight’s charms system; you will pick up more and be able to expand the string with rosary knots to combine more abilities. Relics are interesting in that they can alter the world; for instance one relic grants you the ability to fall through those pesky pitfalls and into other (sometimes secret) rooms below. However I would have liked to feel like it was the character doing this on occasion. An example is in another metroidvania; Axiom Verge. You can use a grapple to swing or fire an address beam (a bit like a pulsing ray gun) to glitch world blocks out in order to make them disappear and traverse through.
There are a lot of nice ideas here. However, when changing out rosary beads, mea culpa hearts, etc. the writing underneath each ability or item is a mixture of lore and function. To the game’s credit the lore is immersive and beautifully written, but this does mean that if you happen to forget what an ability or item does (which is often due to the sheer number of them), you have to re-read the entire passage to recall what does what. Making the lore entirely optional here for convenience would have been a better option. As well as this it’s difficult to know other important factors such as which items can be blessed or subtle hints as to which character accepts them, as this has not been written into the appropriate passages under key items.
Journey of Atonement

Let’s talk about the map for a moment, which is separate from the other menus. It marks out any prie dieu, altar, or any other point of interest automatically just like other adventures. I do feel however that the map in this game could have represented the topology of the landscape more like Hollow Knight or Axiom Verge 2 rather than squares, as each individual area can look quite similar throughout with the exception of boss fight stages. It usually fits in other more sci-fi metroidvanias rather well, but for some reason can throw you off here when trying to find that elusive trinket or character.
This brings us onto our next issue; that non-player characters around the map do not mark themselves automatically for the most part. This is pretty critical here, as there are key items that require you to find the correct character to trade for abilities or purchase from (notably the merchant). It’s easy to get distracted initially as you are trying to comprehend what each character says and means, and the map marker function isn’t hinted at. By the time you realise you can use them it’s already too late and you will need to explore entire areas again to locate characters once more. As a side note, I will say that the characters are beautifully voiced. It honestly is a joy to the ears and I wanted to make sure to take it all in (I know there are text captions but still…).
While travelling through any world, the auditory experience is important for capturing the mood. Here the theme of music felt for me as having a Hispanic or Latin American feel. Considering the central hub is called Albero, this fits nicely. You have the pleasant guitar strums creating a sense of the area you are in. Only small catch to this is sometimes the music can feel repetitive across an area while exploring. A bit more evolution could be necessary here, although there are a few times where the boss' music and approaches to certain pinnacles in the adventure start to make your heart race. On a more visual note, I also feel that a bit more movement in the environment may be needed other than the enemies or crumbling platforms, whether it’s something like particle dust effects, tremors or small creatures flying off when you are near.
Now, we can’t talk about combat-based adventures without bosses. The bosses in this game are probably unlike most you have faced before in other games. In fact they are some of the most interesting designs I have seen personally since Okami. As an example, in one of these you are fighting a skeletal snake while there is a giant, blindfolded baby adorned with a crown of thorns who is constantly trying to grab you. Incidentally, if it does you get dismembered and predictably you are dead. Another is an exhumed emperor being held up by 5 pairs of hands.
I’m happy to report that these boss battles are highly satisfying. The difficulty (or pinch) grows as the boss’ health lessens, more gradually than in most games. They do for the most part feel like they are trying to end you and that feeling when you finally vanquish them is not of relief but of elation. The only slight downside for me is that it may not always be clear when you can and can’t dodge through bosses, but this is slight and infrequent. If you are having trouble with a boss, there is a handy character next to the nearest prie dieu that will make your life easier should you accept their help. They will assist by recovering you if you hold out at low health for long enough. Boss battles are a great joy overall.
Summary
Blasphemous is brilliantly conceived and a great adventure through an otherwise tortured world. It is a feast of visual goodness with the outstanding and graphic art style. The combat is highly satisfying and permeated with rather gratifying fatality-style executions. And those boss fights, although there are more in other games, are memorable and highly enjoyable. Sometimes this is hampered by the game being a slave to the theme a little too much at times with the lore, which can obfuscate the objectives, the map or how your inventory is managed. The character’s agility in the environment can also conflict with combat, mainly with the ladders and ledges. Overall however, I can highly recommend this game and believe this is very much a journey worth taking on account of its unique view on the genre.

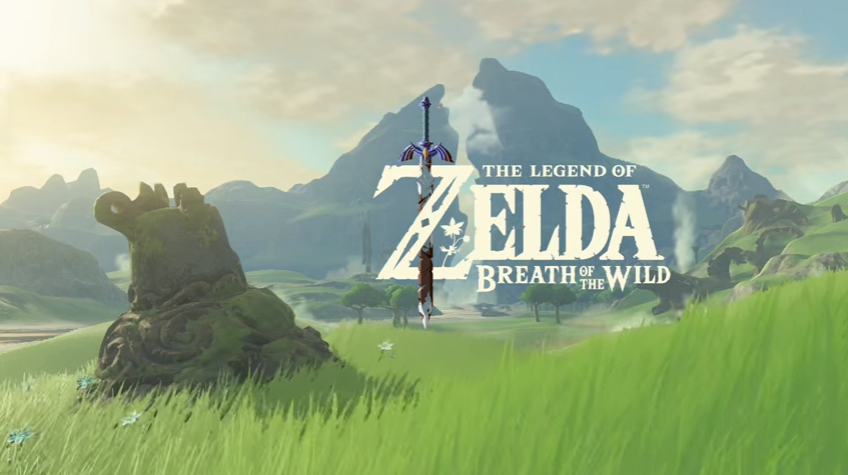
Legend of Zelda: Breath of the Wild - In Review

Every now and again, you get that itch for adventure. Then you remember your holiday is a bit far away. So instead you spin up a game and dive headfirst into an otherworldly realm, letting your imagination wander as you explore the possibilities. There've been many great attempts to capture this feeling, one of my favourites being Okami, where you explore a gorgeous Japanese brush-painted landscape you can not only explore, but can interact with by painting over it. Maybe you prefer to parkour over a zombie-infested city, ducking and diving in order to craft weapons and complete objectives in Dying Light. Perhaps you want to simply race across a desolate, post-apocalyptic world and beat up maniacs to upgrade your car in Mad Max. The one that seems to stand head and shoulders above the rest though, at least in my mind, is Legend of Zelda: Breath of the Wild.
Where other open-world games have provided a worthy escape into unknown lands, this game elevates this to a whole new level. It adds interactivity with the environment in so many interesting ways that now, 5 years on, there are still players finding brand new ways to achieve their goals. Come and join me on a journey to discover why this is more than simply a worthy escape, and is a world to be deservingly savoured.
The Great Plateau Beckons
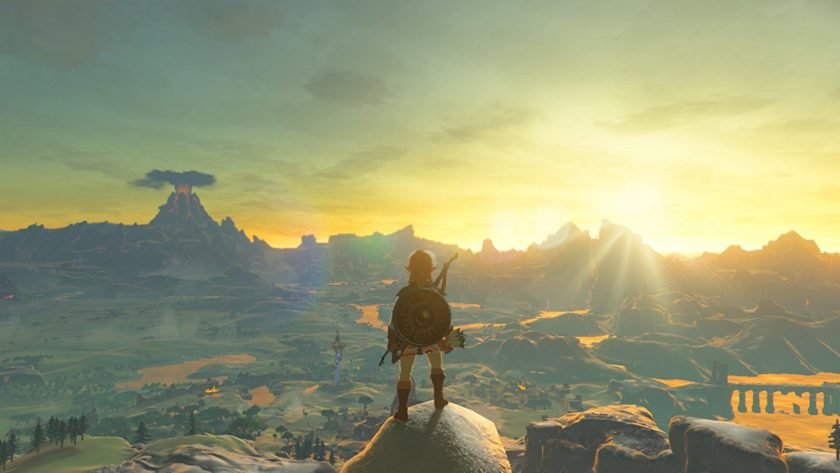
Our hero by the name of Link awakens in a mysterious cave, known later as the Shrine of Resurrection. You walk over to a large glowing stalactite-looking object and (after a rather beautiful animation) pick up your first vital item; a Skeikah Slate. This object is cleverly designed as it resembles a modern tablet, and feels powerful yet ancient. You find and put on your ragged clothes and head out. Immediately upon exiting the cave, you are then greeted by the astonishing vista of the world of Hyrule, and the game then introduces itself in the now iconic moment.
As you head down a hill to the right, you stumble into a mysterious hooded figure by a campfire who guides you to your first destination. As you approach, a place to insert your slate is revealed. Once inserted, a giant Sheikah Tower thrusts itself from beneath you, and all around the map others heave upwards into existence. The vastness of the landscape becomes clear when you are shown the map of The Great Plateau. This area serves as a sandbox to get your bearings with some of the systems in the game. It is now evident that activating towers is how you will also map new areas.
Into the Heat of Battle
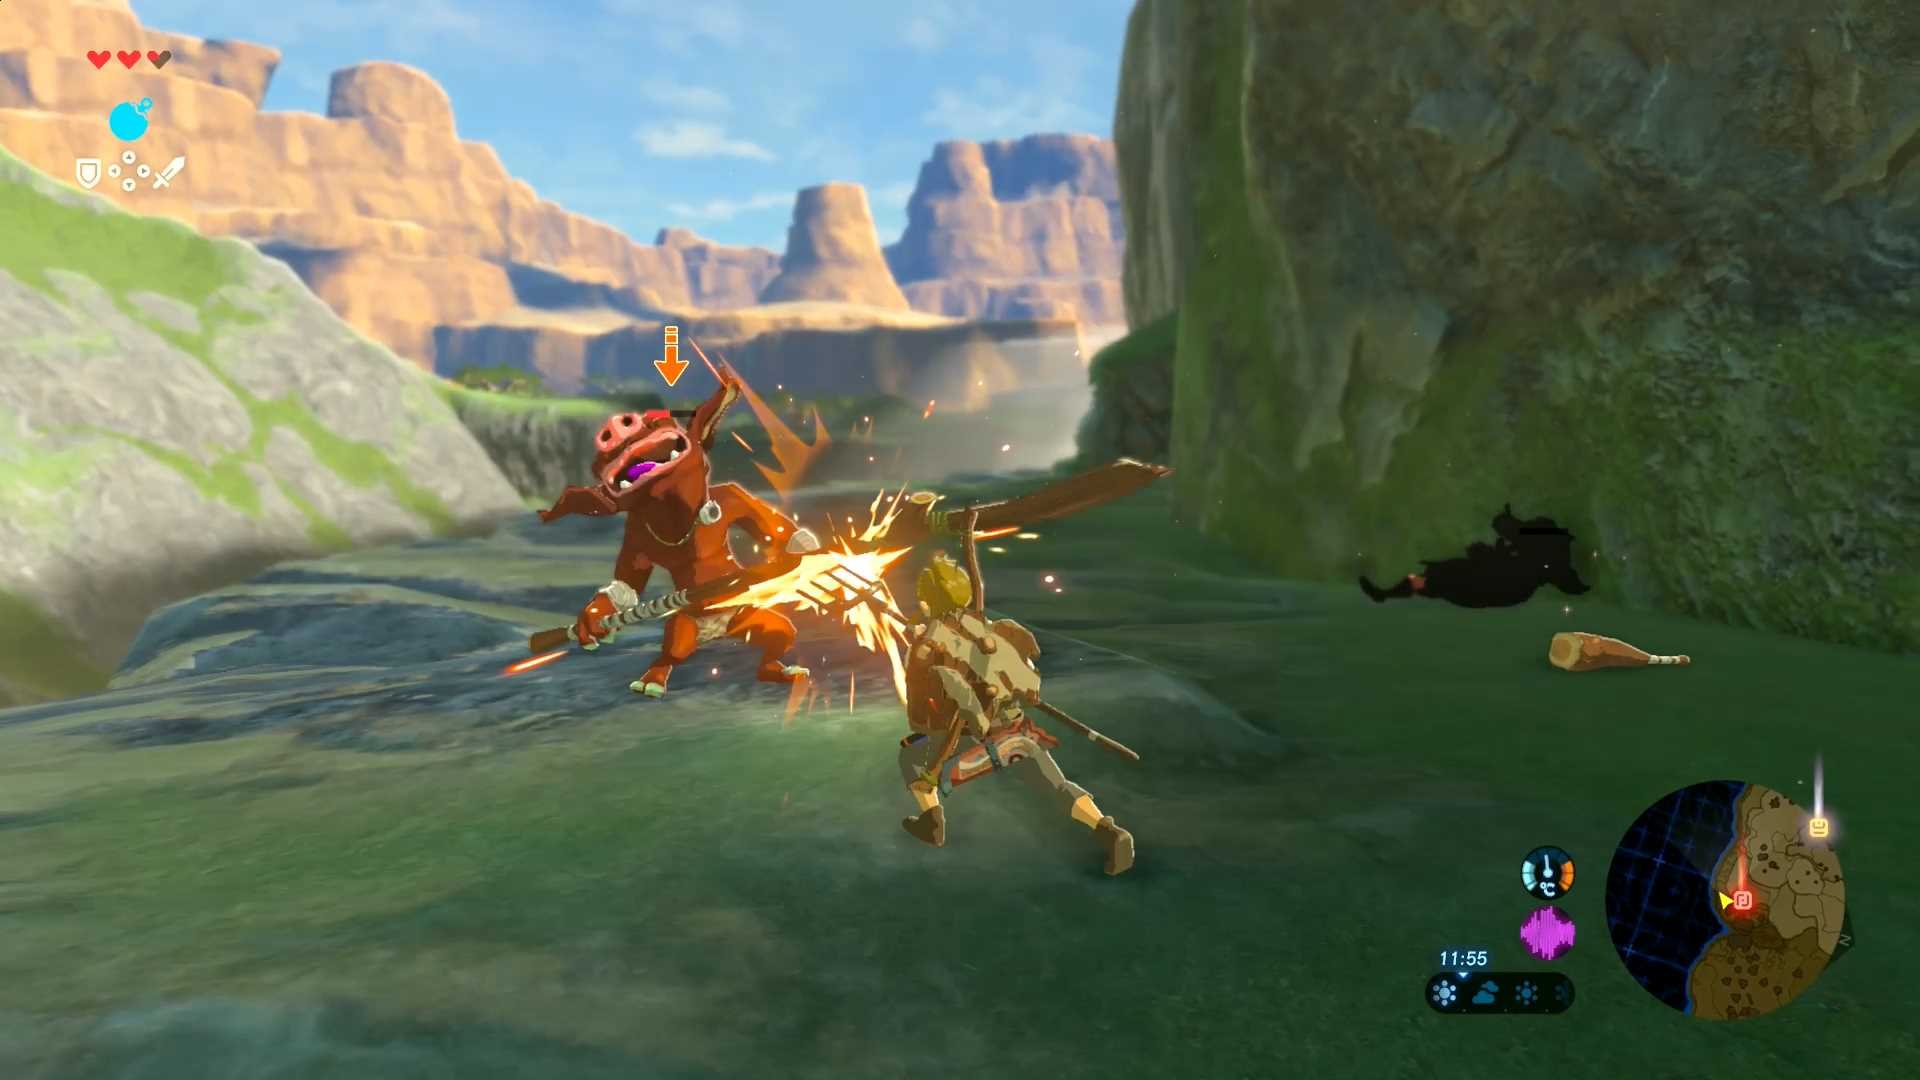
Once you unearth the tower, you will be tasked to reach a few locations in the Great Plateau, in order to upgrade your Sheikah Slate. While on your journey however, you run into some trouble along the way. Suddenly a Bokoblin (a goblin-like creature) notices you, which triggers a frantic search for a weapon. You then realise you don’t have one. But then you remember that tree branch you picked up a little while ago and start swatting. Then the tree branch breaks.
Unlike many other open-world games, you not only have an economy based in rupees (the in-game currency) but also another for weapons in a manner of speaking. Most weapons you pick up have limited durability. You will need to strategize and decide which fights to take on, but also which weapons to use and in what order. It provides a good motive for picking the right tool for the right job.
After wandering about for a while, you find your first rusty weapon. Not the most durable, but it will do the job for now. “Huzzah!”, you cry, “Finally a weapon!”. You then give that pesky Bokoblin a good old-fashioned battering. Then they drop their spear. “A spear?” you think to yourself, searching for another opponent to test on. Once found, you then proceed to machine-prod them into oblivion, they can’t even get near you. Each weapon type carries its own qualities. You may have the traditional sword and shield, or a two-handed claymore that’s powerful but negates the ability to parry, as you can’t carry a shield. Some even have functions other than as mere weaponry such as axes. Finding new weapons is always a joy.
There are also other methods to make the most of your gear. If a dodge is successfully executed with good timing, this will allow you to retaliate with a flurry rush; a series of hyper-fast hits against the opponent. If your melee weapon is about to break, you may as well throw it at them…..which you can. The weapon will inevitably shatter on hit, but will deal double damage in a pinch if needed. Of course the game also has bows as an option to attack from a distance, with excellent Joy-Con motion controls for fine-tuning your aim.
A final consideration in combat basics is the handy colour-coding of enemies. The first Bokoblin you will meet is likely to be red, the lowest level. Later on, other colours will represent increasing levels. Not only do enemies become tougher with level, but they develop new and sometimes unexpected attacks and movements. They will also become more resilient, even immune to certain attacks and statuses. More than anything then, the enemies feel increasingly battle-hardened.
The Fruits of Labour
With every battle comes a need to recuperate and build resilience. There are two main forms of energy Link will need to tackle this great landscape; health and stamina. Health is pretty self-explanatory, you start with three hearts and if they run out you die. Stamina is the more interesting aspect here, as it dictates how much of or how long a given action can be performed before becoming exhausted. Actions that can be performed are numerous, for example; sprinting, climbing and charge attacks with your weapon.
At some point you will need to survive on more than those apples you climbed a tree to retrieve. With that comes Breath of the Wild’s excellent recipe system. Every good recovery item is either some sort of meal or elixir. With the ingredients or monster parts you accumulate, you can create whatever your heart desires, whether it’s an omelette or a fancy cake. The more gourmet the ingredients, the higher the potency. Just find your nearest campfire complete with a cooking pot and start chucking stuff together, it’s always fun discovering new recipes!
Meals are great at recovering health, but if combined with special ingredients they can also have status effects. The first you are likely to locate is the spicy pepper. In the Great Plateau, there is a cold mountainous region and you will need this to cook a warming meal, otherwise you will freeze. Elixirs will also have effects, except using monster parts and critters (bugs, frogs, etc.), with no real health regeneration usually. Experiment with this for yourself, and you will see how versatile the effect buffs can be. Be careful not to mix the wrong ingredients together however, otherwise the result will be something rather vile.
Alongside the recipe system, it is also necessary to hunt for pieces of armour to bolster your defences and increase your overall resilience. The number next to these will determine the level of defence (and incidentally the number next to weapons also dictates their level of strength). Over time, this can also be upgraded with all the items you may be hoarding at a wonderful place; a Great Fairy Fountain. The more of these you find, the stronger your armour can become, and eventually can have additional effects.
The Art of Discovery
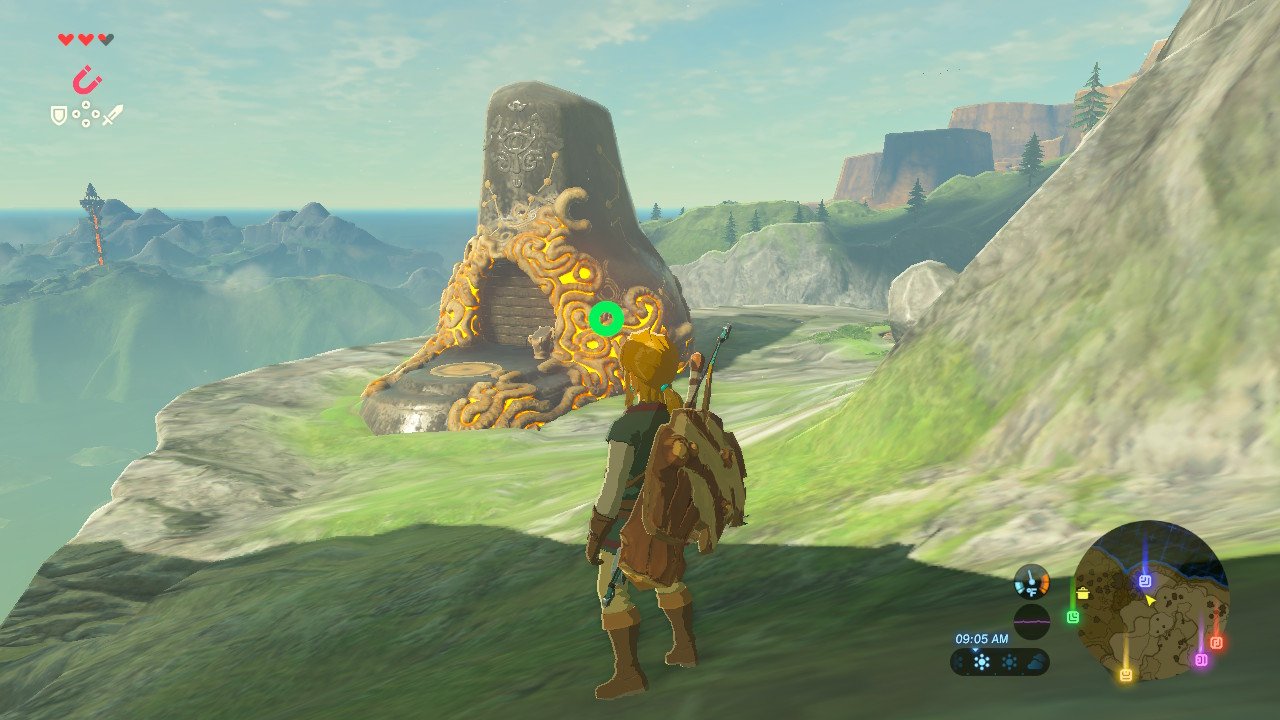
We now move onto possibly the best part about this game. It’s time to step out of the Great Plateau and into the world of Hyrule at large, and talk about some aspects in more detail.
There will be many, many things to discover. You will have already entered and completed a few puzzle areas called shrines (not unlike tombs in the newer Tomb Raider series) in the Great Plateau. Out in the wide world these are everywhere. The shrines range from combat trials, to mental and physical puzzles (some with excellent motion controls once again), or even in some cases simply entering after completing a Shrine Quest. Talk to folk regularly to uncover secrets such as these. Once a shrine is detected, your Slate will bleep faster as you near one. I advise to locate these as and when detected, as they act as fast travel points on the map. They are satisfying to complete and can provide great loot, but also help extend your health and stamina bars using the spirit orbs awarded on completion at prayer statues.
But let’s get to the other fun stuff; the Sheikah Slate Runes. These expose the rather exquisite physics system, which is so good that many of the shrines and key parts of the game depend on it, and make the ah-ha moments of discovery oh so satisfying. No strange, floaty physics here.
Round and Square Bombs can lay a bomb that is lighter that it looks, useful for enemies or broken walls. Stasis allows you to stop objects for a while. A clever part of this is hitting the object repeatedly with, say, a hammer will cause it to shoot into the opposite direction upon the timer running out. Cryonis allows you to summon large, climbable ice cubes in water, handy for say crossing a river if there isn’t enough stamina in the tank for swimming.
One of my most commonly used though is Magnesis. This excellent ability can be used to control metallic objects ranging from crates, to weapons, even treasure chests at the bottom of a body of water. Admittedly, one of my guilty pleasures is using a metal crate to push an unsuspecting Bokoblin off a ledge. There are always new and interesting ways to discover when using Runes.
My advice is to follow your curiosity, as the game seems designed with this in mind - an aspect where many open world games have previously failed. One big reason to do this is Koroks. These are cute little masked wood-sprite creatures that you will find hiding around the map and they are EVERYWHERE. If you see a circle of rocks on the ground, but one missing, find and place a rock there and blam……Korok. See a circle of lilies in a pond? Dive into it and blam……Korok. See a boulder-shaped hole in the ground? Smack one into it using Stasis and……you get the idea. Finding these will award you Korok Seeds, which allows you to expand your inventory via our cheerful maraca-wielding Korok friend Hestu. Feel free to take a small diversion once in a while.
Exposed to the Elements

Exploring the wonderful landscape of Hyrule is a feeling that is difficult to encapsulate in full. You have the birdsong and crickets, the breeze that sways the grass and the occasional broken arpeggio on the piano accentuating the wild in subtle ways. Even strolling through the long grass as it parts around you, you can almost taste and smell the vast ecosystem as if you were actually there. It’s important to keep in mind just how you can affect this environment, and how much it can affect you when you least expect it.
In the land of Hyrule, you will often find yourself contesting its weather systems. Some environments will be extremely hot, cold or simply harsh due to adverse weather conditions. Alongside the physics model, working hand-in-hand with this is the elemental side of the game. This can lead to some rather interesting interactions discussed later.
The weather can present many challenges. One of the most common is when you are climbing, which you do A LOT while exploring Hyrule as nearly all terrain can be traversed (provided you have the stamina for it). Once it starts raining however, surfaces become slippery and Link can barely make his way up anything. Another example is in the volcanic environment. Here, any wooden weapons equipped set on fire and can burn to ash if unchecked. A humerous example of the weather system was with my bow. I had this equipped and spotted a bunch of enemies over yonder. I drew my bow with great enthusiasm, and promptly exploded. Confused, I once again rose up and drew my bow, then exploded again. After cursing expletives and shaking my fist at the enemies for a while, I came to the realisation that it probably wasn’t wise to equip bomb arrows in a volcanic environment.
Used correctly however, these conditions can be turned in your favour. While it is raining, any lightning-based weaponry gets a large boost and creates a field, disarming enemies of their weapons in a larger radius and causing more damage. Also in the volcanic environment, any regular arrow you draw will ignite and become a fire arrow, saving a fair few rupees.
Let’s set up an example of how these systems can be harnessed in battle using our nemesis, the Octorok. These balloon-like enemies can be quite irritating, firing rocks with pinpoint accuracy at your face. Once defeated they provide you with Octorok Balloons, which when tied to an object will cause it to float upwards. Tying one of these to an explosive barrel can float it to a base that is higher up. When it then reaches the right spot, a loosed fire arrow can ignites the barrel, sending nearby enemies to kingdom come!
One final mention is the time of day. During normal daytime hours it’s business as usual, however during night-time there are more enemies that spawn in, as in other games such as Minecraft. On occasion however, an event occurs that respawns all previously defeated enemies; a Blood Moon. We haven’t spoken ill of this game as of yet, however I feel this is a weaker aspect. In relation to the frequency of the announcements, I’ve not felt it really impacted me in a meaningful way as all it appears to do is respawn enemies. I’ve seen this better executed in games such as Terraria, where the enemies kept on spawning in an attempt to overrun, battering doors down and closing in on the player, while they wished it would all end as soon as possible. That was a rush.
A Noble Cause
With all this said and done, let’s get onto the main quest line. Upon exiting the Great Plateau, you are immediately presented with the end game objective; to defeat the evil known as Calamity Ganon, that has taken over Hyrule Castle and is draining Princess Zelda as she attempts to delay it from spreading throughout Hyrule. It is highly unusual for a game to reveal the end objective with a map marker so early. It tempts you, reminding you that this can be approached in your own time, however it would probably be suicidal for a first-time player to do this straight away. Instead, there is another objective to reach Kakariko Village.
After sprinting around for a while, you may be wondering how on earth to speed up the pace on your journey given the size of the map. By this point you should have hopefully reached a stable. These are scattered about the land, and can be used to register and summon your very own horse. This companion will serve as your trusty steed, however when you first manage to tame one, it doesn’t do this straight away. It may go in a different direction than intended or get restless. With enough soothing however, over time the bond will grow stronger and the horse will obey more frequently. You can then relax to the beautiful staccato of the piano alongside the galloping horse.
Upon reaching the village you will learn of four mighty Divine Beasts that have unfortunately come under control of evil and are now causing havoc. They appear on the map in different corners and require separate challenges in order to reach each one. This involves reaching each of four nations; the merfolk-like Zora, the birds of Rito, the all-female Gerudo tribe and the rather hefty Goron. All of these tribes have their own distinctive differences and are all very charming to explore.
Along the way, you will also stumble upon memories of Link’s past from a bunch of photos on the Sheikah Slate, which neatly tie together the characters and story. The story aspect is a little more infrequent in this compared to other open word titles, however I feel this works in its favour and gives space, allowing you to fill in your adventure.
Moving on to the divine beasts, these involve both puzzle solving and precise combat to tame. Each of these revolve around their own overarching mechanic and are satisfying to complete. The first divine beast you are likely to head towards (as I did) would be that in the Zora domain, as this is nearer to Kakariko Village than the rest. Once reached, I spent a couple of hours taming the divine beast there, and after finally completing this I felt satisfied and looked forward to the rest.
However the game fell a bit flat here with difficulty balancing for me. I found the other beasts to be much easier in varying levels. You may be thinking here that this is simply because I improved at the divine beasts, but I beg to differ. Referring back to Hollow Knight, the difficulty curve was such that every boss was tricky but each gave different challenges that still felt fresh and testing, as well as individually rewarding. The mechanic ideas for each Divine Beast were all great designs, but the difference in difficulty means that you could be thinking there is supposed to be an order, which can be counter-intuitive to the non-linear adventure.
We then get onto Calamity Ganon. I will not spoil anything here, but will say that this is an epic-feeling battle as you’d expect. What I did not expect, however, was to beat it in one shot. Somehow, this was easier than any other boss faced, which I thought was strange at the time. The finale confrontation of any game should be a well-fought and satisfying end. Again referring to Hollow Knight, the final boss was tough. Took quite a few tries, but when it was finally beaten I exhaled a sigh of relief and satisfaction at the mountain I had just climbed. And that was with all my gear upgraded to max.
Summary
The Legend of Zelda: Breath of the Wild is truly a magnificent masterpiece. It is an incredible world full of curious interactions that will be different every time you play it. If you have tried previous open-world games just to check that nook over there only to find nothing, this is the game you’ve always wanted. Every discovery is a reward, every battle is a story. The only aspects that bring this down slightly are the questionable difficulty balancing in climactic parts of the main quest and the underwhelming blood moon. These are quite minor points however. For everything else, you will more than enjoy your time exploring and sometimes contesting the utterly beautiful Hyrule and savour every breath in this simply stunning adventure.


Hollow Knight - In Review

I started playing games at just four years old, and I still remember the lightning-fast sensory overload at the time that was Sonic the Hedgehog (my first game) on Sega Mega Drive. Since then I’ve played quite possibly thousands of games on multiple platforms varying from home consoles, through to handhelds and into PC for the ultimate experience. As you can imagine then, there are a lot of games to compare, each with bright and bold ideas with varying levels of successful execution. However, each also had their fair share of problems, even in some of my favourite classics. Then I played through Hollow Knight.
Never before have I experienced a game I’ve felt compelled to write about previously in order to break down the reasons why I believe this to be a strong contender for the greatest game of all time, at least in terms of single-player experiences. The design, art, sound and story are so tightly executed that it is extremely difficult to find flaws. Let’s break this one down bit-by-bit, although I would argue this one would require a lengthy case study to outline all the reasons it is worth your time. It really is that good.
Enter Hallownest

The game begins by landing your character, a humble hero simply referred to as The Knight, into the sombre world of Hallownest, a world populated with bug-like creatures. Here you will eventually arrive at a small village called Dirtmouth. All houses are empty with no-one to be found, except for one lone inhabitant: the Elder. After chatting with him, you drop down into a nearby well and into the vast world below, starting in the Forgotten Crossroads. Here you see the usual starting methods a metroidvania will give you to practice to run, jump and strike enemies with your sword-like weapon referred to as a nail. The enemies will look like standard boilerplate enemies harking back to Metroid, such as wall crawlers, walkers that run towards you if you get too close and basic fliers. This will give you a feel for the highly mobile and controllable eponymous hero.
There are a few things here that are different however. Firstly, contrary to most metroidvanias (particularly those that are closer to Castlevania), you can swing your weapon in any direction - even downwards - to take out enemies. Second, life energy will not be gained from taking out enemies, instead the game utilises a system called soul. You will receive soul in the form of a metre and can use this to either recover health by focussing energy, or simply use this to send a forward blast towards enemies. This gives you a little bit of choice early on, although there will be much more to come later.
The map will also have areas that are currently unreachable from the Crossroads in true metroidvania style. You will have to explore every corner to discover the way forward. It’s recommended to take on enemies as you go, not just for practice but also because on top of soul you will also receive the in-game currency known as geo. Be sure to also find grubs about the place, you will be rewarded handsomely with geo and other goodies when you return to their neighbourhood (you can find that on your own!). The extra cash will come in very handy for times when you run into characters and machines that may require it for items and other conveniences.
The World is Alive
Speaking of in-game characters, the world of Hallownest is full of memorable characters that have their own traits and help add to the story and atmosphere. One of the first you’ll meet in the Crossroads will be the ever-cheerful Cartographer, habitually humming while scribbling away at his parchments. As soon as you hear this sound, you will feel strangely comforted in this sometimes hostile environment and try to locate the source, following the trail of parchment directly to him. Once found, he will offer a portion of your current area map for a small amount of geo (really handy to keep some of this around). This is a great starting point for an area of the map and encourages exploration around the edges.
Another vital character is the Last Stag. Following signs to various areas is how you’ll find useful points of interest such as benches (save points and for health recuperation), hot springs (regenerates soul) and stations which are accessible by this somewhat tragic character, who still shoulders his duty to assist travellers where possible. This is one of the primary ways to get around in the world and make this vast landscape that little bit more manageable.
It is also worth mentioning that returning to the Dirtmouth every now and again after meeting characters can bring new opportunities. A final, useful character can be found after meeting the Cartographer in his own shop; the Cartographer’s Wife. A somewhat bored character (possibly due to the sparse activity in dirtmouth), she will regardless assist in making the map easier to mark points of interest (for a price) as well as offer purchase options for lost parts of the map in case the cartographer was missed. She will also open up one of the most unique and versatile mechanics ever experienced in the genre at the time of release.
Charmed I’m Sure

The main mechanic that sets this game apart is the inclusion of charms. These are abilities that can be equipped according to the current limitations which are dictated by the number of charm notches available. Every charm has a different number of charm notches in its cost, which helps balance the game as more powerful and versatile abilities will cost more. These have the power to not only grant abilities (such as Steady Body, which allows the player to hit without their character recoiling back, handy if on a ledge) but also make abilities more powerful (Soul Catcher will give you more soul when slicing enemies with the nail).
These even stretch to things that have come to be automatically expected from the metroidvania genre. Chances are the charm given (for a price) by the Cartographer’s Wife will be the first you receive - Wayward Compass. This charm costs only one notch (out of three initially) and will allow the player to see their current position on the map. The game quite literally gives options to strip everything back if the player does not need the abilities.
But it doesn’t stop there. Later in the game, there are hidden synergies between charms which reward the player for experimenting with mixing and matching charm setups. As an example, one of these is between Spore Shroom (releases toxic spores when focussing) and Defender’s Crest (releases a ‘heroic’ odour that damages enemies). Pair these together and instead of spores being released on focus, a more potent stench will be released that is much more damaging. I’m still quite pleased that I found that one! You will be genuinely surprised at how much you can make the Knight your own hero, your own way.
A Sight to Behold

The world of Hallownest is a real audiovisual treat that feels alive like never before. While travelling around the map you will come across incredible sights giving each area its own distinct theme and feel. Although this varies widely, the visuals paired with the evolving sound design make this world come alive in the most immersive way that commands your attention. It also helps that the astonishing parallax scrolling give the background and foreground incredible depth, sometimes showing other areas as well. There are three areas that captured my attention most, however all areas are worth your admiration.
Let’s start with Fog Canyon. This is an area that can be quite dangerous if you decide to attack an enemy, possibly made more obvious by the fact that they are mostly floating jellyfish. But what makes this incredible is that the sound makes you feel as if you are underwater with swimming, bubbling sounds. Pair that with the twinkling soundtrack and it’s wondrous.
We go from there to the murky depths of the Royal Waterways, a sewage system underneath the City of Tears. Not only is the music more tense, but there are also atmospheric echoes of the highly unusual creatures lurking within, each very distinctive. The creatures are also quite unsightly aberrations more suited to a mutated sewage environment.
Then there is the lush, naturally built-up area known as Greenpath. This ecosystem is just bustling with life; out of a pile of leaves a creature may emerge for example, sometimes small, sometimes large and charging right at you. One very memorable time for myself is falling through a maze of tight corridors in one vertical room where you have moss creatures appearing from leaves, others that will spew spores if too close, and plants that are nearly invisible that snap shut like venus fly traps on you if you are not careful. These events happened so close to each other that you really had to watch your step. There is also one really rousing moment where you are charging through a horizontal corridor with a new ability and the music evolves into something more uplifting and adventurous.
Word of warning, any spider phobics out there will find one particular area that will make your skin crawl. Even the cartographer hates it. I always tried to get this out of the way as soon as possible!
What is That?!

We move to quite possibly the only downside that may put players off; the higher difficulty level. For the uninitiated, the world of Hallownest will seem brutal at times. It will mercilessly throw you into mini-boss and boss battles which can seem impossible when you first encounter them. However, it’s important to remember that you will always have the right tools to take on a boss when you encounter it, it’s just a case of reading their attacks and timing yours correctly. If there is one thing that I can credit this game for, it’s the fine-tuned difficulty curve throughout the game once you get over the initial step. The challenge will always push you a bit harder than you are used to while exploring, and you will come out better for it. On top of that, beating a boss successfully is one of the most satisfying feelings you will have in any game, as you made it happen because of your skill. As with any defeat.
Before moving on, we should probably get the defeat part out of the way. In this game, you will die. A lot. I will say however, as somebody who really didn’t gel with Dark Souls, that the game has great ways of encouraging you to carry on. When you die in this game, a ghost of your past life will appear, and all of your geo will stay with this ghost marked on the map. To get this back you will need to retrieve it from the ghost. But this ghost won’t give it up without a fight, and will get tougher with nail upgrades. Once you do defeat it, all your geo is retrieved and you can get back to battling that boss. If you do happen to die when this ghost is on the map however, it will be lost forever along with your geo.
It is worth mentioning at this point that every boss is fair and just. The Knight is incredibly mobile and there are ALWAYS opportunities to evade their attacks. It can at times be easy to forget this however, as every boss has a very well thought-out and unique attack pattern that also succeeds in making the boss actually feel like it is trying to kill you. Each attack can even have multiple steps to evade. I can think of many previous examples in games where bosses just feel like they are going through the motions and as a result are very easy to predict, even in my all-time favourites such as Sonic the Hedgehog 2. To this day, I do not believe I have seen better designed boss battles. And bosses there are a lot of. And they are never boring.
Let’s go through an example. The first enemy you are likely to have problems with will be a husk guard. This is a clear jump from all those crawlers in the Forgotten Crossroads and has two main attack patterns; he will furiously run at you while repeatedly trying to hit you with his club and occasionally slam causing a shockwave. The way to beat him is to slash in between hits, making sure to jump when he slams. This will be tricky the first few times, but will also ignite those lizard-like reflexes in preparation for what’s to come. And once you beat this mini-boss, you will feel invincible already.
Other honourable mentions in terms of difficulty are the sometimes tricky platforming (particularly in Queen’s Gardens) which will test your understanding of the movement of The Knight. As well as this, at one point the Forgotten Crossroads even become the Infected Crossroads, beefing up all enemies in the area and in a genius move resolving one of the main problematic tropes in metroidvanias - previous enemies becoming harmless and boring.
Wait……There’s More??

You may think I have covered most things at this point, but oh no. Not even close. The amount of what other games consider endgame content is quite frankly astonishing. And somehow, again, it never gets boring. To gain access to this, you will need to work at upgrading your dream nail. That’s right you have more than one nail, except this one is not designed for combat. Rather, it is primarily used to access the dreams and memories of fallen champions. You will find these lost souls around the map. There is also the option to fight them, they tend to have only one or two attack patterns but again they can be quite devious. The real fun starts when you hit the corpses of the fallen bosses. Once you do this, you will be transported to a dream land in the heavens where there will be a supercharged version of the fallen boss, which will require you to be a complete badass in order to beat them.
So how far should you go? I would recommend all regular players do the following; work to get all the charms, get all upgrades, complete your beast journal and beat the Colosseum of Fools (yes there is a colosseum, and it is glorious). This is where I was happy to leave it completed. For everyone else, there will still be more after this.
There may be what is considered spoilers here in this paragraph if you would rather discover the rest on your own, you have been warned. Still wish to know more? OK here goes - there will even be something for all the Super Meat Boy fans out there if you upgrade the dream nail enough! This also contributes to the game’s multiple endings. There is also a test for only the most masochistic known only as the Pantheon (I’ll leave you to discover that on the map on your own) - fighting bosses back-to-back. And if you are truly sadistic you can even have a crack at Steel Soul Mode (permadeath - for maniacs only).
In Summary
For all the reasons above, this is quite possibly the best game I have ever had the pleasure to explore and fight through. For every single ordeal you undergo, for every character you interact with, and every nook you explore you will be rewarded if not with a unique item then a memory that will stay with you for the rest of your gaming days. A hallmark of a great game is that you get out what you put in, and Hollow Knight delivers this in spades. This game will make an impression on you that will set the bar for future games and perhaps this along with an elevated difficulty curve will be the only downsides, but for me that is simply splitting hairs at this point.
