

Steam Deck - The Honeymoon Period (With Tips, Tricks & Quirks Along the Way)
In my last post I shared my first impressions of the Steam Deck, alongside my very first YouTube unboxing video. After this I embarked on quite the bender, where I downloaded a fair few games to really put the hardware through its paces. It’s safe to say it turned out to be more than a week in the end! I always feel that for anyone tech-oriented, there’s this beast-mode adrenaline-fuelled frenzy when you receive that piece of highly-anticipated technology that’s finally in your hands, and for the first few days (or weeks) nothing else matters. I call it the honeymoon period!
This will be a more in-depth article than usual, the big one if you will, so if you want to skip a paragraph or two go ahead. If you just want to see the tips, tricks & other need-to-knows, find the text that’s emboldened like this. Come along for the ride while I take you through what I experienced and stumbled upon!
Steam Navigation
It all starts with a bleep on the first power button press, then the futuristic sound and animation transitions into the Valve logo. Sign in at the login screen, then you’re in. Before we go further, I should mention that you're holding a fully-fledged & capable PC; a desktop operating system in your hands. I mention this because Steam (the main digital game distribution and management software for PC, a bit like the Google Play Store or the PlayStation Store), has two different modes: Gaming Mode & Desktop Mode.
Gaming Mode
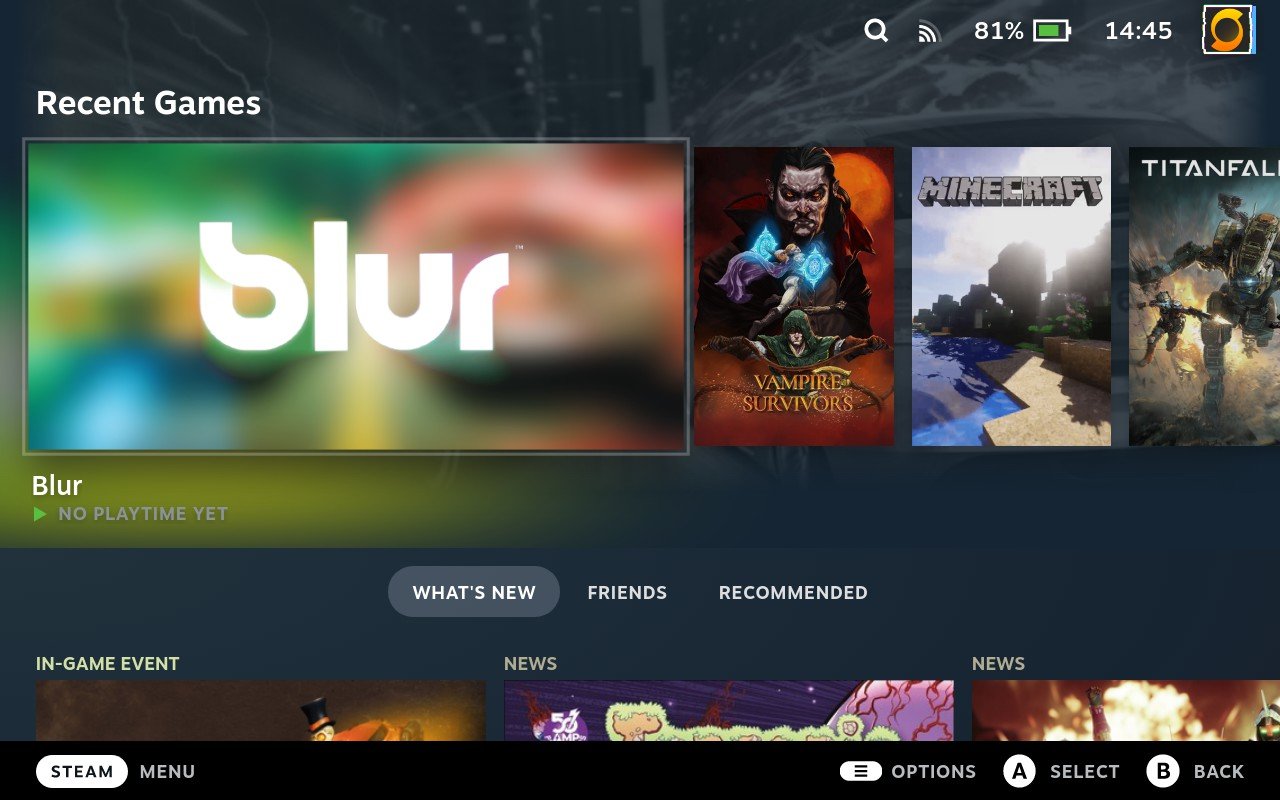
Gaming mode will be the first thing you see once booted. Valve designed this over a long period of time for TVs and other entertainment-oriented displays, to make Steam a user-friendly experience for sitting on the sofa (or couch for the Americans out there). It’s a beautiful feedback loop of UI visuals and tactile sound and as such, this is a joy to use. All of your Steam games are organised as you originally had them on desktop & are easily identifiable. There’s even a category indicating which of your games are great on Steam Deck. I welcome Valve's new rule for developers to remove review scores on thumbnails, it’s so much cleaner than it was!
Hotkey Cheat Sheet
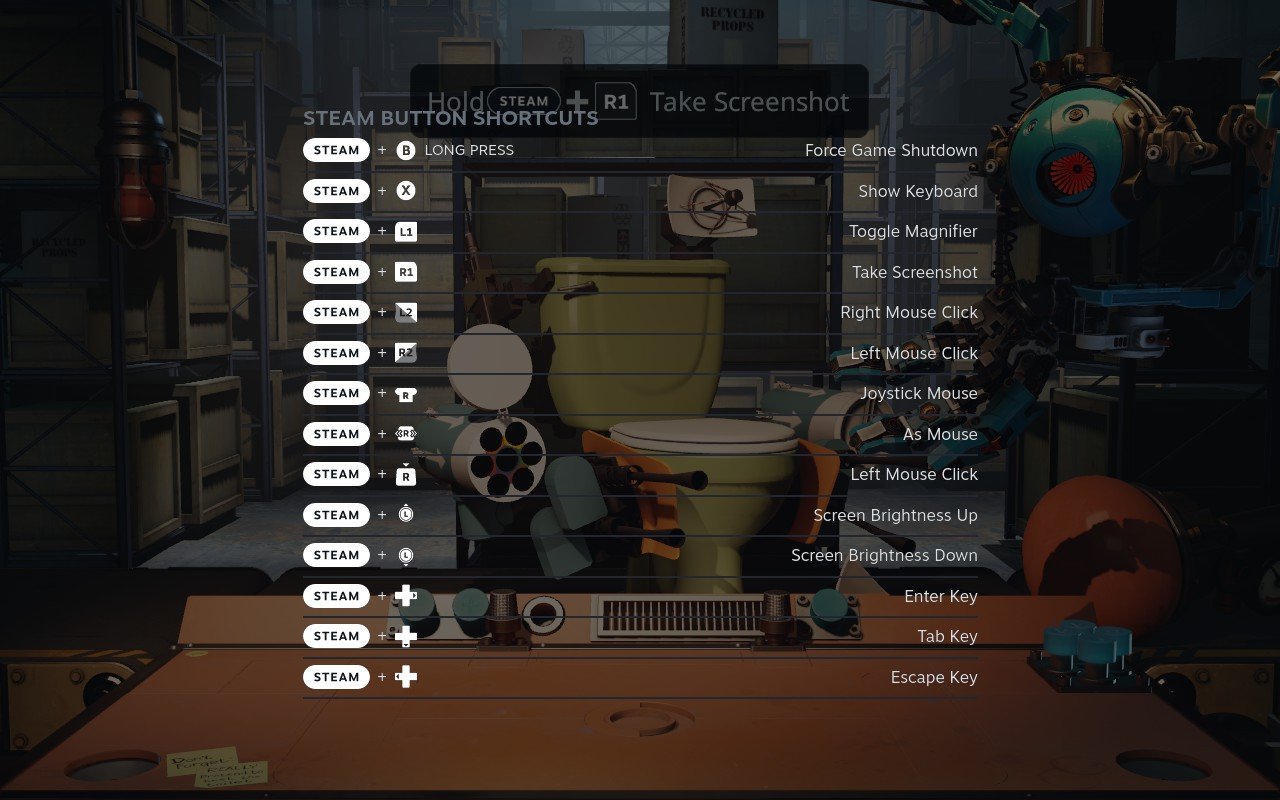
Aside from this, there are a few other ways to get around. The [Steam] button when clicked will take you to settings, account details etc. You can also hold [Steam] down to bring up the hotkey cheat sheet for things like screenshots, brightness up and down, etc. The versatile physical controls give you freedom to move about via joystick or d-pad, and you can bring up a keyboard when required.

On-Screen Keyboard
We are all now used to an on-screen keyboard popping up whenever we tap a text field on a smartphone. However, the Steam Deck does this part manually which may take a little getting used to. You can bring up the keyboard using [Steam] + [X], then type with the touch screen, or move the left joystick to select letters, or even using dual trackpads to select left/right letters and type using two thumbs. The versatility of input is something that constantly surprises me with this device. The only small gripe I had was that sometimes the keyboard covered the field I was typing in, leading me to hide and show the keyboard multiple times for one sentence.

Quick Settings
You also have a Quick Settings menu, accessed by pressing […]. You will use these a lot to switch on/off things like bluetooth & wifi. But there are also a bunch of adjustable features you will not find on any other commercial handheld. For example, changing the refresh rate of the display or adjusting GPU (graphics processing unit) power. Before the Nintendo Switch, battery life was standardised across all games on a handheld. But as handheld consoles moved more into PC-quality, the power consumption levels required by games started to vary more. Having these as quick options then is a great aspect, that exposes core features I would love to have had more agency over in previous handheld consoles, so I could balance battery vs performance on the fly.
I really enjoyed getting to grips with all of these features, and honestly Gaming mode has come a long way since Big Picture mode (an entertainment-focussed GUI that can be launched from the Steam desktop client, which may be replaced at some point by Gaming mode). Valve has been extremely thoughtful with their UI; it was useful, an absolute joy to use and never got in my way!
Steam Gameplay
But enough about that for now, how do actual Steam games perform on this thing? After all, that’s what we really want to test. And test I did. A lot. But we’ll keep it to the highlights as much as possible! Let's get this out the way: I believe the first game you play should be Aperture Desk Job. It will teach you every Steam Deck control possible in the most entertaining way (with some Portal 2 lore along the way!).
As a reminder, the games that can be played on Steam Deck are PC games. They have much more compatibility variance as a result. To make this easier, next to each game in the Steam Store and Steam Library you will find a little tag with the Steam Deck compatibility status, as tested by Valve. A green tick means the game is Verified and fully compatible, a yellow exclamation mark indicates a Playable game with a couple of things that may need work such as small writing, then there are the Unsupported or Unknown games which may have compatibility issues. At the time of writing, around 145 games in the 519 I own (dare you judge my pile of shame!) are verified working. A large chunk of the others (quite possibly half the remainder) were in the playable category. Bear the different gradings in mind as we proceed. The frame rate will be in the top left corner of the images for reference.

Dying Light
The first game I tested was Dying Light (Verified), and it was absolutely stunning. For those that don’t know it is a beautiful marriage of open-world zombie action with parkour mechanics similar to Mirror’s Edge. I completely lost myself in the half hour or so I tested it. It was just as I remember, dare I say even more comfortable on the Steam Deck thanks to the excellent ergonomics. One thing that was tricky at first was that the right bumper was a bit harder to press. That’s significant because it’s the jump/hold/pull up button, which you did a lot. Another interesting thing about this game was in the graphics settings. I noted that they didn’t go to ultra-high, they were limited here. To be honest though, it looked incredible and led me to re-think what these settings mean on a 1280x800 display.

Doom (2016)
I then got round to playing what I wanted to test the first time, Doom (Verified). As mentioned in my first impressions post this game was a rather large 60GB, so I had to wait a while to download it (~3hrs). Once I had this game up though, my senses ignited and I felt that familiar surge of energy as I took up the mantle of Doomslayer once more. The last time I played this was on the Nintendo Switch port, and I made a number of comparisons, after it’s the only other mainstream handheld console of this display size on the market at the time of writing. Firstly, the vibrancy of the Switch OLED display was missed somewhat. That being said, the game looked incredibly sharp here whereas it felt slightly blurred or flat on Switch. Secondly, the joysticks and triggers feel incredible. Forget controllers, the triggers may be the best I’ve used full stop. The difference between this and the almost digital joycon sticks, and the corresponding digital triggers, was immeasurable. Once again I felt completely immersed. Not only that but the Steam Deck trumped this by adding surprise gyro control when your finger touched the top of the right joystick. This gave me that awesome Breath of the Wild style precision adjustment to my shots, which was a pleasant surprise!

Horizon: Zero Dawn
At some point I had to really test the graphics, and a good option was none other than Horizon: Zero Dawn (Verified). This one is renowned for really pushing the capabilities of the PS4, and here was no exception. The graphical settings defaulted to medium, then I performed the old ultra textures trick, which gives much more detail with less 3D geometry overhead. Using the [...] button you can show an overlay in four levels (& off) to expose game performance, ranging from 1 which shows frame rate only, to 4 which is full stuff; temps, memory used and much more for the true enthusiast! Performance was steady here ranging from 35fps-45fps, but this game in particular really tested the battery. Based on fps, I found it best to set the screen’s refresh rate to 40 Hz via the […] button to save battery as it looked exactly the same. Also turned the brightness down to 1/3, however this only got around 15-30 mins more out of it. This one is more of a commute/take your charger type scenario in that case.

Titanfall 2
Titanfall 2 (Playable) was a bit of a surprise to me. As this game was not Verified, a caution warned that some writing may not be readable, and advised on how to use magnifier controls using [Steam] + [L1]. Once I got in though there were no issues, I was racing through the gauntlet in no time! I was also curious to see if multiplayer worked on the Steam Deck, as games that use Easy Anti-Cheat (EAC) – a common software used by Epic games such as Fortnite to prevent hacks – are only playable if the developer has included Linux support, which won't be all of them. I'd recommend checking compatibility on these beforehand. To my astonishment, I was able to get online and found myself in a frantic battle of pilots & titans. Underpinning this once again was the level of comfort. I know I keep mentioning this, but first-person shooters on Switch were notably uncomfortable due to ergonomics.

BPM: Bullets Per Minute
Fine, I admit I did a lot more testing than I thought! Next up was BPM: Bullets Per Minute (Playable). This plays like a musical equivalent of Doom. Every action from shooting to reloading depends on it. This worked pretty well, although on occasion the framerate dropped when loading new assets. It also brought up a different issue: the latency of the gameplay changed when on bluetooth headphones, throwing off the rhythm. This is inherent in bluetooth headphones, but something to be aware of if playing on the go. When trying a demo of a different rhythm FPS, Metal: Hellsinger (yes, there is more than one in this genre!), even calibrating latency settings didn’t hold for long. I therefore recommend using wired headphones if you are considering rhythm games.

Edge: Now Extended
I also tested a few games outside of the Verified and Playable categories. Burnout Paradise (Unsupported) ran like a dream, and I was tearing up the road like a champion. I also tried a little hidden gem called Edge: Now Extended (Unknown), a skill-based action puzzler with just so much character. Again this one worked perfectly so I tried a final one, ESA: Environmental Station Alpha (Unsupported). Unfortunately, this was unplayable as big picture mode didn’t seem to like the Multimedia Fusion 2 game engine this time round. As may happen with others, my experience with Unknown/Unsupported games varies a fair amount. However, I’m tempted to say that the ones that seem to work best have controller support and open full-screen by default. If you’re considering Steam Deck, make sure the main games you want to play are Verified or Playable, with Unknown/Unsupported games being seen as a bonus for now, although they could be supported in future.
Desktop Mode
Once I had my fill, I changed to Desktop mode by pressing [Steam] then selecting ‘Power’ > ‘Switch to Desktop Mode’ (holding [Power] for a second or two then selecting ‘Switch to Desktop Mode’ also works). I then began exploring. To control the desktop you have two physical trackpads either side under the joysticks. The right one by default controls the mouse, and Valve has a wonderful haptic system here (adapted from the Steam Controller), which makes the mouse feel like it’s scrolling like a trackball. The left trackpad is used primarily for keyboard input when it is showing, using dual trackpads with your thumbs to type. Probably worth mentioning that although the right trackpad (used to control the mouse) felt amazing to use, it was awkward to double click as it seemed to scroll no matter how vertically it was pressed. You can change this in the Steam desktop client under: ‘Steam’ > ‘Settings’ > ‘Controller’ > ‘Desktop Configuration’. I’ve changed the mouse clicks to the triggers, but it’s up to you.
For those who might be unaware, the Steam deck runs SteamOS as its operating system, which is based on Linux. Linux is an incredibly powerful and customisable operating system that serves as an alternative to Windows or MacOS. It will always be open source and free for anybody to be able to change to their needs, as originally intended by the GNU Project. Here’s a bit of context on where I’m currently at on Linux & some information, as I know there will be many experiencing it for the first time. I first discovered it on an Acer Aspire One netbook (a very small laptop), as there were two versions; Windows & Linux. This type of choice was unheard of commercially at the time (around 2007-2008), at least for me. Little did I know, I would proceed for the next two years exploring as many delightful Linux distributions I could get my hands on (flavours of Linux customised by an individual or organisation from their original base e.g. Debian or Fedora). SteamOS uses Arch Linux, a system I can tell you that’s notorious for being one of the most barebones and complex installations. You start from the command line (text-only) and have to tell it EVERYTHING you wish to install step-by-step, including things you take for granted such as WiFi and even the GUI (graphic user interface). That’s right you have to even install the visuals!

KDE
For the reasons just outlined and in general, SteamOS is a highly optimised, well-integrated system. Even though I am able to customise using Super User privileges (used to modify powerful things that can potentially break Linux), fortunately I haven’t broken it yet. They’ve done a great job with the failsafes. The desktop uses KDE as its window manager (manages files, open applications, etc.), which makes the start menu, taskbar and some hotkeys behave like Windows. There is a Steam Deck icon in the bottom left that mimics the Start button, showing all apps when you click it. There are icons in the tray on the right for things such as wifi & bluetooth settings. Even some of the hotkeys are the same, for instance pressing the Windows button on a keyboard will open the ‘Start’ menu so you can search via browsing or text input. There's even a window-snapping feature similar to Windows (Mac users are still missing out on this!). For anyone new to Linux, this almost feels like home.

Discover Package Manager
There are a few key differences here though. For example, installing applications can vary in difficulty depending on if they are available in Discover (like the Mac App Store, except everything is free). The standard internet browser is Firefox, instead of Safari on Mac or Edge on Windows. If anything needs to be installed on the Steam Deck from third party places such as the browser, you may run into complications as there are different package types with different base types of Linux. This version of Arch Linux uses Flatpak packages, a type of distribution-agnostic application package. In other cases, you will sometimes need to get your hard hat on, which can commonly lead to using Konsole (a text-only tool similar to Command-Line in Windows or Terminal on Mac). In which case, be prepared to drill deeper if you want to change anything outside of any default options, it’s going to be a rough yet educational & rewarding ride!
Non-Steam Apps & Gameplay (in Gaming Mode)
After exploring Desktop mode for a while, I switched back to Gaming mode, double-clicking the desktop icon. It does take a little while for this to initialise, the cursor characteristically stops moving for a moment while the system transitions, just a little tip so you know you’ve clicked it. Let’s jump into the non-Steam stuff!

Blur
There are very few gamers out there that will know this one, a combat racing hidden-gem called Blur released in 2010. This one holds a very warm place in my heart as it’s single-handedly the most concurrent fun I’ve had playing online. And it excited the inner-child in me when I found a Reddit thread dedicated to getting Blur working on Steam Deck! As I own the PC copy, I downloaded the ISO (DVD image of the game) online then followed the guide step-by-step. It takes you through a very important thing for any app outside Steam: how to add Non-Steam apps (in the desktop client version of Steam: ‘Games’ > ‘Add a Non-Steam Game to my Library’). To my absolute astonishment the game ran perfectly, even better than it did before! I remembered it running at around 30fps on Xbox 360, but it kept a buttery smooth 60fps the whole time at the highest settings possible. The only issue was that the cutscenes didn’t work, but this was an easy fix. The Steam Deck uses a kind of mad wizardry called Proton, a software layer that allows Windows games to run on Linux. You can install & use ProtonUp-QT (from Discover in Desktop Mode) to download a more compatible version of Proton GE if the app does not work correctly (in this case, Proton-7.3-GE-1). You can check compatibility for each game you want to play here. After this I had a very, very happy time playing this classic again!

Minecraft: Java Edition
No journey was wilder than the one I had with Minecraft: Java Edition, but lord do I love the way this ran when I got it how I wanted! Minecraft is an unusual one not to be available on Steam, but that’s just the way the cookie crumbles. The easiest way to get Minecraft up and running is with PolyMC, a launcher that allows for easy management of multiple accounts, mods and resource packs on Linux, as well as a download client. [Edit: DO NOT DOWNLOAD POLYMC. It was a safe Minecraft launcher to use at the time of writing, but has since been compromised by malicious individuals. Instead use an alternative. I have chosen to use the beautiful GDLauncher (via Discover), you can find installation information here. You can also still follow the next emboldened instructions for which mods to download.]. So this part is easy, but anyone who’s played for a while before knows how good Minecraft can look with shaders and mods, and I really wanted to test the Steam Deck! For some reason though, I was confused at how to get there. So confused in fact I tried to go back to what I knew before, which was using the official launcher with an optimization mod called Optifine (the classic way on Windows). Then I made a giant misstep: I went through the Java installation process (as this was required in order to install Optifine using a .jar installation file). This was incredibly painful, as you needed to use text-based commands to install it, and I had to perform numerous Google searches as I kept on running into issues. This is an example of what can happen if you venture outside of Discover. It turns out I was foolish because I could have simply downloaded everything I needed for Minecraft in PolyMC (‘Edit Instance’ > ‘Download Mods’) [edit: changed for reasons above] in GDLauncher (‘right-click Minecraft Fabric instance’ > ‘search for mods’). If you want my recommendation for getting shaders and mods running easily, download the following and don’t ask questions: Fabric API, Iris, Lithium, Mod Menu, Sodium & Starlight. The end product has incredibly clear and extensive graphic options, a drag and drop interface for shader packs, mods etc. and a highly optimised lighting system that is reportedly better performing than Optifine. With all of this out the way, at around 8 chunks render distance and simulation (with Sildurs ComplementaryShaders) I got 60 fps most of the time, something even my desktop GPU even had trouble with at times (OK it’s a dinosaur GTX 970 at this point but still!). I may have taken a lot of screenshots ([Steam] + [R1]). One final note, and that’s the controls. They shone here like never before, and easily gave this game the edge over Minecraft on other controllers. You could have the controls so that the gyro could be used to fine-tune block placement, the d-pad could represent perspective, debugging and screenshots and the left trackpad could have a radial menu to quick-select within the hotbar. The rear-grip buttons also came into their own here, assigning crouch, dropping blocks and chat here was great. Also a note here, if you plan to play games not native to Steam, you will need to find a suitable controller layout on occasion. This can be found by pressing [Steam], then selecting the open game in the top-left corner, then ‘controller settings’. A whole bunch of really handy layouts submitted by the Steam community (regular folks like you and me) can be found here. You can also find an exhaustive guide for customising Steam controls in this awesome post. For the full and labelled control scheme I modified for Minecraft, look out for PlanetSuj!
Discord
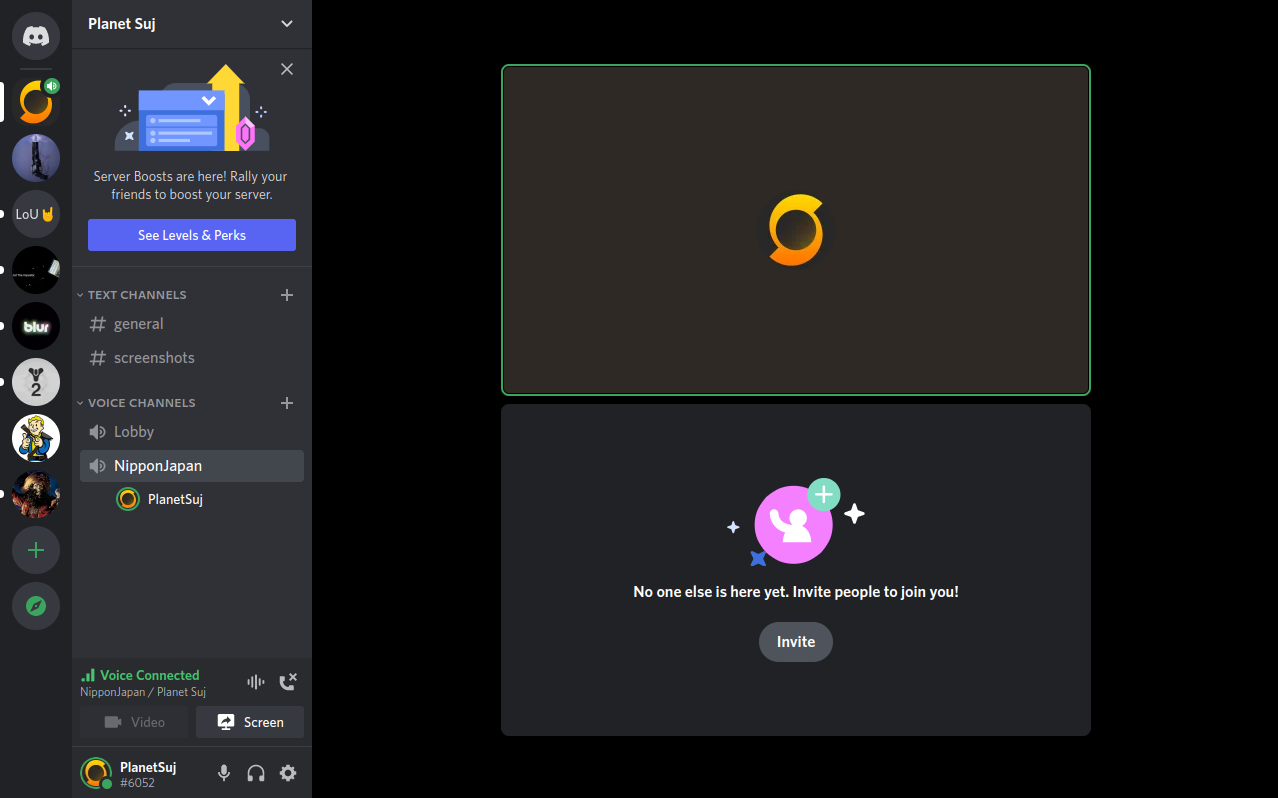
We all know that every gamer needs Discord to voice chat when online. You’ll be happy to know it was as easy as downloading this via Discover, and once again adding it as a Non-Steam App in the Steam desktop client then logging in. Very straightforward. It also worked both in Gaming mode and in the desktop client – at the same time as playing. This kept on surprising me, perhaps just because of the times we live in with smartphones: the fact that true multitasking was in a portable device other than a laptop. If you wished you could play Spotify, be on Discord chatting and play a game all on the go in one device, now you can! One thing you may notice with some Non-Steam Apps in Gaming mode is that they will start as an application and can only be controlled by touch screen sometimes, which was the case here. Although you may find this preferable over using the right touchpad to double-click even if this option would be available. Another thing to note is that in the same mode I had trouble closing any apps while Discord was open. It appears anything Chromium-based currently causes issues in Gaming mode, resulting in the Steam Deck needing to be shut down with a long press on the power button. Hopefully this will be fixed in future updates. This doesn’t happen in desktop mode however; it just works like any desktop would.

Emulation with Emudeck
Of course we were always going to get to this stage: the grey area of emulation. A small disclaimer here: although you can theoretically play any emulated game on this device, you need to have a physical or digital purchased copy of the game for it to be legal to play in this way. Anything I speak of here, I own. With that said, emulation here is ready in quite literally a couple of minutes. Simply download a 700kb script called EmuDeck, double-click & follow the instructions. Every emulator you can think of will be automatically downloaded, all relevant folders for game rom images created & all Steam art applied so you don’t have to do anything much. I’ve only tried 2 emulators so far (don’t judge, there’s so much that I want to do with this device and not enough time!): PPSSPP (for PSP) & RPCS3 (for PS3).

wipEout Pulse
The game I tested was wipEout Pulse (PSP). I knew this one was going to work as it plays on most Android smartphone emulators, but even so it looked amazing on this screen. It was incredible to finally play at this quality on a display that is in excess of 7 inches. I also modified the UI using an HD remaster which you can find on this excellent github repo (download using ‘Code’ button, then follow the readme file to rename the main folder correctly).

wipEout HD Fury
So I ramped up a bit and tested wipEout HD Fury (PS3). This is the first real time I saw the Steam Deck struggle. Bear in mind that the original PS3 had a six-core processor, whereas the Steam Deck only has four. The fact that this even runs at the occasionally 40-50fps I noted was very impressive. It took time to load at the beginning of the race and when there were AI opponents, or in the constantly re-texturing Zone mode, and it did crash a couple of times, but still. To get PS3 emulation working you also need to download the latest update.pup file for PS3, and copy it to the update folder in each game you play. There may also be occasional times where you need to copy over a bios file, such as on previous PlayStation generation devices. If you’ve never played an emulator before, placing the game file in the respective roms folder is the main thing to do.
Things to Know
It’s been quite a journey so far, so let’s step back from the testing & technical stuff, and I’ll tell you things you may need to know if you’re considering a Steam Deck. There are three models: 64GB, 256GB & 512 GB. I opted for the full-fat, all guns blazing 512GB model. I did this for a few reasons. Firstly, I wanted the fastest memory as it saves you time every time this handheld PC does anything. Second, although you can disassemble your Steam Deck, I won’t feel I need to do this even in the first year to upgrade memory (there’s always the Micro SD card slot anyway). Thirdly, I wanted some headroom in case I want to use this as my primary computer (you heard me right). It’s a very powerful machine, and I have begun to question whether I need a desktop now. Lastly, the anti-glare screen on this model will allow play in more situations. And yes, one of the reasons was that blue Steam Deck logo and grey inner lining. I just want to be the cool kid!
Let’s go into some things about this model. The anti-glare screen does its job; I don’t see reflections and can focus on game time. It does come with a small downside though – because the outside of the screen is etched (microscopically roughened), it is harder to keep clean. Valve recommends just using a microfibre cloth in their care and maintenance advice, and after using a simple screen cleaner I concur with that. I’d also recommend against using isopropyl alcohol cleaner. The 512GB of storage also gives you peace of mind, that 1TB MicroSD can wait for a bit.
On the Steam Deck in general, you’ll spend time adjusting settings to optimise battery life. This boils down to three main things: refresh rate, screen brightness and frame rate. These can be set via quick settings per-game if you wish. The lower these are set, the more battery you'll get (I should patent that slogan!). If you use Desktop mode just be aware that Linux can be complex if you stray away from the default customisations, but it can also be a gift for the true enthusiast! The only problems I suffered was when attempting to log in to Dropbox and Spotify in Desktop mode initially, although I got into Spotify by finally managing to cut ties with my Facebook login and log in normally. For some reason nothing happened when trying to sign into Dropbox, so for now that’s browser-only. Of course, you can absolutely use your device in Gaming mode with Steam games exclusively and not step foot into the Desktop mode.
A couple of handy tips for you here. It’s best to use the rear grips by pressing the button from the back of the device rather than the grips. If you have trouble with these, use this tip to improve your muscle memory over time. Another very simple tip is to move the ‘Return to Gaming Mode’ shortcut to a different folder, then right click and create a shortcut on the taskbar. Not only will your desktop be cleaner, but you can click once with mouse or tap no matter where you are. You can thank me later. Finally, a mod called DeckyLoader can help add functionality to the Deck and make other aspects better. I mentioned before that I missed the bold colours of the Nintendo Switch’s OLED display. This can be improved by installing vibrantDeck and raising the colour saturation, and take it from me it’s very impressive.
The system gets updated regularly, so you will see new features and optimisations all the time. For instance in a recent update, Valve added the ability to change your boot screen video on wake up and power on, using a video in .webm format. This is significant as this was previously an unofficial trick on Reddit, pulled off by changing a code line in a file and placing the video with the correct size in a folder in a certain location. Valve listened to this and added the feature officially, in order to stop people potentially breaking stuff while also adding a nice new feature that was clearly popular. This really heightened Valve’s reputation even more in my eyes.
What Are the Next Steps?
So here we are. We’re finally coming to the end of our journey together, so here’s what’s happening next. At this point, I have tested many things and now begin the assimilation phase. Ever since watching more Steam Deck videos on YouTube, I envisioned a dream setup which revolves around just having the Steam Deck as my everything. I could take it out and play games on the go, then dock it at home and use it as my PC. This brings me to the Steam Deck Docking Station. Anyone that has had a Steam Deck since February, I salute you. You’ve waited a long time for this. I lost patience with it myself and ordered a third-party solution that offers 4 USB ports, HDMI, ethernet and power delivery (to keep the Steam Deck powered by its charger). Irony of ironies, Valve announced it in the evening of that day! After placing my order for one, I decided against it. Then the dongle I had previously ordered arrived damaged, so I got annoyed and slammed down my wallet on the Docking Station. Then after I calmed down I ordered the Amazon one again. My curiosities about both potential set ups are difficult to satiate it seems.
I’ll be using the Steam Deck as my primary game console and PC, really testing its prowess on external displays in both modes, mouse-heavy games such as FTL:Faster Than Light, and Windows productivity apps such as Affinity Designer (one I definitely use every now and again). Perhaps I’ll even try using a different setup: the Docking Station on the TV at some point and the USB-C dongle as a go-between for both my laptop and the Steam Deck. Thanks for reading this far. I hope you’ve enjoyed it, we shall see what happens and I’ll get back to this at some point soon!