
Steam Deck - Content Creation on a Budget: Recording in Desktop Mode (Part 1 of 7)
Ever thought those awesome gaming sessions you have are just that little bit too entertaining? Have you fancied saving those memories or sharing the fun with communities around the world? Well, you're in luck!
In this multi-part series, you will be transformed from a humble Steam-Deck-owning gamer to a content creator - all on a tight budget. I've been doing this exclusively on the Steam Deck for YouTube and have had a blast so far. Follow along to get started!
FYI - all the important tips and steps will be in bold like this if you want to save time. Lets get prepped!
What You’ll Need
Download this free software from the ‘Discover’ desktop app:
OBS Studio (the video capturing software we will use)
Discord (if other players’ mic input is needed for multiplayer, also create an account if required)
You’ll also need the following hardware:
A microphone (on a headset or otherwise. The Steam Deck has a built in mic but it isn’t the best tool for this job)
Steam Deck Docking Station or USB-C hub (including HDMI port, at least 2 USB ports, and USB-C charging passthrough with at least 45w charging power)
Mouse & keyboard
A monitor (or TV)
Make sure that all of your hardware is set up so that your USB-C dock is plugged in and charging your Steam Deck, and your mouse, keyboard & monitor are also connected.
Let’s Get The Steam Deck Set!
OK, here we go. Let’s now get your external monitor set up in SteamOS. If you’ve already done this, feel free to skip to the next section (‘Get the Visuals Cooking!’).
Firstly, click the SteamOS ‘Launcher’ button in the bottom left of the desktop and find the ‘System Settings’ button. My launcher menu will look different to yours, I’m using one called ‘Tiled Menu’ (found via the ‘Discover’ app). The important thing is to look for a button like the one in the screenshot below.

Next head to ‘Display & Monitor’.

Next, select your external monitor from the ‘Device’ dropdown.
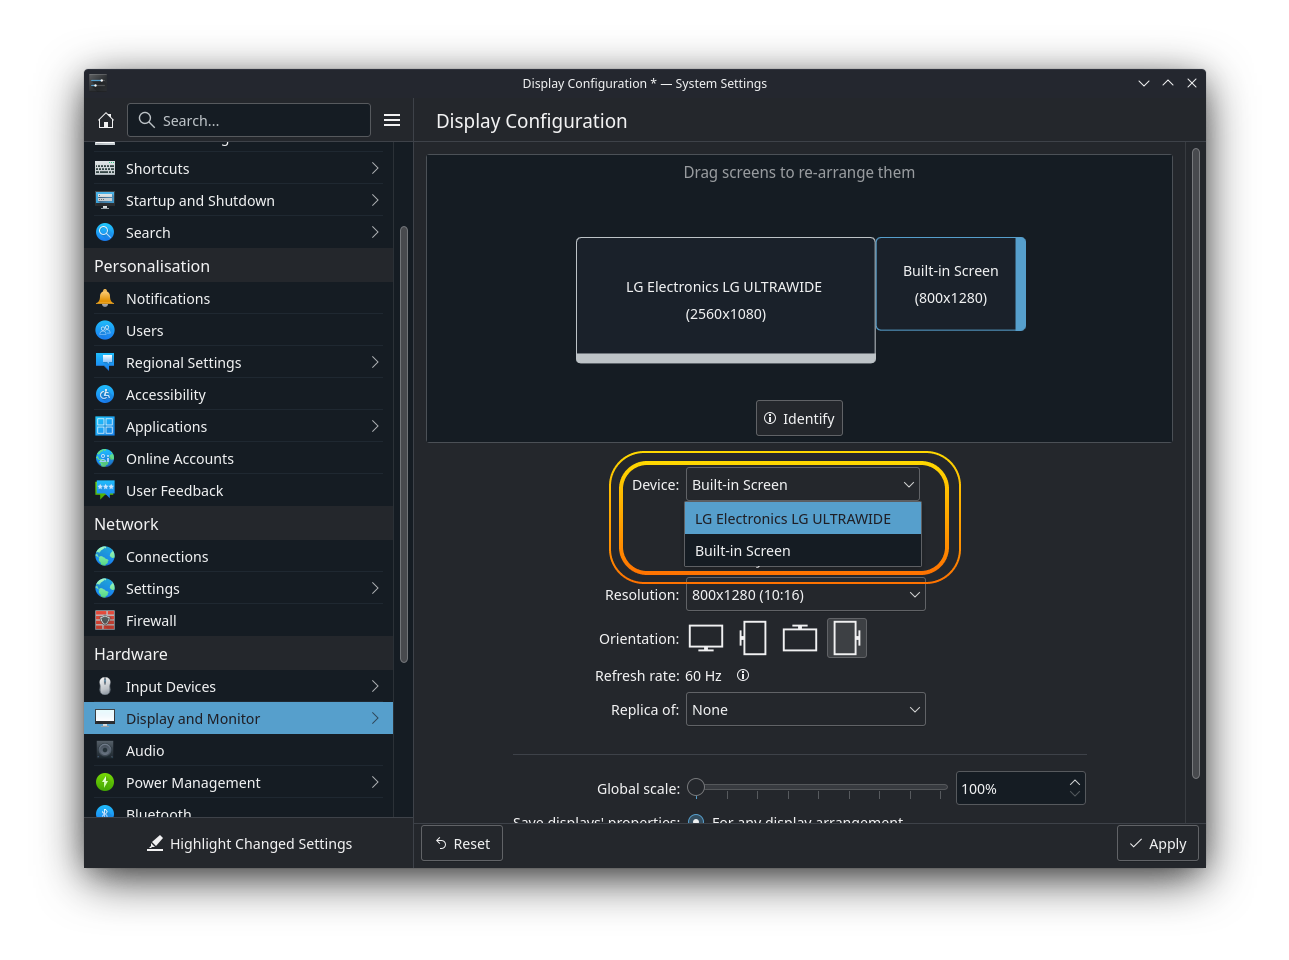
Now tick the ‘Make Primary’ checkbox. Not doing this means any game you fire up will open on your Steam Deck display by default in desktop mode, not on your external monitor.

Get the Visuals Cooking!
Let’s get to it! Fire up a game and open it full-screen on your external monitor.
Open up OBS Studio, and move it to your Steam Deck display. The initial video settings won’t matter yet, we’ll get to those. Get to the point where you should see this interface in front of you.

If you have never used software like this, at first this may look daunting. However, in the famous words of the Hitchhiker's Guide to The Galaxy cover title; Don’t Panic! I’ll highlight the important areas and what they do, and once you’re set up you’ll find that all you need to do later is press ‘Record’ most of the time and get straight into the action!
Firstly, let’s set the scene. In the ‘Scenes’section, press the ‘+’ button and enter a name.

As we’re not filming a high-budget blockbuster or documentary here, we’re only using one scene. It doesn't matter what you call it, just name it and go.

The ‘Sources’ section is where you establish what your scene actually records, such as audio from a mic, a desktop window or even just an image. Press the ‘+’ in this area and select ‘Window Capture (Xcomposite)’.

Next, select the source you’ve just created, then the little dropdown next to ‘Window’ (just above the ‘Audio Mixer’ section) and select the open game window.

You should now see your game on the central canvas. Now head to File > Settings.

Now select ‘Video’ & change the resolution to your needs. I would suggest either 1920x1080 or 1280x720 for both ‘Base (Canvas) Resolution’ & ‘Output (Scaled) Resolution’ as these are preferred by services such as YouTube due to automatic video compression applied while uploading.


At this point I’d advise setting your game resolution to 1920x1080 (or 1280x720 if your game is sluggish). The Steam Deck is only so powerful when docked and using an external display, so it’s preferable to play less resource-hungry games and use 30 FPS instead of 60 FPS where required. Keep testing to find what works for you.
Now then, this is where things got a little weird for me. I have an Ultrawide monitor with a resolution of 2560x1080 (21:9 ratio) instead of the usual 1920x1080 (16:9 ratio). If your monitor resolution is unusual, you can adjust the game window on the central canvas in OBS. Click the game window on the canvas, then drag the corner while holding [Alt] on your keyboard to maintain ratio while you resize.

Get The Path and Format Set!
Back in ‘Settings’ (‘File’ > ‘Settings’), select Output then the ‘Recording’ tab. There is a lot here but we only need to set the recording output location and the video format.

To set the recording location, click the ‘Browse’ button next to ‘Recording Path’.

If you can see yourself recording multiple videos in future, I recommend setting this to a generic ‘Recorded Footage’ folder or something similar. You can always move it where it needs to be later, so this will simplify things which is always good at the point of recording.

Next, set the video format. For YouTube, the recommended formats are MP4 and MOV, however the newer MKV format is also supported (the format I chose).

Now under the ‘Encoder’ setting, make sure this is set to ‘FFMPEG VAAPI H.264’ as YouTube also recommends this.

Get The Audio Pumping!
Audio is where things can get a little bit fiddly, but stick with this and you will see immediate improvements to your audio quality. I will lead you through this. Remember this: audio mastering makes or breaks the final product.
OK, it’s time to plug in your mic if you have one. Still in ‘Settings’, head to ‘Audio’ . Next, in the ‘Global Audio Devices’ section select the dropdown menu next to ‘Mic/Auxiliary Audio’ and change this to what your mic is.

You can close the close the ‘Settings’ menu.
Now we need to add filters to process your mic audio in real-time. Trust me, it will be worth it. Back in OBS Studio, click the 3 dots next to your ‘Mic/Aux’ audiometer in the ‘Audio Mixer’ section then click ‘Filters’ in the dropdown menu.

Then add the following filters top-to bottom using the ‘+’ button in the bottom left of the ‘Filters for ‘Mic/Aux’’ window: ‘Noise Suppression’, ‘Gain’, ‘Compressor’.

‘Noise Suppression’ is an algorithm to help minimise recording noise. It’s pretty handy if you have a particularly noisy mic or ambient noise where you are. Set ‘Method’ to Speex (low CPU usage, low quality). I use a budget Razer Kraken X Lite headset (great for the price by the way), and for me this method was much more palatable than the alternative. I also found setting ‘Suppression Level’ to -60dB worked for me, but feel free to tweak these settings to your needs.

‘Gain’ will help to increase input volume if your mic is too quiet. Set this so that the mic is perfectly audible.

Finally, the ‘Compressor’ is an essential for anyone recording their voice, used by radio and music producer professionals alike. It will help counteract peaking distortion (when the volume or input gain gets too high) and will make sure that your mic level remains consistent in real time throughout your recording. You never know when you’re getting a little over-enthusiastic during gameplay!
You should leave most settings alone here for the moment, except for two which you can adjust to your needs: ‘Ratio’ & ‘Threshold’. ‘Ratio’ is the strength of the compression, in other words how aggressive it is. The ‘Threshold’ is the amplitude level (or volume if you will) where the compression starts to kick in.

I’d say test talking & loud gamer yelling, then tweak these settings until the result sounds good. Now that your video and audio is primed, it’s time to adjust the input levels of the audio a bit.
If you’d like to use other players’ mic audio, it’s time to fire up Discord (or your chat tool of choice). Once in a voice chat, you can change the volume of each of your gaming buddys’ mics. In Discord, you can alter this by right-clicking any active user during a voice chat, then adjust ‘User Volume’ in the popup menu.
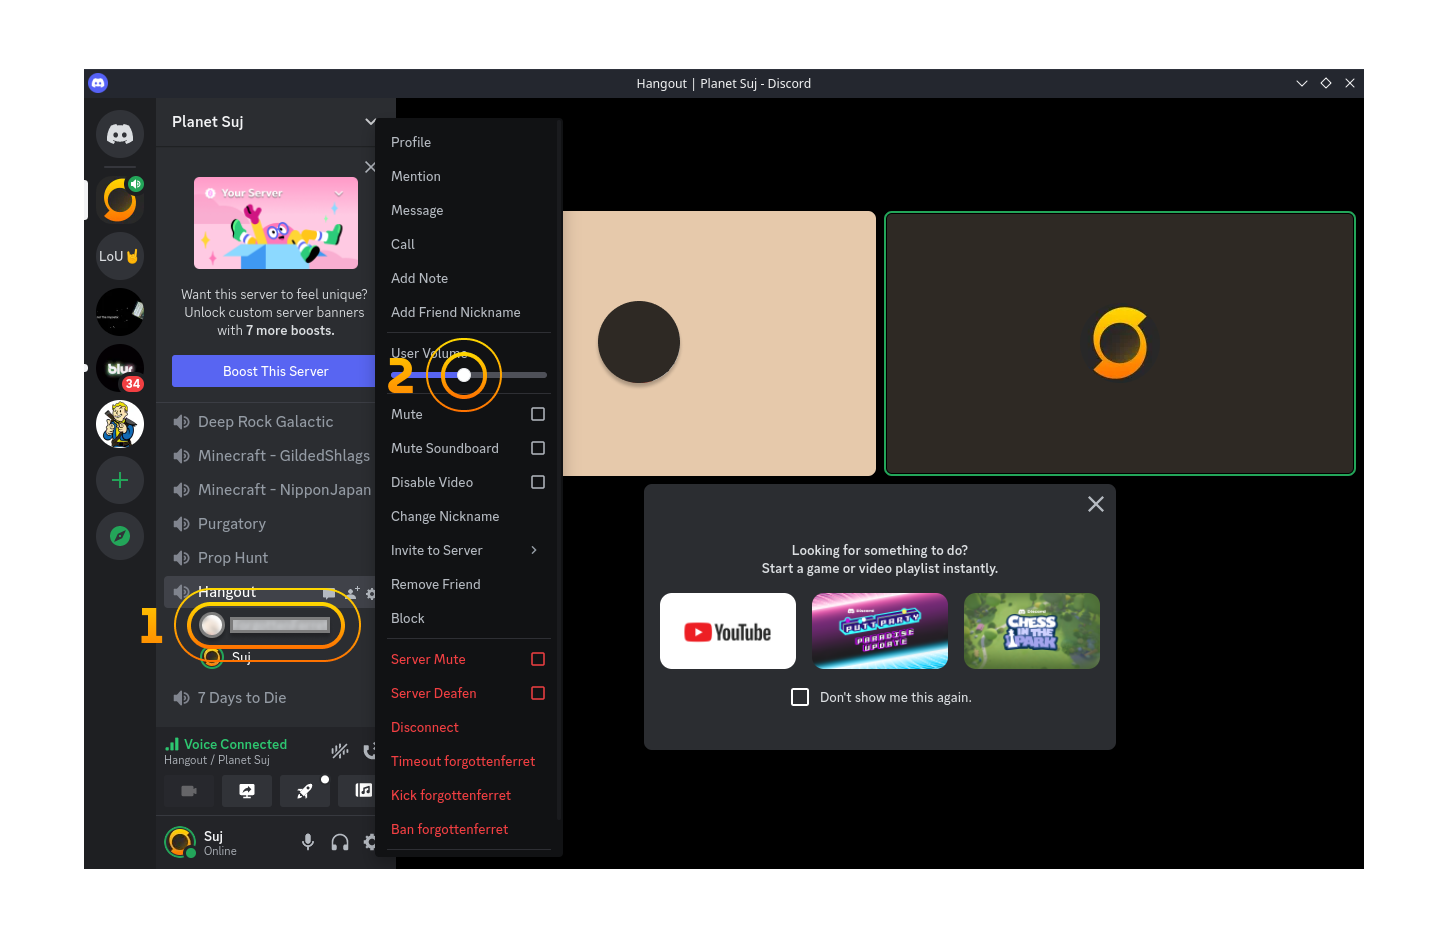
Do this until you get a good balance between each other player and in-game audio. I’d say the aim is to make the in-game audio about half or less the volume of all mic audio.
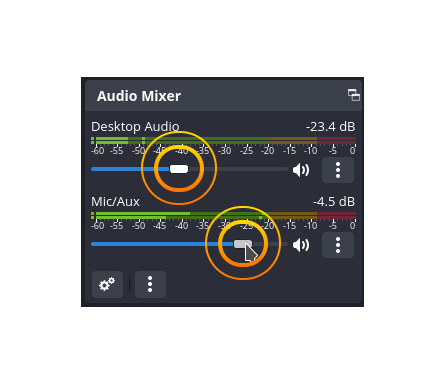
Once done, head back into OBS Studio now and check the audio mixer section. You should see both audiometers reacting to sound, if not check which is not working and adjust settings accordingly, or backtrack a bit through the steps if you have to.

Now adjust the volumes of the Desktop Audio & the Mic/Aux channels. What we’re aiming for here is for audio to be loud enough (i.e somewhere in the lower part of the orange zone) without reaching its peak (the red zone).
Time to Record!
If you’ve made it this far and everything is now set, congrats! With the hard part over we now get to do the fun (and surprisingly easy) part. Press the ‘Start Recording’ button in the ‘Controls’ section in the bottom-right of OBS.

I recommend a test recording first. Get your friends to say something silly and you can reply back. Then hit stop and check if the recording is good and in the right place. If not, head back to the right section to see if you’ve missed anything. If all is well, enjoy your play session!
Where We’re At
Good job! You have successfully captured your gameplay and hopefully learnt a few things along the way. Next time, we will be trying a different way of recording right in gaming mode; a much more comfortable way (and my preferred way). There will also be a few editing tips which will give you much more flexibility to do what you want with your videos down the line.
See you for the next part! (Edit: The next part is now here!)